Creating A Plugin : Developer
In This Topic
This tutorial will walk through the creation of a basic plugin written in Visual Basic. It is not intended to be a general introduction to Visual Basic, and some prior experience in using VB is required. To complete this tutorial you will need to have installed:
- The latest version of
- Visual Basic 6 Pro or Enterprise Edition (the examples were done using VB6 SP4 Enterprise)
- MSDN Library (VB help files - also available online at Microsoft
 ).
).
- The ActiveX Test Container (recommended - available on your under "Extras\Technical")
Plugin Basics
Each component in a drawing can have an associated plugin, which is an external control that integrates with the interface and that the user can interact with. Plugins can read properties from your component (such as the "Material" field), and your component can read properties back from the plugin.
On the technical side, a plugin is an
ActiveX control like many of the other controls provided with Windows. ActiveX controls can be created in several languages, so you can write your plugin in Visual Basic, Delphi, Visual C++ and more. You should already know about controls if you are familiar with VB: they (usually) have a graphical element combined with a set of properties you can modify. Some also come with a collection of property sheets, like on the TabbedDialog control for instance.
It may not seem apparent, but any controls you use in Visual Basic could possibly be used as plugins! When loads a plugin, it displays the graphical part of the control (i.e. the part you see on a form) in the preview window. Any property pages associated with the control are added alongside the existing "Components" and "Component Details" pages.
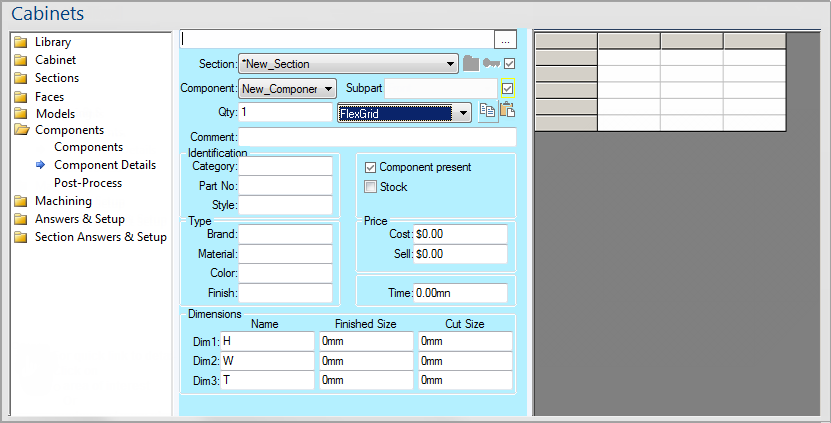
In fact to show that this is possible, here is a picture of the cabinet property sheet in with the MSFlexGrid control loaded as a plugin:
You can see the graphical part of the control (the grid) in the preview pane on the right, and next to the "Component Details" page are all the property pages of the FlexGrid. If you used one of these controls in a VB project, these are exactly the same property pages you would see there. Hopefully this screen shot alone is giving you all sorts of ideas of what can be done with plugins. You could have a full-blown spreadsheet, internet browser, or anything else running right out of the preview pane in !
Let's get in and start writing our own custom control to use as a plugin.
Before starting, you may wish to read the chapters in MSDN on custom controls. These are located under "MSDN > Visual Studio 6.0 Documentation > Visual Basic Documentation > Using Visual Basic > Component Tools Guide > Creating ActiveX Components". The chapter titled "Creating an ActiveX Control" contains a good example and is an excellent place to start.
Creating a Plugin
Start Visual Basic and create a new project of the type "ActiveX Control". You will be presented with what almost looks like a normal app form, except it has no titlebar or borders. This is the graphical part of our control, which will be displayed in on the preview pane.
For this simple example, we will be making a plugin which displays any image that the user selects. It will have a property page where we can select the image file to load, and a checkbox to resize the image to fit the window. Although we are just using this example to learn the technique of creating a plugin, this plugin could be used in real drawings to show pictures of components.
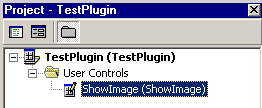 The first thing to do is give the parts of the project more sensible names. Click on "Project1" in the Project Explorer and call it "TestPlugin". Rename "UserControl1" to "ShowImage".
Note that like applications in VB with forms, a component can contain more than one control. However this example will only have one control in the project.
- We will now resize our UserControl to the size of the preview pane in . Even though it will get resized in automatically, we will make it the right size now so that we can get an idea how much room we have to work with. Set the Height to 6450 and the Width to 4500 - these are the dimensions of the "Wide Preview" in . You should design your control so that it can be resized to any width, for example the "Narrow Preview" pane is only 2400 twips across.
- From the Toolbox on the left, add an Image control to our blank UserControl. It doesn't matter where you place it or which size you make it. Change its name to "imgPreview".
- Open the code window for the UserControl by double-clicking it, then create a Resize event handler by selecting "UserControl" and "Resize" from the list boxes at the top of the window. Add this code:
Private Sub UserControl_Resize()
    imgPreview.Move 0, 0, Width, Height
End Sub
We will now add a few properties to our UserControl. All interaction with a control is done via properties, whether it be with a property page or a container ( in this case). Properties are like normal variables, except that when you read or write the value of a property, it executes a method. Refer to MSDN for details on properties.
The two properties we will make available are the name of the current image, and whether to resize the image to fit. These will be called "Picture" and "Stretch" respectively. To add a property, you can just type (or paste) the code below, or select "Add Procedure" from the Tools menu in VB.
Public Property Get Stretch() As Boolean
    Stretch = imgPreview.Stretch
End Property

Public Property Let Stretch(NewValue As Boolean)
    imgPreview.Stretch = NewValue
    If NewValue = True Then UserControl_Resize
    PropertyChanged "Stretch"
End Property
What this code does: each property usually has two methods, a Property Get and a Property Let (or Set for objects). These are called when the property is read and written. Our Image control already has a property called Stretch so we can just return the value of that when someone reads our Stretch property. Because no program can modify our Image control directly, we have to pass the value through to it, and pass it back when someone tries to read from it. We could have called our property "Resize" or something else, but we've chosen to keep it as "Stretch" for consistency.
The Let method has a little more code which calls our resizing routine so the Image changes back to the size of the UserControl, but that isn't important regarding properties. The important addition is the PropertyChanged call, which informs our container () that the our Stretch property has been modified. If we didn't make this call, wouldn't know to update any controls that refer to this property. The PropertyChanged method should always be called at the end of a Property Let with the name of the property, only if the value has changed. If this is still unclear, please read the MSDN documentation on properties because it will be assumed knowledge from here.
We will now add the code for the second property, Picture:
Private ImagePath As String

Public Property Get Picture() As String
    Picture = ImagePath
End Property

Public Property Let Picture(NewImage As String)
    On Error Resume Next
    Set imgPreview.Picture = LoadPicture(NewImage)
    If Err Then
        MsgBox "Couldn't load image: " & Err.Description, vbExclamation
    Else
        ImagePath = NewImage
        PropertyChanged "Picture"
    End If
End Property
We have declared a private String variable to store the image filename in, because this is not saved as a property of the Image control. The Property Let method is a little more complicated because it actually loads the provided filename into the image control. Note that it only changes the value of ImagePath and calls PropertyChanged if the image loaded correctly.
Adding a Property Page
Our UserControl is effectively complete, so we will now add a property page to let us interact with it. For this control, we need to be able to load a picture, and set the value of the Stretch property.
- From the Project menu, select "Add Property Page". Rename the new page to "PreviewOptions", and change its Caption to "Preview". The Caption is what will appear on the actual 'page' of the property page.
- Like the UserControl, we will now resize the property page to the standard size. will set its size when it loads, but we need to see how much room we have to work with. Set the Width of the page to 5100 and the Height to 5490.
- Add a CommandButton control called "cmdLoadPic" and set its caption to "Load Picture".
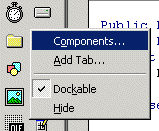
- To add a File Open dialog to browse for images, we have to use a Common Dialog Control. Extra controls are added to the Toolbox on the left by right-clicking it and selecting "Components". You can also access this from the Project menu or hitting Ctrl+T. Scroll down until you find "Microsoft Common Dialog Control 6.0" and tick the box next to it. When you click OK a new icon will appear on the Toolbox... select this and add it to our property page. Rename it to "dlgOpen". You can also set the Filter and Flags properties to only open image files if you like.
- Finally, add a Checkbox called "chkStretchPic" and a Label called "lblImagePath". Set their captions so that your property page looks something like this:
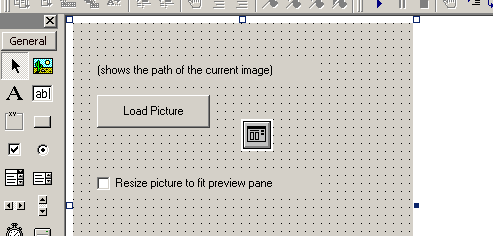
The caption of the Label control will be overwritten when the property page loads, so you can enter anything you like. These controls will appear in the positions you place them now, so arrange them however you like.
Open the code window for the property page (double-click it) and add this code:
Option Explicit

Private Sub PropertyPage_SelectionChanged()
    lblImagePath.Caption = SelectedControls(0).Picture
    If SelectedControls(0).Stretch Then chkStretchPic.Value = vbChecked Else chkStretchPic.Value = vbUnchecked
End Sub
The SelectionChanged method is called every time the property page is displayed, which allows us to display the current properties of the control. "SelectedControls(0)" is a reference to the control we are modifying the properties of. They refer to the "selection" because normal property pages can edit multiple controls at once. With plugins you will only have to consider a single control, hence SelectedControls(0). So all this method does is read the current property values from the control and update the displayed values on the property page accordingly.
Private Sub chkStretchPic_Click()
    SelectedControls(0).Stretch = (chkStretchPic.Value = vbChecked)
End Sub
This event occurs when the checkbox on the property page is changed. It updates our UserControl immediately by setting its Stretch property (which calls the Property Let method on the control). Note that with normal ActiveX controls this is done using the Changed property and ApplyChanges method of the property page, but in there is no Apply button so all changes can be done immediately.
The actual code of the method is shorthand which may be unfamiliar to some. It basically says "if the checkbox is checked, then set Stretch to be True, otherwise set it to be False". It evaluates the boolean expression on the right, then puts the result into the Stretch property.
Private Sub cmdLoadPic_Click()
    dlgOpen.Flags = cdlOFNFileMustExist + cdlOFNHideReadOnly
    dlgOpen.ShowOpen
    If dlgOpen.FileName = "" Then Exit Sub
    SelectedControls(0).Picture = dlgOpen.FileName
    lblImagePath.Caption = SelectedControls(0).Picture
End Sub
This is the event for when the user clicks the "Load Picture" button. It displays an Open dialog so the user can browse for an image file, then passes the filename to our UserControl via its Picture property. The last two lines may look confusing to those who have used an Image control before, because you usually have to use the LoadPicture function. However, we are setting the Picture property on our UserControl, not an Image control. Remember that passing a file name to our property will automatically load the picture for us.
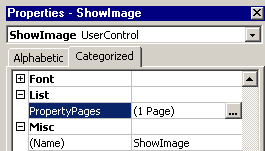
At this point we have almost finished a basic plugin. The final step before building the control is to associate the PreviewOptions property page with the ShowImage control. This is because property pages can be used on several controls within a component, and each control can have several custom property pages. Change back to the ShowImage control and edit its "PropertyPages" property. Click the small [...] button then tick the box next to the line that says "PreviewOptions".
Building the Component
Once the property page has been added, save the project then select "Make TestPlugin.ocx" from the File menu. This will compile your project into an OCX file, which is an ActiveX control that you can distribute. Whenever you build a control, Visual Basic automatically registers it on your system. This means that other programs can reference it by using a special ID, without having to know where it is located on your hard drive.
Therefore it does not matter which folder you create your control in, but it does mean that you need to tell the special ID, called a ClassID. Once the control has been built, you need to run the "FindClassID" program to search for the reference to your new control.
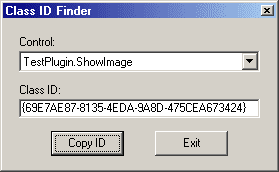
When you start FindClassID it should find the name of your new control automatically - if not, just locate it from the list. The long string of letters and numbers is the ClassID that we need to give to . Click "Copy ID" to put it on the clipboard; it will be required for the next step.
Installing the Plugin
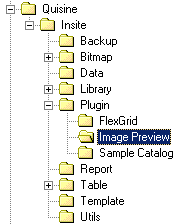
A plugin must be located inside the folder where you have installed, under "C:\AllMasterSoftware\CabMasterPro\Plugin\<plugin name>". The "plugin name" part doesn't have to match the name of the control, but it will be the name used within on the Component Details page. Create the "Plugin" folder if required, then create one inside that called "Image Preview", which will be the name of our plugin.
Normally when you distribute a plugin, the OCX component file will be placed in the plugin folder to keep all the files together. Instead of moving and registering your OCX every time you rebuild it, just browse to the plugin folder next time you run "Make TestPlugin.ocx". However, as mentioned above the physical location of the component doesn't matter so you can skip this step.
The next required step for installing a plugin is to create a "plugin.id" file. Inside the "Image Preview" folder, create an empty text file and rename it to "plugin.id". Open the file in a text editor (eg Notepad) and paste the ClassID we obtained earlier into it:
Save the file and close Notepad. If you created the file with Notepad (instead of just editing with it), make sure that the file has indeed been saved as "plugin.id", and not "plugin.id.txt".
Testing the Plugin
Start a new drawing as normal, without any library loaded. Note that while testing plugins you have to shut down and restart every time you rebuild or add a plugin, so not using a library saves time.
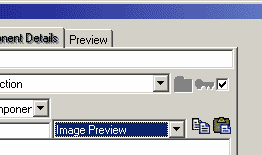
Open the cabinet properties sheet of any cabinet (or the default tool) and create a new component. Change to the Component Details page and "Image Preview" should be in the plugins list.
When you select the plugin from the list, the preview pane will clear and a Preview tab will appear next to the current one. To load a picture, change to the Preview tab and click "Load Picture". Ticking the checkbox should stretch the image to fit the preview pane. If everything is working fine at this point, then you have just successfully created your first basic plugin!
However, the plugin is not completely finished. If you start changing between components then back again, you might notice that any picture you selected has disappeared. This is because our component has not yet implemented loading and saving of its properties.
Persistent Properties
Back in Visual Basic, open up the code window for the ShowImage control. From the two lists at the top of the window, select "UserControl" then "WriteProperties". This is the method that will be called when our control is destroyed, and gives us a chance to save any property values. Basic persistence is explained in the next paragraph - for more detailed information, look in the MSDN index for "life cycle of ActiveX controls".
Every time you change between components in , an instance of your plugin control is created and the old one is destroyed. Therefore our plugin must use the provided WriteProperties and ReadProperties methods to save any settings it uses. Otherwise, the plugin will reset to the default every time the user changes components. So to the user, our plugin appears to exist in the background (or
persist) while we are looking at another component. However in reality, the plugin instance saves its configuration and gets unloaded. When the user changes back to the original component, the plugin is created again and its configuration is reloaded. For this to work seamlessly, we have to make sure that the WriteProperties and ReadProperties methods are the exact opposite of each other. Fortunately, this is very easy to do.
Under the WriteProperties method, paste this code:
Private Sub UserControl_WriteProperties(PropBag As PropertyBag)
    PropBag.WriteProperty "Stretch", Stretch, False
    PropBag.WriteProperty "Picture", Picture, ""
End Sub
You will notice that the generated WriteProperties method gets something called a PropertyBag passed to it. This is an object where we can put in and take out properties without having to worry about what data format they are in or how they are stored. All we do is put our properties in the bag and will store it for us.
The WriteProperty method takes three parameters: the property name, its current value, and the default value. The name of the property should be the same as the variable name in the code - this will avoid confusion. The reason a default is used is so that if the current value of the property is the same as the default value, it doesn't have to store the value. For more detail on this method, type "writeproperty method" in the MSDN index.
Private Sub UserControl_ReadProperties(PropBag As PropertyBag)
    Stretch = PropBag.ReadProperty("Stretch", False)
    Picture = PropBag.ReadProperty("Picture", "")
End Sub
The ReadProperties method simply reads back our two properties from storage, using the name of the property and a default value. If the property does not exist in the PropertyBag for some reason (eg. it has been deleted or this is the first time the plugin has been run) the default will be used instead.
As mentioned above, the ReadProperties method should be the mirror image of the WriteProperties method. This is so that the plugin works consistently no matter how many times it is destroyed and re-created. The property names, variable names, and default values must match exactly. If you make a change to one method, be sure to make the same change to the other.
Version Compatibility
Once property saving and restoring has been implemented, rebuild the component and test it.