Panel Estimator Setup Boards and Inventory
In This Topic
Before using the Panel Estimator you will need to enter some information in regards to saw control and run control specifications.
These areas in the Boards/Inventory window are extremely important in regards to the way Panel Estimator will optimise.
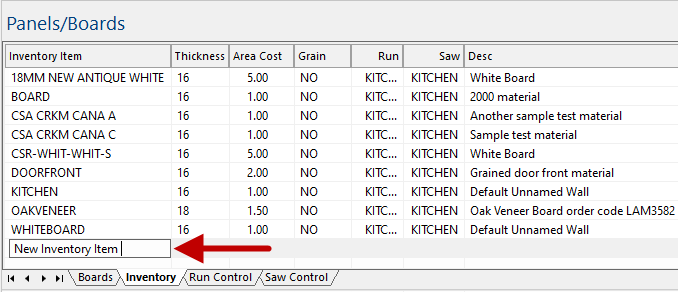
The Inventory tab is used less frequently than the Boards tab and is therefore the second tab in this window. Each inventory item setup created on this tab is selectable from the Boards tab - See Adding New Inventory Items.

Inventory Item
The name that is typed here will appear as the selectable ‘Inventory Item’ in the Boards tab. Enough Inventory items must be set up to represent all the different types of inventory used in your operation.
Thickness
Enter the appropriate thickness for the applicable inventory item. This field is for information only.
Area Cost
The Backtracking Algorithm uses this field. It helps this algorithm compare cutting time versus the cost of waste material produced in the many patterns this algorithm compares before deciding which is best. Simply enter the square unit cost of applicable Inventory Item e.g. $15/m2.

Grain
Check this checkbox if the applicable Inventory Item has to have its height field aligned with the length of the board.
DO NOT use Grain control with the Backtracking Algorithm.
Run
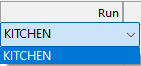
The Run control defines how to ‘run’ the optimiser.
Select which run control setup you wish to use from the drop list on the applicable Inventory Item field. (See below on ORC files)
There is only one distributed, but you can create as many as you like. - See
Run Control tab.
Saw
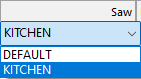
The Saw control tells the optimiser which ‘saw’ is to be used and therefore allows it to consider accurate information relevant to the appropriate saw.
Select which saw control setup you wish to use from the drop list on the applicable Inventory Item field. (See below on OSC files)
There is only one distributed, but you can create as many as you like - See
Saw Control tab.
Adding New Inventory Items
Before using the optimiser, the available boards in stock need to be added to Inventory.
The following example will go through the steps in adding a new inventory item.
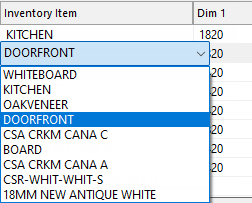
- Select the Boards/Inventory window and then select the Inventory tab, as shown.
- Type in the material and fill in corresponding tables with relevant data e.g. thickness, sqm rate etc.
- Then select the Boards tab and select the new inventory item from the drop list.
- Type in the length and width of the board material, and how many sheets are in stock.
The Boards tab will display all the material you have in stock and will be updated automatically after each job.
The Boards tab is for specifying your current stock boards available for Panel Estimator to use during optimisation. Full optimisation will only occur if there are enough stock boards available.
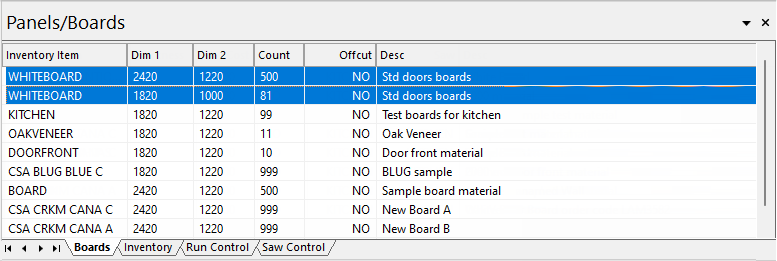
Inventory Item
Select which Inventory Item setup you wish to use from the drop list on the applicable Inventory Item field for this set of boards.
Example of drop list
Dim 1 and Dim 2
These are the dimensions of the board. For grained material the usual convention is to have ‘Dim1’ be the direction of the grain and ‘Dim2’ be across the grain. The convention used must be the same one used for panel dimensions. For non-grained material, it is usual to list the longer dimension first.
Count
Enter the number of boards of the specified size that you have in stock. You may wish to simply enter a fictitious number to ensure that there are plenty available so you can determine from the optimisation how many boards to purchase.
Offcut
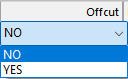
Select Yes from the drop list if the board(s) are off-cuts i.e. not full boards.
You can configure the Backtracking Algorithm to create and use off-cuts. OFFCUT pieces are NOT put back into the ‘Available Boards’, however, the Backtracking Algorithm will use off cut pieces it has generated through optimisation that matches the minimum dimension criteria for an off cut - see Run Control tab.
Desc
This description field is simply for you to enter some notes on these boards. Although it is descriptive only, reports could be constructed to report on this field.
The settings on the Run Control tab helps determine the optimising process.
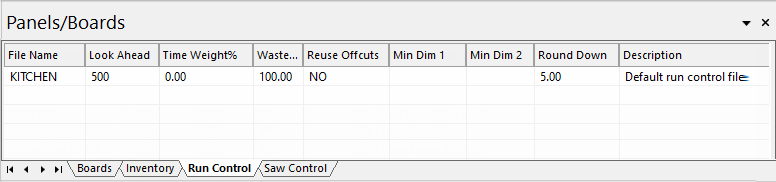
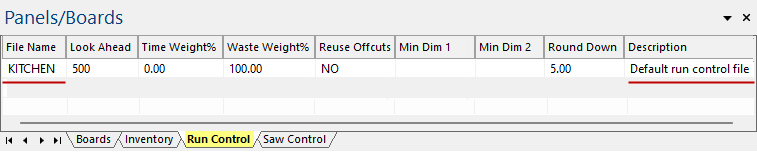
File Name
The name that is specified here will be the name of the run file created and will be available for selection from the Inventory tab.
Look Ahead
The Backtracking Algorithm uses this field to determine how far ahead in the Inventory Codes list to check in its attempt to find the best optimisation possible.
Enter a number from 0 to 500 where...
- 0 = No look ahead i.e. fast optimisation;
- 100 = Medium look ahead and medium speed of optimisation;
- 500 = Maximum look ahead but slowest optimisation speed.
Time Weight and Waste Weight
These two fields work in conjunction with each other. Note that only ‘Backtracking Algorithm’ uses this value. The value of these two fields added together must total 100(%)
Defaults settings are…
- Time Weight = 0
- Waste Weight = 100
These settings tell the ‘Backtracking’ that time taken to produce the optimised patterns is not important and that our only interested is in producing patterns with minimal board wastage. In practice, the extra time taken to cut the most material efficient pattern may be more expensive, for example, due to labour costs involved.
The weight that you decide to use (in association with the Saw Control tab > Cutting Time field’ and the Inventory tab > Area Cost field’) will affect the patterns created by the Backtracking Algorithm.
Reuse Offcut

This is used by the Backtracking Algorithm only and is operated by selecting YES from the drop list i.e. create and reuse offcuts. If YES then the next three fields, Min Length, Min Width, Round Down, are activated. Selecting NO tells it to not create or reuse offcuts.
All algorithms except the ‘Backtracking Algorithm’ will try to place a panel into any offcut piece regardless of its’ dimensions and of this flag setting.
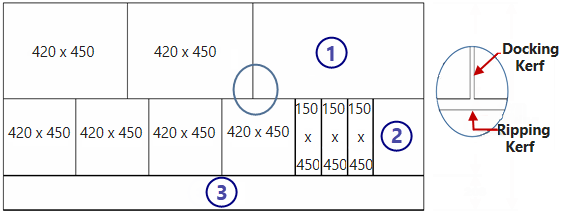
Min Length
If Reuse Offcut was selected then the size here will determine if the length of an offcut is long enough to be kept and reused.
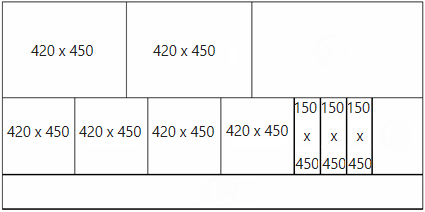
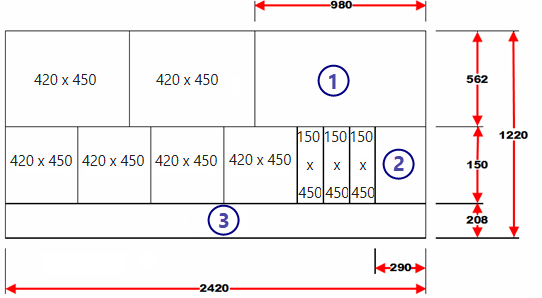
Example of Min Length, Min Width and Round Down
For example, if the minimum length was set at 300mm, then the offcuts 1 & 3 in the diagram would pass this minimum length criteria. Therefore it will be kept and subsequently passed to the next checks. Offcut 2, however, fails this examination and is therefore not kept.
Min Width
This is similar to Min Length field. If an offcut passes the minimum length criteria, then its width is then checked against the current Min Width setting to see if it should be kept and refused.
In the example diagram above, if Min Width was set to 250mm, offcut 1 & 2 would pass the criteria but offcut 3 would fail. Considering the given example for both Min Length and Min Width in its entirety, however, only offcut 1 would be kept for reuse. Offcut 2 failed Min Length criteria.
Round Down
If all reusable offcuts were automatically added to the available Boards list with exact sizing, the number of entries would get quite large. A Round Down value is used to reduce this.
For example, if a ‘Round Down’ value of 10mm is used, all offcuts that are going to be reused will have their actual ‘Lengths’ and ‘Widths’ rounded down to the nearest 10mm.
In this example...
- Round Down is equal to 10mm;
- Offcut size is equal to 824mm x 457mm;
- Offcut entered into Boards list with size of 820mm x 450mm.
If the Round Down in the above example was set to 5mm, then the offcut would be entered into Boards list with size of 820mm x 455mm.
Desc
This description field is simply for you to enter some notes on these boards. Although it is descriptive only, reports could be constructed to report on this field.
The settings on the Saw Control tab let the optimising algorithms use appropriate information for the actual saw you will use when cutting the appropriate optimised board. You can set up information for each of the different saws used (or different settings of those saws), supply an appropriate name and then use the settings in the Inventory tab.

File Name
The settings on this tab let the optimising algorithms use appropriate information for the actual saw you will use when cutting the appropriate optimised board. You can set up information for each of the different saws used (or different settings of those saws), supply an appropriate name and then use the settings in the Inventory tab.
Saw Type
Specify the general type of saw that the information to follow will represent e.g. Bench, Panel, Press etc. This field is descriptive only but can appear in reports.
Max Turns
This field specifies the maximum number of times the ‘Backtracking Algorithm’ is allowed to rotate the board in the theoretical cutting of a pattern i.e. one optimised board. The Backtracking Algorithm used this information to help determine if a pattern is too complex and time consuming to be practically feasible.
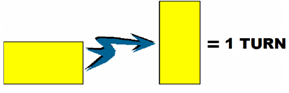
The default setting of ‘99999’ ensures that the most material efficient pattern is created, irrespective of if the number of times a board will have to be turned during the cutting.
One turn is equal to a 90 degree rotation of the board.
Max Cuts
The maximum number of cuts that are allowed during the cutting of a pattern should be specified here. One cut is a single ripping of docking cut.
The default setting of ‘99999’ ensures that Panel Estimator creates the most material efficient pattern irrespective of the number of cuts required to remove the desired pattern pieces from the board.
Example
Each thin line represents one cut.
Rip Kerf and Dock Kerf
Rip and Dock Kerf is the waste created by the saw blades teeth offset. The fields are separate as these operations may be required on use different saws or setups.
Docking Kerf Ripping Kerf
Example
Diagram shows the Rip Kerf extends along the length of the board and the Docking Kerf is 90 degrees to the Rip Kerf.
Also, notice that in this diagram that the Dock Kerf is depicted as being smaller than the Rip Kerf.
Description
The description field is for user defined notes on these boards. Although it is descriptive only, reports could be constructed (with Crystal Report Writer) to report on this field.
Order Sep
This setting is for a Press saw type (vacuum forming).
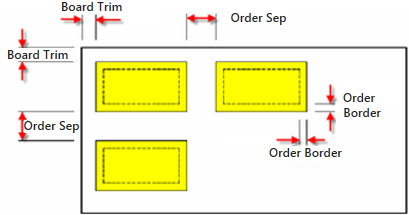
Order Border
This setting is for a Press saw type (vacuum forming). The actual size of the piece will be reduced by this amount during optimisation.
Border Trim
This setting is for a Press saw type (vacuum forming).
Time / Board
This is the user defined best estimate of the number of minutes it takes to lift board onto the Saw. Note: 30 seconds = 0.5 minutes etc
Time / Turn
This is the user defined best estimate of the number of minutes it takes to turn board 90 degrees on the Saw. Note: This could involve some set up time.
Time / Cut
This is the user defined best estimate of the number of minutes it takes to setup the Saw for another cut.
Time / Length
This is the user defined best estimate of the number of minutes it takes to cut 1 metre (or whatever the default unit of length has been set to)
Time Cost
This is the cost per minute of operation of the saw. This figure could include labour costs, leasing cost, maintenance costs etc.
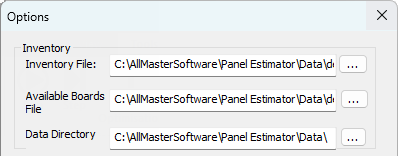
The Options command button on the Tools tab provides the location of Data and Inventory and Available Boards files.
Click to view Tools tab
Data Directory
The Data directory is the default location for files used by panel estimator. These include the following types...
Data Directory
The following shows a selection of each file Type saved in the Data folder.
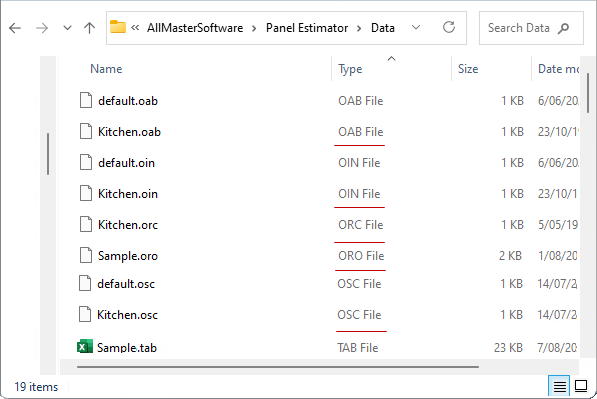
Inventory File (oin)
The Inventory File has an .oin file extension and is controlled in the Options dialog. This is what populates the Inventory window.
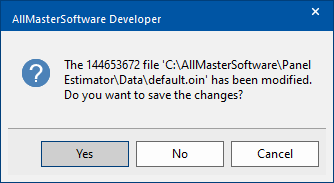
When you exit from Panel Estimator you may get a message modifications have been made to the file and asks if you wish to save the changes.
Save changes to oin file message
Available Boards File (oab)
The boards file has an .oab file extension and is controlled by the Available Boards File in the Options dialog and populates the Boards window.
When you exit from Panel Estimator you may get a message modifications have been made to the file and asks if you wish to save the changes.
Save changes to oab file message
Saw Control File (osc)
The Saw Control window is populated by looking through the Data directory for any .osc file.
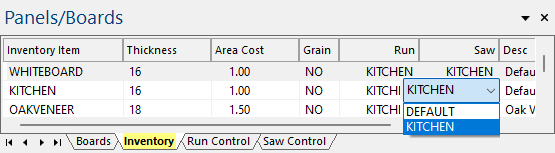
Boards/Inventory tab
You can control which saw control is used from the Boards/Inventory tabs.
In this example there are two saw controls i.e. KITCHEN and DEFAULT from drop list.
Run Control File (ORC)
The Run Control tab of the Panels/Boards window is populated by looking through the Data directory for an .orc file.
Run Control tab
The saw control is selected on the Boards/Inventory tab in the above example was KITCHEN, therefore the default run control file used is kitchen.orc file.