CabMasterPro User Guide
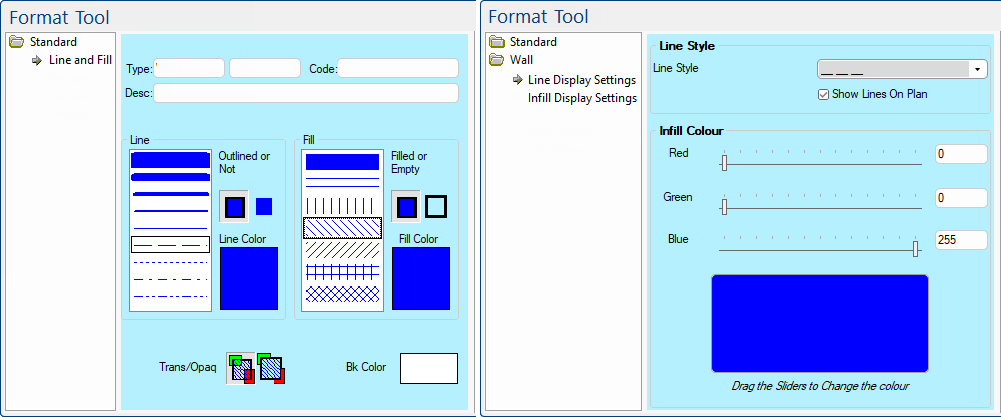
Line and Fill options are common for a number of tools.
The following custom tools have been created in v12 and v12.1 to simplify selections by separating options over two pages...
|
For RGB colour picker codes go to RGB Color Codes Chart 🎨 (rapidtables.com)
 |
Refer Common Controls.
The style options of the line is either controlled on the Standard > Line and Fill page or (in Version 12) the Line Display Settings page. The principles are the same.
The Line controls consist of a pen style list, a pair of icon buttons and a colour select button. The two buttons labelled "Outlined/Not"  (On/Off) control whether a line is drawn around the object at all, simply click the applicable button.
When you have an Outline turned ON, the Pen Style List box becomes active. From here you can select the thickness of a solid outline, or one of four dashed pen styles. Click the preview of the line to select it.
The final option in this group is the Line Colour preview box where you can view or change the colour of the outline. Clicking it opens a standard Color Select dialog where you can select a preset colour or create your own.
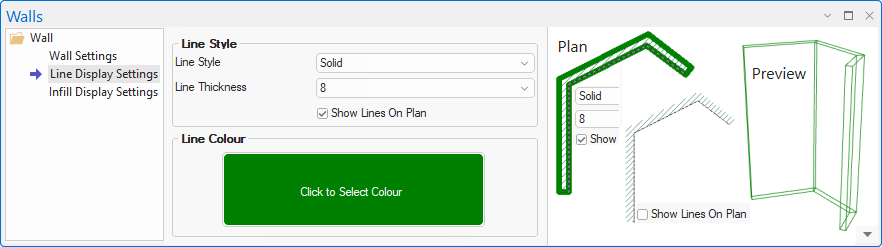
Wall Tool V12
The Line Style drop list allows you to select the pen style which includes Solid.
The Line Thickness drop list is provided to allow you to set the thickness from 1-20 but is only made available is the pen style is Solid.
Example of a thick Solid line used on the Plan
This shows the Line Style for a Wall as Solid. The Line Thickness drop list allows you to select from 1 (thin) to 20 (thick).
The Show Lines on Plan is used to turn on/off the Outline. The Line Style is only displayed (or active) if turned ON.
Infill Colour relates to the colour of the Outline. Use the slider or enter the RGB colour directly into the edit boxes.
For RGB colour picker codes go to RGB Color Codes Chart 🎨 (rapidtables.com)
Wall Tool Classic
The Line Style drop lists allows you to select the pen style and thickness.
The Line Thickness drop list allows you to select from 1 (thin) to 20 (thick) but is only made available is the pen style is Solid.
Click to Select Colour button opens the Colour Selection dialog. The diagram shows examples of a combination of these options.
Controlling the Fill options is very similar to setting the Line style discussed above.
The two buttons labelled "Filled/Empty"  (On/Off) controls whether you actually want the object to have a Fill Pattern, simply click the applicable button.
When you have an Filled turned ON, the Style List box becomes active and you can select a solid or crosshatch style by clicking the list, like you select a pen style.
Finally, click the Fill Colour option to set the colour of the floodfill (fill an enclosed area) or hatch lines.
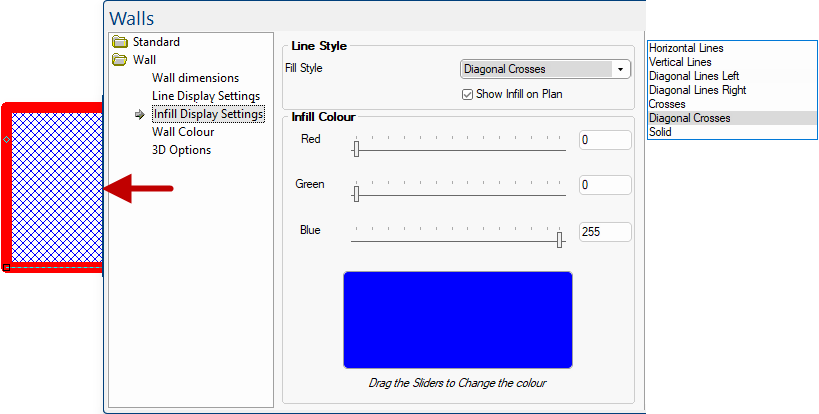
Wall Tool V12
Use the Fill Style drop list to select an available fill pattern.
The Show Infill on Plan is used to turn on/off the fill pattern. The Fill Style is only displayed (or active) if turned ON.
Infill Colour relates to the colour of the Fill Pattern. Use the slider or enter the RGB colour directly into the edit boxes.
Example of Fill Style and Colour Example on the Plan
In this example, the Fill Style of the wall has been changed to Diagonal Crosses and the Infill Colour is blue.
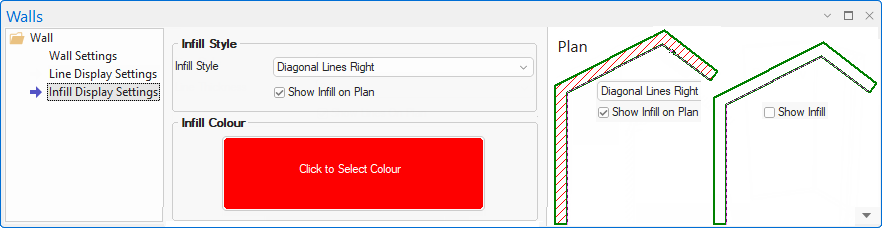
Wall Tool Classic
The Line Style drop lists allows you to select the Infill Style.
Click to Select Colour button opens the Colour Selection dialog. The diagram shows examples of a combination of these options.
The transparency controls are only available when the selected Line Style has gaps in it e.g. a crosshatch fill pattern or a dashed line, as per example below.
When one of these patterns is used you can set the transparency option to either transparent or opaque ![]() respectively. When transparent is selected, anything behind the object shows through the gaps. Otherwise, with opaque, everything behind the object is obscured and the object's background colour is drawn in the gaps instead.
respectively. When transparent is selected, anything behind the object shows through the gaps. Otherwise, with opaque, everything behind the object is obscured and the object's background colour is drawn in the gaps instead.
With opaque, everything behind the object is obscured and the object's background colour is drawn in the gaps instead. In this example, the blue back colour is visible between the red line colour.
You can only set the background colour of an object when the Trans/Opaq controls are enabled and set to Opaque. Clicking the coloured preview box opens the Color Select dialog where you can pick a preset colour or define your own. The background colour is then used to fill in the gaps of the line or fill pattern, instead of drawing whatever is behind the object.