CabMasterPro User Guide
Panel Estimator allows you to produce efficient cutting or pressing patterns, it can tell you the best way to arrange boards to produce the most optimal patterns with the least amount of wastage. It is not tied to a particular brand of saw, it will just as easily optimise for a bench saw, laminate press or manual cutting.
This section will discuss the Panel Estimator Interface and includes tutorials and a Video 
Panel Estimator is included with $$CabMasterPro:CabMaster Software$$ or a higher software license but needs to be installed separately. If using with CabMaster, then contact support as there are some things you need to have set up to work properly.
Check CabMaster Saw settings and ensure that CabMaster materials are setup as discussed below to output for optimisation.
CabMasterPro+MaxCut can be purchased as a product for handling panel cutting jobs for panel saws (not CNC machines). MaxCut is a 3rd party product which is like an advanced Panel Estimator but is run as a Plug-In.
Activation Notes
CabMasterPro V12.0.0.76 [20240527]
During installation on a new PC, the activation of MaxCut is handled automatically as part of the CabMaster product activation.
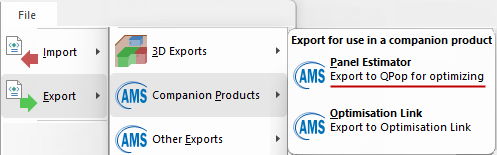
1) You need to decide how you want to setup Materials to export to Panel Estimator.
2) Then you simply export the details from the CabMaster File menu > Export > Companion Products > Panel Estimator.
Click to Expand
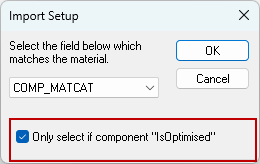
3) In Panel Estimator you will need to turn on the Only select if component "IsOptimised" option. (You will only need to do this once).
Click to Expand
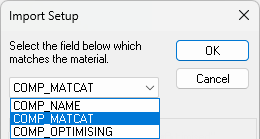
Import Setup
COMP_NAME
These are hard coded values in CM-Cabinets such as ‘Board’, ‘Door’, ‘Benchtop’ etc.
COMP_MATCAT (Recommended)
When exported to Panel Estimator, the required information is taken from the materials ‘Raw Material’ field in Materials Manager.
COMP_OPTIMISING
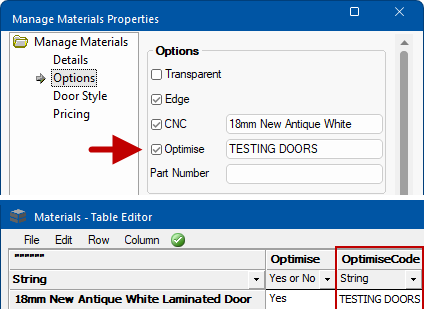
This is taken from the ‘Optimise Code’ field in the Materials Manager.
Example of Optimise Code
Click to Expand
CabMasterPro Design software packages, by default, always output to Panel Estimator i.e. Saw.
With Machining Premium, however, you will need to change the appropriate parts to 'Saw & Flatbed' on the Mach.General > Const page  in the Catalog Properties (discussed in detail in the CM-Cabinets Library User Guide).
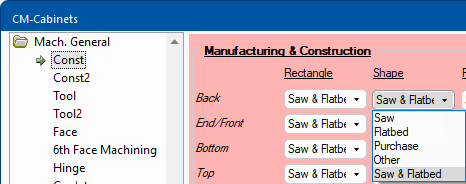
Mach.General > Const page required settings - Click to Expand
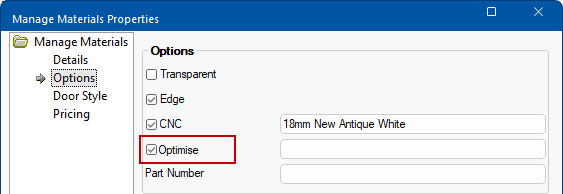
For Optimisation, make sure any relevant materials that will be processed by Panel Estimator have the'OptiLink' check box ticked in the Materials manager, to tell CabMaster that this material is to be sent to the Optimisation Link for cutting on a Saw/Flatbed. Typically this would be the Panel and Door materials.
In the Catalog/Drawing Properties for the examples used in this topic we have ..
to enable OptiLink as shown...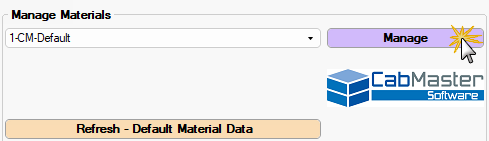
Click to view Job Setup > Materials
Door and Panel set to OptiLink in Materials Manager
1. On the Details page, select the relevant material using the Type/Group/Name using the drop lists.
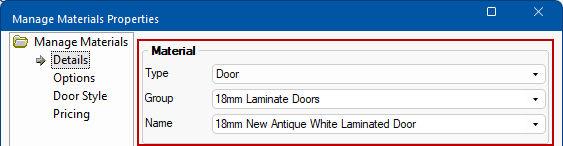
Click to Expand
2. On the Options page, enable OptiLink by ticking the checkbox and Save.
- Optional: If you are using the Optimiser Code then type in a name for use in the corresponding edit box - see Extra Notes on Import Setup.
Click to view Save details
Remember to Refresh
Changes made to materials using the Materials Manager will not automatically update the default or same materials in the current drawing (or catalog editing session) if it was already selected prior to the change. As a new drawing is started default materials will refresh to the latest.
Bulk Changes to Materials Table
If you need to make a bulk change to the materials you can do this directly in the tables using eight TableEdit or Excel.
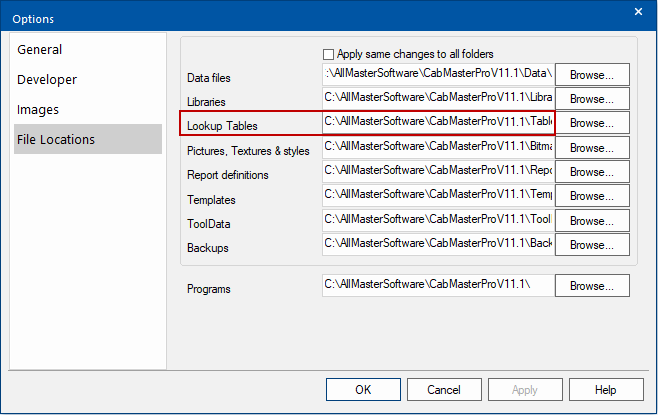
With both methods you will need to locate your tables i.e. File Options [F10] and copy the location to your clipboard...
File Locations
Copy this location...
Then open File Explorer [![]() +E] and paste the location into the search field...
+E] and paste the location into the search field...
File Explorer

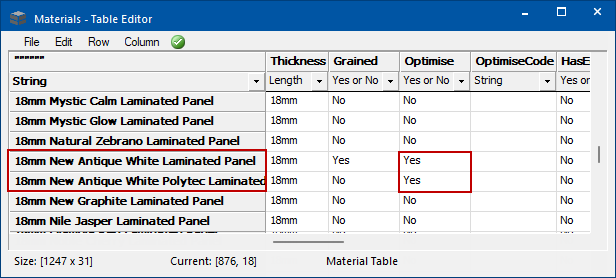
1) Open the Material table you wish to edit by double clicking on the file name - typically 'Materials.qlt' which is your CM-Default table.
2) Change the 'Optimise' column to 'Yes' on each applicable material.
Example : Materials.qlt table
3) Save the table i.e. File > Save
4) In the Catalog/Drawing Properties you must refresh;
- on the Materials-Advanced > Manager page press Refresh - Default Material Data (see image at top)
Repeat Steps 1 and 2 above and then click the Save icon and exit the application.
- This may prompt you to save in excel format on exit which in not required.