Requirements and Installation for Automation Server
In This Topic
Requirements
The computer that is to be used to run the Automation Server should have:
- A copy of already installed with a QServer license;
- The exact same bitmap and report directory trees that the designers have on their client machines;
- A properly configured and working webserver (such as Apache, IIS or PWS) which supports ASP or PHP;
- A good connection to the local network;
- Enough RAM and hard drive space to handle the expected print load.
Installation
- Install on the server, including the full set of provided libraries.
- If you use any other custom libraries or reports, copy these into their correct locations as well.
- Run CabMasterPro once and then quit so it registers itself on the system.
- Run the QServer Setup program. Since QServer has a web interface using ASP/PHP pages, these will need to be installed under your web server root (e.g. "c:\inetpub\wwwroot" for IIS).
- The Setup program will try to automatically determine this location and use it as the default.
- If a web server is not detected, it is recommended that you cancel the install and setup your web server first.
- You shouldn't have to change anything on the Server URL dialog unless you modified the destination directory.
- The defaults on the next Client Setup screen should be OK as well, although you may wish to change the Map Drive if this is already used on any of the client machines.
- Once setup is complete, open up Explorer and locate the folder you installed QServer to.
- Right-click on the Spool folder and select "Sharing".
- If you don't see this your network is not setup for file sharing (see the Windows documentation on this).
- Click "Shared" and then "Full Access".
- Leave the password field blank and click OK.
- During setup, two files were generated and placed in the Client Setup folder.
- Copy both of these files to each client machine.
- For each client, double-click "QPClient.reg" which will setup CabMasterPro to use the print server.
- Copy the web shortcut to a handy location such as the desktop - this will let the users access the print queue.
- Also on each client, open Network Neighbourhood and locate the print server machine.
- Expand this and you should see the "Spool" folder you shared earlier.
- Right-click the spool folder and select "Map Network Drive".
- Select Q: as the drive (or whatever you changed it to during install) and check the "Reconnect At Logon" box.
- Click OK to continue.
- Finally, run Automation Server from the Start menu on the server machine.
If the spool directory needs to be moved or renamed, QServer will prompt you to locate the new folder next time you run it.
- Make sure to exit QServer before moving the spool folder.
Make sure that has been run at least once on the server (just start it up then quit) so that it can register itself on the system.
- It is also required that you repeat this whenever you upgrade to a new version of .
QServer must be left running on the server, and can be minimised to the system tray. It is assumed your web server is always running.
Details
Jobs Database
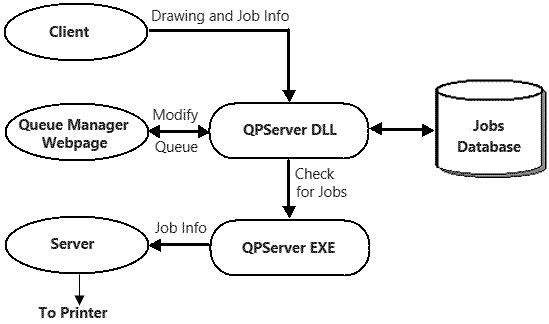
This data flow diagram shows how the components of the system interact:
A typical scenario:
- A user running a client starts a print job. saves a copy of the drawing and copies it to the specified spool directory on the server. It also contacts a page (submit.asp/php) on the web server and provides it with details about the job, including the name, user, and where it just copied it to.
- The Submit page passes these details through to the DLL which adds the job to the database.
- The user can access the queue through the Queue Manager webpage, typically to see how many other jobs are waiting.
- QServer detects the new job in the database and notifies the server, which prints it.
Registry options
The following options control the setup of Automation Server and can be found in the registry folder HKCU/Software/QuisineSoftware/Quisine/Options.
- ServerMessages [default=0]:
- ServerSpoolPath - see Miscellaneous Issues
- ServerURL
- ServerStandalone
- CrystalDataPath
- DeleteExistingTemplate: When we apply a new template in Automation Server, items from a previous template are left alone.
- Setting this flag to 1 deletes them all before applying the new template.
- RecalcDummyLoadOnly: Automation Server library recalcs to allow you to load various libraries.
- If you want to do this for test purposes, either for timing or testing for errors, then setting this flag to 1 will cause all recalc requests to load the libraries but no recalc will actually be done.
See Also