In This Topic
Filters are one of the main actions that you can add to your script, as we saw from the example in Using The Editor. To add a filter to your script, click the "New Action" button then select "Find lines where" from the Action list. When you do this, you will be presented with two more lists which you use to specify the filter. The image here shows the two lists - it has been edited to show all the options at the same time. From these lists, you select options to build up a sentence which constructs the filter. For example we could create a filter that said "Find lines where Value is at least...".
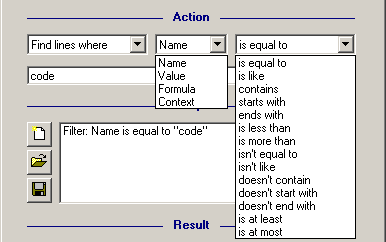
The first list selects the field to search for. As you can see from the sample export line in
Using The Editor, each line is made up of four fields separated by tabs. These fields are (in order) Name, Value, Formula and Context. "Name" is the variable identifier from , and it's usually fairly obvious where it comes from - e.g. the Description field of a cabinet has a name of "desc". "Value" is the current value of the variable, and "Formula" is the formula control behind it (if any). "Context" tells CabMasterPro where the variable belongs in a library, and shouldn't be edited.
The second list is what gives filters such flexibility - you can search for a field in practically any way. The different options in this list are described in the
Comparison Operators section.
After picking the appropriate values from these lists, you complete the sentence by typing a value in the text box. So for our example we might type "50" to make the filter "Find lines where Value is at least 50".
IMPORTANT: When entering values, especially text strings, make sure they have the right number of quote marks on them - some strings in export files have up to three sets of quotes on each end.
If you are searching for a string using an "is equal to" filter and are not finding any results, try adding triple quotes around the search string.
Combining Filters
Our example filter is not much use by itself. If this was used on the a library, it would output every line with a value of more than 50 including component dimensions, section offsets, and much more. To make our script really useful, we can combine this with other filters to narrow the scope down to only the lines we want. Click the "New Action" button to add another filter, or just change one of the filter lists. The Export Editor will usually add a new filter automatically for you so you don't forget. Change the new filter so that it says "Find lines where Name is equal to dim[3]". Dim[3] is the third dimension on the Component Details page of a cabinet, so our script will now find all the components where the third dimension is at least 50.
The order that these two actions appear in the script is not important to the output, but it may affect the time it takes to process. When an export line fails a filter it is discarded immediately, so if we put the most specific filters first, most lines will be filtered out near the start of the script and it will speed things up.
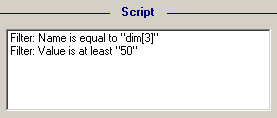
Although its not essential, we will move the new filter up to the top of the script. This is because there are probably less lines that start with "dim[3]" than those that have a value of more than 50 (depends on the library). Therefore, most lines will be filtered out by the first one and the script will run faster. To do this, make sure our new filter is highlighted then click the Up button next to the script. Conversely, you could select the first action and move it down. Either way, your script should end up looking like the one shown here.
By continuing in the manner, we can combine as many filters as we like. Note that only the lines which match
every filter will make it though to the end of the script, so the filters are effectively joined with the word
AND, i.e. "Find lines where Name is equal to dim[3]
and Find lines where Value is at least 50". If we keep this in mind it will be easier to understand
Script Branching which is discussed later.
When setting up multiple filters, it is easier to do a test "Create Merge File" after every few filters. This is just to make sure that we are picking up the right lines, and prevents us from accidentally over-filtering and ending up with no merge lines at the end.