CabMasterPro User Guide
For quick links to more information, click on  the controls or another category/page.
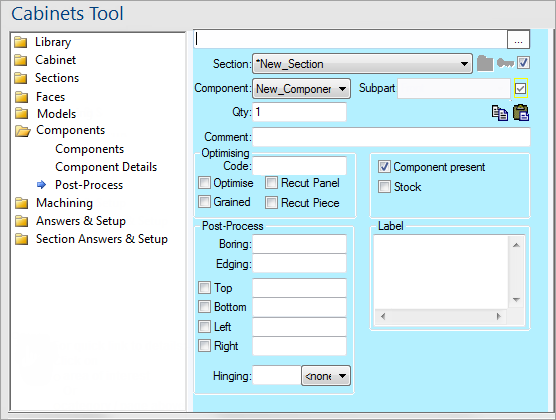
To find out the property names for these controls, see the Post Process page under the Formula Reference.
The Optimising Code is used by external programs like QMIF to group components and can contain any relevant information and be in any format you like. The checkboxes below this are used by QPop when optimising component cutting patterns. The Optimise flag indicates that this component is eligible for optimising, and the Grained flag indicates that the rotation of the piece is important.
The last two checkboxes are used for components which are to be treated as a single panel but recut later into separate pieces. An example is when using a grained material for a microwave cabinet all the pieces should be cut from the same panel so the pattern matches up. This is done by creating two sets of components - a large one representing the full panel, and smaller ones for the individual pieces. For the large panel component the Recut Panel box should be ticked, and for each piece the Recut Piece is ticked. Depending on whether a grained material is used, the optimiser can choose to treat the section as the full panel or as individual pieces (which should optimise better).
A multi-line field which is output to reports and the Machine Center, which can be used for creating printed labels on parts.
The Boring text box is usually used for CNC label and barcoding information, and is passed through to external applications like QMIF and QPop.
The four Edging check boxes correspond with the four sides of a section, and a ticked box indicates that a side is edged.
The Edging edit boxes are used to store information about each edge such as the edge colour code or thickness. A property like EdgeSideCode2L2S or EdgeSideCodeTBLR is usually used to formula control the Edging text box - see the Post Process Formula page for more information.
When you use EdgeSideCodeTBLR, the location of each checkbox matches the location of the edge, e.g. the left checkbox matches the left edge. However, determining EdgeSideCode2L2S is a little more complicated.
If the "First dimension is height" flag (under Length Units heading) is checked on the Options [F10] dialog then the height of the component is Dim1 and the width is Dim2. If it is unchecked then these are reversed - height is Dim2 and width is Dim1. The component is always laid out so its height corresponds to the Left and Right check boxes, and its width to the Top and Bottom checkboxes.
Example:
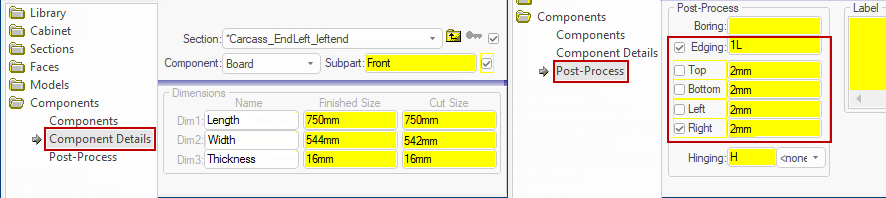
The above image shows parts of the Component Details and Post Process pages.
You can see that Dim1 is the taller height dimension (750mm). In this case we have ticked the "First dimension is height" checkbox on the Options [F10] dialog.
The dimensions are formula controlled based on ActualHeight, ActualWidth and ActualDepth. Since height is first and Dim1 (750mm) is more than Dim2 (542mm) then the height of the component is the longer dimension.
This can be confirmed by the preview picture - the component is taller than it is wide. Because the Right edging checkbox always refers to the height, and it is ticked then the long side is edged. The Edging code, which is formula controlled and based on EdgeSideCode2L2S, contains "1L" which means "one long". Since neither the Top or Bottom are ticked, the result is "1L", not "1L1S" or "1L2S" - that is, the "short" sides are not edged.
Hinge part numbers and/or quantities can be entered into the Hinging edit box and the side that the hinges are on is selected from the list. Formula-controlling the hinge side can be done in the same way as the Within Face list.