CabMasterPro User Guide
In This Topic
    Sections Line and Fill
    In This Topic
    LibrarySizesSectionsSection Size and PosSection ImportsSection 3D TransformSection AppearanceSection Line and FillFacesModelComponentsMachiningAll AnswersAdvanced Donor Acceptor TutorialsCommon ControlsContainerWithin FaceSection ListGo To ParentUnlockPresent FlagCommon ControlsLineFillTransparencyBack ColorSection Line and Fill

    For quick links to more information, click on the controls or another category/page.

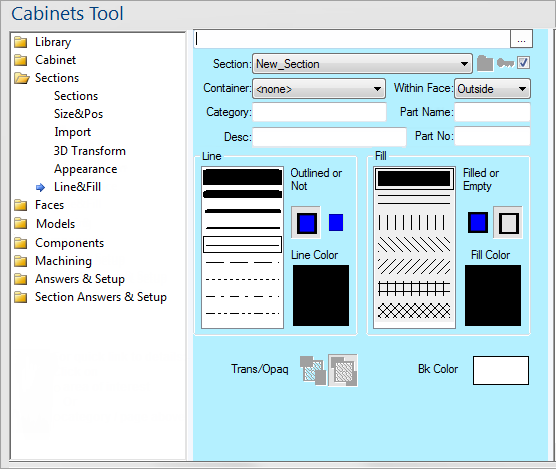
    To find out the property names for these controls, see the Section Line and Fill page under the Formula Reference.


    Same as the Standard Line and Fill.

    Line

    The Line controls consist of a pair of icon buttons, a colour select button, and a pen style list. The two buttons labelled "Outlined/Not" control whether a line is drawn around the object at all. Click the button with the outlined blue box to turn the line on, or the box with no outline to turn it off.

    When you have an outline turned on, the pen style list box becomes active. From here you can select the thickness of a solid outline, or one of four dashed pen styles. Click the preview of the line to select it. The final option in this group is the colour preview box where you can view or change the colour of the outline. Clicking it opens a standard Color Select dialog where you can select a preset colour or create your own.

    To formula-control the pen style list, you have to give the index of the line you want. For example, to set it to be the default thin solid line the formula must evaluate to zero. The first dashed line style in the list has an index of one, the second has an index of two, and so on. To control the thickness of the line, take the desired thickness in pixels, subtract one and multiply it by 16. A line three pixels thick would have an index of (3 - 1) * 16 = 32.

    Note that you cannot have dashed lines thicker than one pixel. So the indexes of all the preset pen styles in the list are, from top to bottom: 256, 128, 64, 32, 0, 1, 2, 3, 4. A small yellow bar appears at the bottom of the pen list to indicate when it is formula-controlled.

    Fill

    Controlling the Fill options is very similar to setting the Line style. First select whether you actually want the object to have a fill pattern by clicking either the button with the filled box or the one with the empty box under "Filled or Empty". If you select filled then the brush style list becomes active and you can select a solid or crosshatch style by clicking the list, like you select a pen style. Finally, click the fill colour option to set the colour of the floodfill or hatch lines.

    Formula controlling the brush style is also similar to the pen style, except the indexes you need to use are a not obvious. They are, from top to bottom: 0, 2, 18, 34, 50, 66, and 82. These might seem almost random but they are actually 16 times the hatch style plus two to enable hatching.