CabMasterPro User Guide
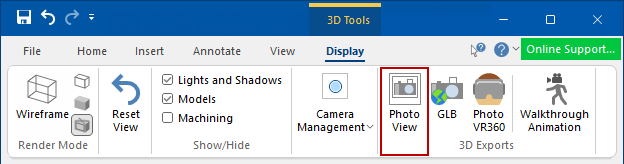
The Photoview command button is located on the Display ribbon which is only made available in 3D View mode. Photoview allows you to generate photorealistic renders that include ultra high quality models.
The settings used to get a good render in Photoview depend on what purpose for which you plan on using the rendered image. If you are going to be placing the rendered image on your plan view alongside the top view of the cabinets, a smaller resolution is suitable, however if you plan to send a rendered image to your customers then much higher settings are recommended.
 Watch the Video : A Minute with Mike : How to level up your PhotoView renders using environment.
Watch the Video on How to Create Photoview Renders.
This really depends on the settings you put into it, and the hardware that is available in your computer. If you have a video card with a GPU, you can use the “Use GPU if available” option which uses the graphics card to help create the render, thereby speeding up the process. Rendering speed is also affected by how many cabinets and models are in your drawing. A drawing with only 3 cabinets will render a lot faster than a drawing with 100 cabinets.
It also depends on the quality and detail that you require, so we will quickly explain some of the available options...
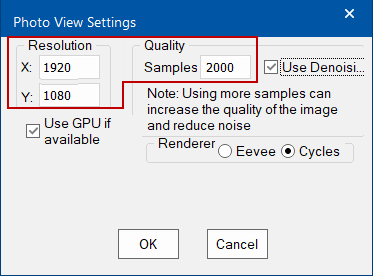
The image resolution refers to the level of detail in a picture. The resolution of a digital image is measured using its pixels; specifically in pixels per inch (PPI). The higher the resolution the more pixels are bunched together, which creates a smoother and more detailed image. However, this will increase the rendering time.
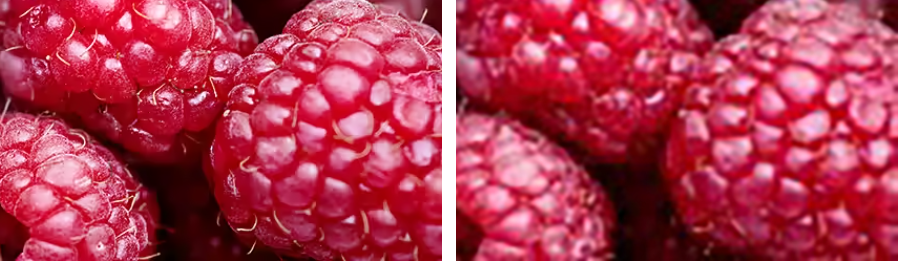
Example
This example shows the difference between high-resolution and a low-resolution image.
The image on the left is high-resolution i.e. 4715 x 2779px (300DPI) compared with a low-resolution image on the right i.e. 200 x118px (96DPI) which, when enlarged, makes the image pixelated.
Note: DPI (Dots per inch) is for printing pictures, referring to the tiny droplets of ink that printers create.
The most common digital images are raster images. These are formed with a grid of tiny colored squares (pixels) that blend together to create an image. Since they are made up of pixels, raster images can be blurry if they have too few pixels. Common raster file formats include jpg, png, gif, and psd.
Using more Samples can also increase the quality of the image and reduce noise. Keep in mind, however, that the higher the Resolution and the Samples values are, the longer the rendering process will take, which isn't required if your image is only going to be reduced to a thumbnail e.g. added to a kitchen plan.
Turning this on applies an additional level of smoothing to the image, thereby reducing the spottiness (noise) in the render.
Eevee is a real-time rendering engine in Blender that can be used to produce high-quality images for printing. Eevee is best for simple scenes without complex backgrounds, such as scenes with low-poly objects, a colored cube, or a longsword.
You might want to use a renderer like Cycles for more complex scenes with multiple light sources, detailed textures, and different materials. Cycles offers a high level of realism and can produce high-quality images. It also supports both central processing units (CPUs) and graphics processing units (GPUs) to speed up the rendering process. It is more accurate and realistic but takes longer to complete but works well with CabMaster Software™ application and is the default.
Consider the purpose of your image, how large it needs to be and where it will be used.
Before spending the time to do a full quality render, it can be useful to first produce a smaller, low-quality image to make sure your positioning is correct, so your final image will show your design from the desired angle. This can be done with a low sample rating, usually between 20 and 100, as shown below:
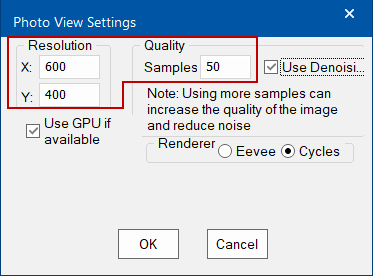
If you will be putting your rendered image on your Plan View alongside your cabinets, a small resolution is recommended as it allows the image to have a small file size and will have a minimal effect on how much of the computer's memory CabMasterPro will be using. Use an average rate for the Samples value, generally about 500 and 2000 samples, and a relatively small Resolution.

Click to view on Plan
A much higher setting will create a much better quality image. If you plan to send your rendered image to your customer, try using a higher Resolution and higher Samples value. A larger size resolution like 1200 x 800 will be large enough for your customers to clearly view your render. A higher Samples value will produce a "cleaner" picture that is far less grainy/spotty, thereby creating a much smoother final image. CabMasterPro can now create a high quality render at a low sample rate, so use a Samples value of about 100.
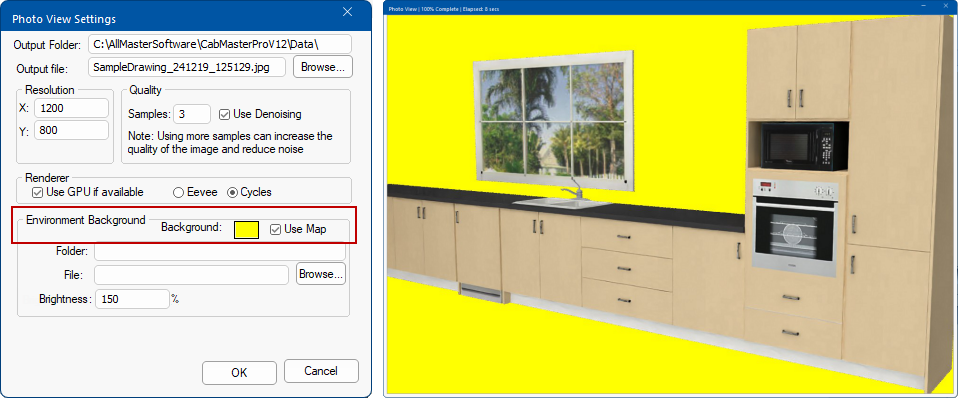
The background can be changed by using the Use Map checkbox in conjunction with either the Background colour selection button or selecting an EXR file.
Watch the Video : A Minute with Mike shows you how to level up your PhotoView renders using environments, which give you a 360° background with natural lighting such as the sun shining in the window.
HDR Environments : These are available by simply using Google search.
In this example, we have repositioned the 3D kitchen and removed the walls and wall cabinets (click on image to see how). Then selected a colour to apply for the background.
Click to view 3D Options prior to rendering
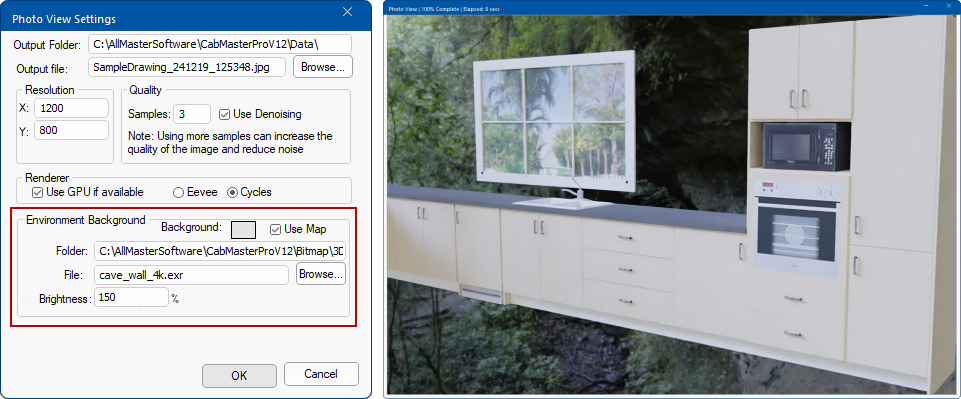
Environment maps (.exr) can be downloaded from sites such as https://polyhaven.com/hdris for use in conjuction with the Use Map option.
In this example, we have used a downloaded exr file and applied it to our kitchen discussed above without walls by using the Browse option.
Click to view Poly Haven download site
Images provided here are only intended for illustrating the use of options.
EXR files can be filed anywhere for future use but in this example we have created a new folder i.e. <your CabMaster folder>\Bitmap\3D Environments (click on above image)
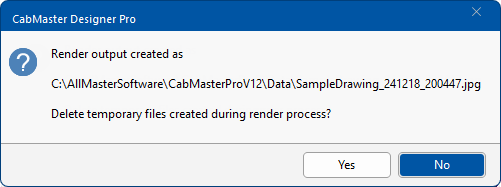
When you close your render a message-box similar to the following will confirm the location of your render.
You will also be asked if you want to "Delete temporary files created during the render process?" which will normally be "Yes", most of the time.
Temporary files may be required, in which case you would click "No":-
A Minute with Mike : Shows you how to level up your PhotoView renders using environments, which give you a 360° background with natural lighting such as the sun shining in the window - which is discussed in a separate video. [2:07 mins]
This video will add bulkhead, ceiling, floor, models and lights with tips on creating the best render in Photoview. [20:34 mins]