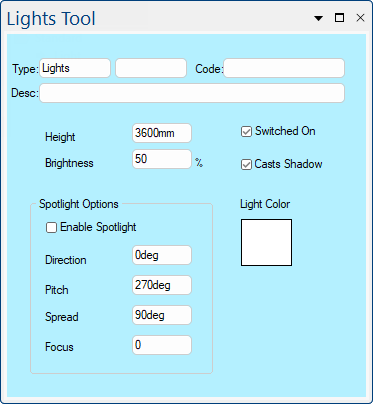

A Standard Lights Tool (shown left) and a Light Classic Tool (shown right) which has a clean and easy to use interface.
 |
For quick links to more information, click on  the options.
This drawing tool is located on the Insert tab and can be customised with the right click Format... option.
The height field controls the distance above the ground where the light is. This is used by CabMasterPro to calculate lighting effects and shadows. By default this is the height of the ceiling. If using the Light Classic Tool (shown above right) the Ceiling Height button can be used to reset the height field set on the Job Setup > Job Defaults page of the Drawing Properties.
The brightness field determines how bright the light radiated from the light object is. Multiple lights shining on a surface can make it almost white, so try reducing this value. Brightness can also be boosted over 100% which may be required for some spotlights.
The switched on tick box determines whether or not a light is deemed to be switched on or off. If this box is unticked the light object will simply not produce any light.
The cast shadows tick box determines whether or not CabMasterPro will calculate shadows cast by this light source. Calculating shadows can decrease the speed of rendering substantially.
The light colour field determines the colour of the light which the light object radiates. Normal lights are white or slightly yellow, so this works best when set to lighter colours.
To lighten a colour, select the initial colour from the Basic Colors squares, then click "Define Custom Colors" and slide the Luminosity arrow, on the far right, upwards.
Example
Clicking on the Light Color button, opens the Colour Selection dialog.
- Click on Define Custom Colors button to open the Color dialog shown below.
This 'initial' colour will be displayed in Custom colors area, as shown.
- Click on this and slide the Luminosity arrow upwards.
In general, light sources radiate light in all directions from their location, but if you use the spotlight feature you can make the light source be focused in a specific direction. There are multiple options for spotlights, these are:
If this checkbox is ticked/enabled, then spotlight mode will be used for the light.
If this checkbox is unticked/disabled, the other options in this section have no effect on the light.
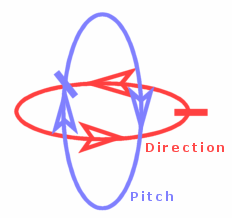
Direction is the horizontal rotation of the spotlight.
Zero points the light to the east (right side of the screen), 90° is north (top of the screen), 180° is west, etc. Positive angles rotate the light anti-clockwise.
Pitch represents the angle vertically at which the spotlight points.
0° is taken to be pointing straight along a horizontal plane in the direction specified above, 90° is pointing vertically up, 180° is pointing backwards on the horizontal plane. Minus 90° (same as 270°) is pointing straight down, and this is the default so it can be used as a down light.
The Spread property sets how wide the angle within the light beam is.
For example a wide floodlight may have it set to 120° or more, and a narrow pencil beam may have a spread of only 20°. A larger value will cause the light to go over a larger area. The maximum value (180°) covers half the area of a point source.
Focus is how sharply the edges of the spot are defined.
A Focus of zero means the edge is very clear, it cuts straight from light to darkness, while a Focus of 5 makes the light just fade out near the edges.