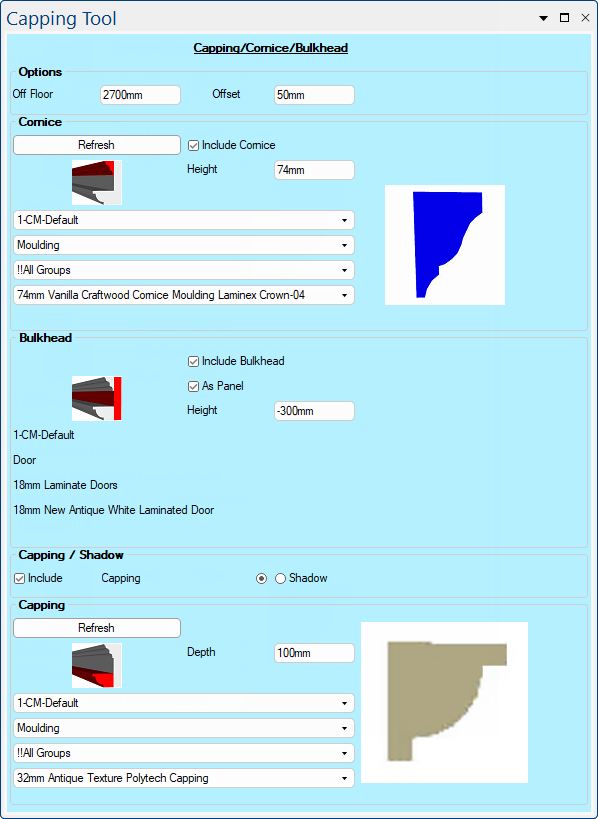

A Capping Tool V12 (shown left) and a Classic Capping/Moulding Tool (shown right) which has a clean and easy to use interface.

The default capping tool discussed here is the Capping Tool v12 - see discussion on Tool Properties and Creating Custom Tools.
This drawing tool is located on the Insert tab and can be customised with the right click Format... option. It enables you to add capping to the top of cabinets, the floor, ceiling etc, creating a decorative finish in your choice of material.
Off Floor measurement reflects the Overall Kitchen Default Height set on the Job Setup > Job Defaults page of the Drawing Properties and the 'Reset' button will overwrite any changes made here. The Offset is from the point of where the attachment is and can be changed, thereby overriding the default.
Cabinet Top : Top of Cabinets sits around the top of the wall cabinets.
Wall Top : Top of Wall positions is at the top edge of the walls.
Floor will put it along the edge of the floor.
Custom allows you to set the vertical positioning of the moulding manually.
It is recommended that the floor-level mouldings should be added to a material group named 'Skirtingboard'.
See tutorial on how to create a new Group in the Materials Manager
The Cornice (or Crown) is the moulding piece and is usually made out of a flat piece of material and then the profile is cut according to the selection. The drop lists allow you to select the material, size and style. The style selected is displayed in the diagram, as per the following examples.
The diagram shows the cornice, bulkhead, cap, backing and shadow in relation to the cabinet.
The bulkhead is the piece behind the Cornice and, if included, can be made of Panel/Door material. This can be set to any height.
The Capping radio button allows capping to be added to the cornice/bulkhead configuration. It is a moulding piece that would can go just above the cabinet. If included, drop lists allows you to select the profile, size and material.
The Shadow radio button allows for an alternative. As shown above, it is possible to have a shadow line effect by putting a piece below the bulkhead, that is 'set in' the distance of the bulkhead to form the shadow. The material used can be set as Panel/Door.
If the Shadow is included, then you have a Backing piece that is behind the bulkhead and above the shadow to have something to fasten everything to. The material to be set to as Carcass/Panel. (Click on image to view additional Backing options.)
Each material is classified with a Type (e.g. Moulding) and a Group (e.g. Craftwood Capping). The Materials drop list is populated by filtering the available materials from the chosen DataSource  by 'Type' and 'Group'.
The Group called '!!All Groups' does not actually exist but is a wildcard that ignores the actual Group and extracts all the materials based only on the Type.
The default materials can be set on the Materials-Advanced > Bulkhead page of the Drawing Properties. (See discussion on Materials-Advanced  category).
The default options to Include and set height/depth are located on the Materials-Advanced > General Options page  under the heading Capping/Cornice/Bulkhead.
Materials can be set to the Panel/Carcass material defaults set in the Drawing Properties or you override the defaults by unchecking these options and using the drop lists to select required material. To ensure that your changes are immediately made available to your current job, click on the Refresh button especially if you have updated the Materials Manager  which can be accessed by clicking on the Edit button.