CabMasterPro User Guide
CabMasterPro has two distinct environments i.e. Paper Space and Model Space. To understand the difference between these two environments, you simply need to understand what you can place in each environment and how that affects the drawing.
Model Space:
This environment is for real world 3D entities, such as cabinets and walls, which can therefore be displayed in 3D views.
Paper Space:
This environment is strictly for the placement of 2D entities. These are for annotations and do not appear in 3D views. They consist of things like text boxes, labels, rectangles, and poly curves.
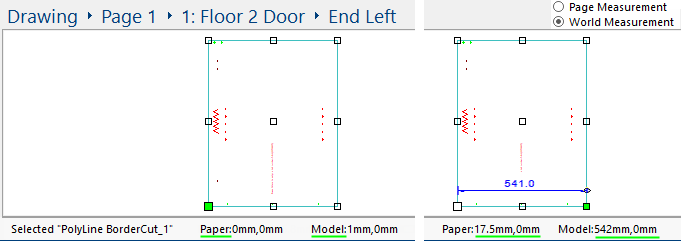
Example of Paper vs Model
The example shows the comparison of Paper and Model space with the X:Y for the bottom left point and the X:Y for the bottom right point of a cabinet part.
The size of the printed output controls the page size, therefore it is beneficial to have your default printing options set correctly prior to commencing a CabMasterPro drawing session.
This may not always be possible, however. For example, if you have several output devices and may possibly wish to print to one or the other for various reasons. In this case, you should get into the habit of using the File menu > Print Setup option before beginning the drawing.
By default, CabMasterPro will automatically select Landscape orientation. If required, this can be changed to Portrait orientation via Print Setup.
Scale is simply a fraction that can be entered by selecting from the File menu > Prepare > Scale (See Scale Drawing Tutorial).
Scale should be set after the page size has been determined, if not, CabMasterPro will automatically adjust the scale to keep the drawing in the same proportion. Of course, you can then simply readjust the scale as necessary, however, it is better if you have a rough idea of the plan size before you start, because although you can change the scale on the fly, it is not so easy to go and reposition all walls and cabinets afterwards. (In other words, it is better not to have this problem in the first place).
See Size Guide below and note that a scale of 1:30 means that the drawing is being viewed at 1/30th its actual real life size. If you increase the scale to 1:50 then, as the Paper Space size does not vary, you get more Model Space. Conversely, if you reduce the scale to 1:20, then less Model Space will be available.
If your page size is set to A4, then you can use the table below as a guide to ensure that the plan will fit in the first place.
| Scale | Model Space Drawing area |
|---|---|
| 1:20 | 5700mm x 3900mm (19ft x 13ft) |
| 1:30 | 8700mm x 5000mm (29ft x 20ft) |
| 1:40 | 11700mm x 8100mm (39ft x 27ft) |
The printable area of any size page will vary according to the printer that you are using. This may cause a problem because you cannot print to the extremity of any size sheet on any printer. CabMasterPro overcomes this problem by making the origin the lower left hand corner of the printable area, instead of the corner of the page.
What this means is, whatever you place in the white area of the drawing page will be printed, provided you have the printer set up correctly.
As previously mentioned, you can adjust the page size within a CabMasterPro drawing session by selecting from the File menu > Print Setup. From here you can set the required printer and printer options.
You can access this same printer setup dialog without going though CabMasterPro: