CabMasterPro User Guide
The status bar is displayed at the bottom of the CabMasterPro application window. It includes notifications which can be turned on/off using the right click menu as shown below. Above these are Page tabs.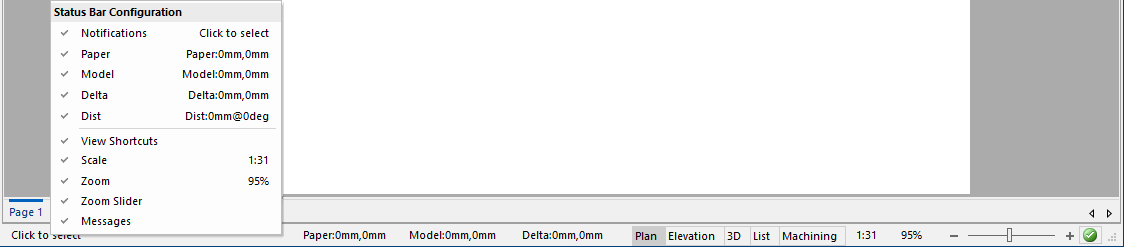
The following is a summary of available features - click on the links for full discussions.
| Indicator | Description |
|---|---|
| Notifications | Describes actions as these are performed. For example:  |
| Paper |
The position of the mouse cursor in Paper Space co-ordinates. Paper Space is strictly for the placement of 2D entities i.e. annotations such as text boxes, labels, rectangles, and poly curves and do not appear in 3D views. See File > Options where you can change Length Units to either metric or imperial. |
| Model |
The position of the mouse cursor in Model Space co-ordinates. Model Space is for real world 3D entities, such as cabinets and walls, which can therefore be displayed in 3D views. |
| Delta | Difference in X and Y of mouse cursor from last mouse click position |
| Dist | Distance and Angle of mouse cursor from last mouse click position |
| View Shortcuts |
Change the displayed view by clicking buttons (Plan, Elevation, 3D, List or Machining) in the same way as on the View tab.
|
| Scale | Displays the current scale. To change the drawing scale, click on this button to open the relevant dialog. |
| Zoom | Displays the zoom percentage. To select a preset zoom level or enter a new percentage value, click on this button to open the relevant dialog. |
| Zoom Slider | Use the slider (indicated in red |
| Messages | This is either green |
The Page tabs are located above the Notifications and each page has a name. The current page is indicated by a blue line above the tab, in this example "Page 1". Pages can be renamed or deleted. (This can also be achieved using the Breadcrumbs Bar - click on image to see example).

Click to view an example of the use of page scroll bars in Split window mode
The page scroll bars  at the far left only work when the drawing window is minimised to the extent that all the available page tabs don't fit (click on image above to see an example). This is especially useful when in Split window. When the scroll bars are available, the applicable arrows are darker e.g.
  means that you can scroll right.
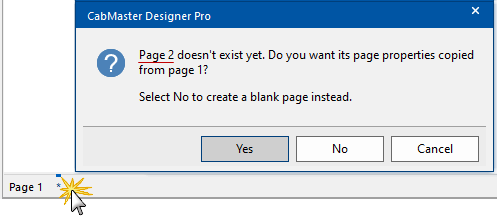
Clicking on the asterisk will allow you to create new pages. A dialog will be presented allowing you to select:-
- Yes: Copy page properties from current page to new page.
- No: Create a blank page.
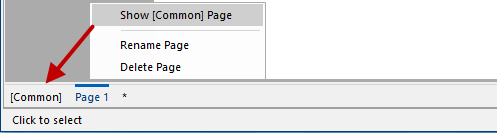
Right clicking on a page tab provides a menu selection, which allows you to "Show [Common] Page". This is useful when creating templates as objects placed on page zero appear on every page. See also Using Multiple Pages.
Each page has a name, and the middleware variable PageName evaluates to that name.
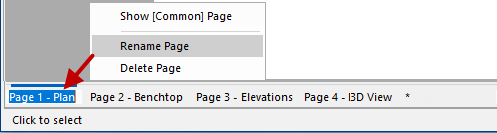
To rename, select the required page and use the right click menu to select "Rename page". Then simply type in new name.
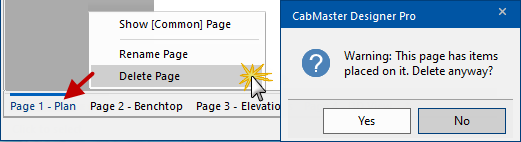
To delete, select the required page and use the right click menu to select "Delete page". A warning message will be presented to allow you to confirm if you want to continue with this command or not.
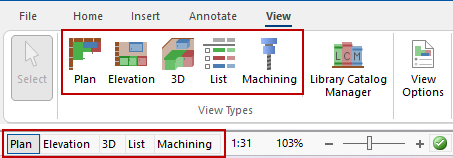
Plan changes the display mode of the active pane to a top-down plan view of the drawing.
Elevation changes the display mode of the active pane to a side-on elevation view of the drawing and only works if there is an elevation on the Plan.
3D changes the display mode of the active pane to a three-dimensional rendered view of the drawing.
List changes the display mode of the active pane to List View providing a listing of all the items currently on the drawing as well as library items which have no visual representation in the plan and items which do not represent any physical items such as freight etc, allowing pricing information to be added independent of any specific cabinet.
Machining changes the display mode of the active pane to allow selection of Machining options, integrating EzyNest directly into CabMasterPro.