CabMasterPro User Guide
You can generate a 3D View of your design at any time by clicking on the View > 3D command button or use the view shortcuts on the status bar, shown.
This changes the display mode of the active pane to a three-dimensional rendered view of the drawing and the 3D Tools on the Display tab becomes available.
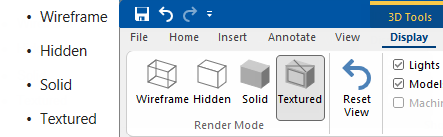
The rendering style/mode refers to the way 3D objects are drawn/generated in 3D views.
There are four Render Modes i.e. Wireframe, Hidden, Solid or Textured.
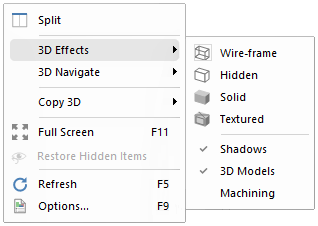
You can use the 3D Effects menu, as shown below, or the command buttons on the Display tab, shown above.


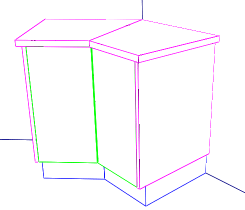
In Wireframe mode, lines are drawn representing the bounding edges of solid sections. There is no attention paid to hidden edges, which means you can see right through cabinets.
In wireframe mode you can clearly see inside the cabinet and even the wall behind it. This is the mode that you should use when first generating a 3D image or for checking that the internals of a cabinet look correct.
Wireframe is the simplest of the 3D view modes and is generated in the shortest amount of time. There are no calculations needed to determine which edges should not be visible, and no textures used. It is useful for correctly positioning an image before you create the fully smoothed and textured image because it is quick to move around.
Machining can only be seen when in 3D Wireframe view and Show Machining is enabled.
See also topic on Display > Show Machining options for full discussion.

Click to Expand

Hidden mode is almost the same as Wireframe, except with the addition of "hidden line removal". After calculating the wireframe image, it determines which lines would be hidden from the current viewpoint and removes them, giving a more meaningful and easily understood view.
You can see the difference in that the internal detail is missing along with the wall line behind the cabinet, however, surface details are still not drawn.

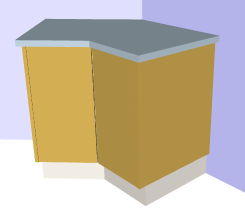
A 3D image rendered in Solid mode is more realistic than either wireframe or hidden because of the addition of coloured faces. Each surface on an object, such as a cabinet, is filled with a single flat colour.
The colour applied to each face is typically similar to the colour of the texture that would be on the face, although you can select any colour you like.
Solid mode images do not undergo a hidden line removal process, so generation times are marginally quicker than those of Hidden views. Solid views also give a good estimate of colour without actually using textures.

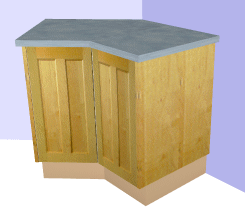
An image generated in Textured mode is almost the same as Solid except with textures added. The bitmaps are applied to the appropriate faces, giving them a very realistic look, depending on the quality of the textures.
Some cabinet sections have two bitmaps superimposed over each other. For example, if you have selected a square or curved head door style, then this style will be blended with the door surface bitmap, which in this case is a plain wood texture. See the Textures tutorial for more information on this.
Textured view takes the longest of all to generate, because each texture bitmap has to be loaded from disk, decompressed, then "painted" on each face. However, with current 3D accelerators this delay should be minimal, and once the textures are loaded moving around the 3D object is possible in real-time.
Performance Note: Many machines ship with OpenGL acceleration turned off by default and in some cases, the manufacturer will leave the standard Microsoft display driver loaded and not even load the correct driver that goes with the hardware supplied which may well support OpenGL. If you are being told that the graphics on your machine is "fast" then query the supplier and check that OpenGL support is loaded and enabled. You should be able to bring up a textured view and pan and zoom without any obvious delays in repainting.
Also, you should check in File > Options [F10] that "Full quality while moving" is checked if your hardware supports OpenGL.
To get a better view of your 3D generated image of your design, use the 3D Navigate menu or Mouse Shortcuts
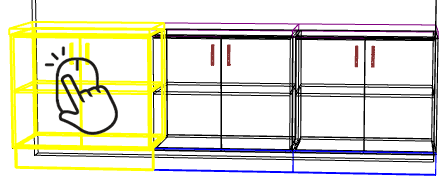
Select items in 3D View by ensuring the Select ribbon command button is enabled.
Select one cabinet/item by left clicking on it, as shown.
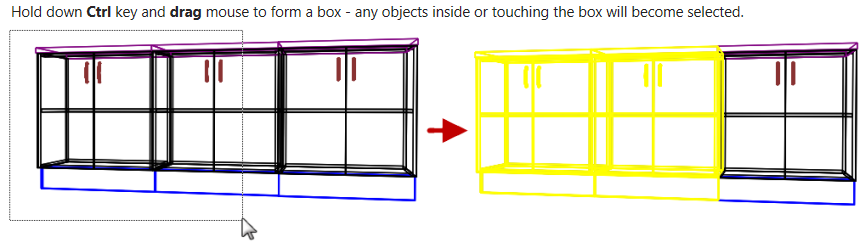
Select multiple items by ...
Any objects inside or touching the box will become selected.
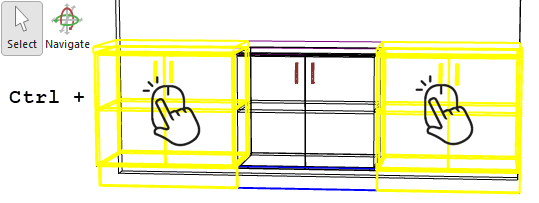
Holding down the Ctrl key while in Navigate mode will automatically change the mode to 'Select' - see Mouse Shortcuts.
Deselect single items (i.e. one by one) by holding down Ctrl while using the left mouse button.
Deselect all items in one go, simply click on a blank area of the 3D page.
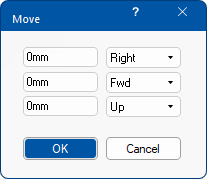
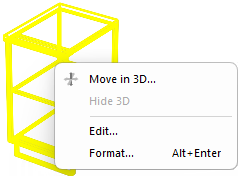
The Move 3D dialog is used to move a cabinet or group of cabinets a precise distance in 3D space.
Example of Move dialog and option available from the 3D right click menu
After you have rotated, panned and zoomed your way around a design, picked a nice rendering mode and applied any effects, you will either want to get a copy of it or print the picture - see 3D Image for Print/Email tutorial.
This command is located on the View tab. It copies the current 3D Image to the Windows clipboard, from where it can be pasted into any image or word processing application.
This command is located on the View tab. It copies the current view to 3D format (if in 3D View) or saves the current 3D view to a bitmap file, using the selected rendering mode and effects. The bitmap of the view will appear the same as it does in CabMasterPro, and can be opened up in any image editing or viewing software. You can even set the bitmap to appear as your desktop picture.