CabMasterPro User Guide
A template is simply a pre-saved drawing that can be used to base new drawings on, useful if you want to reuse a standard layout, such as...
 in the CM-Cabinet Library User Guide).
 In this tutorial we will discuss how to:-
 Watch the Video which covers all the points discussed in this tutorial.
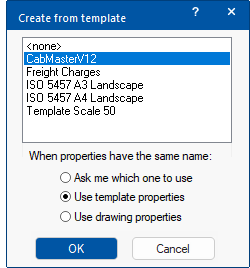
A template is typically applied when starting a new drawing using the Create from template dialog but you can apply one or more templates in a currently opened drawing i.e. from the File menu select Prepare > Apply Templates.
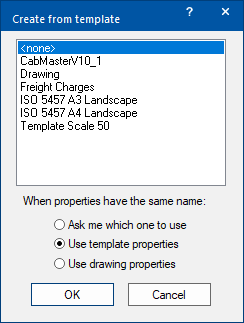
The Create from template dialog allows you to merge in a template in several ways:-
Since these templates should contain only properties relevant to their purpose, you could apply them all, in any order, without problems.
This also means you could switch between similar templates at any time because they will only overwrite a limited number of properties.
If you don't need to use a template, then it is preferable to enable Use drawing properties.
See topic on the Apply Template dialog and the tutorial on creating a template to Scale Drawing.
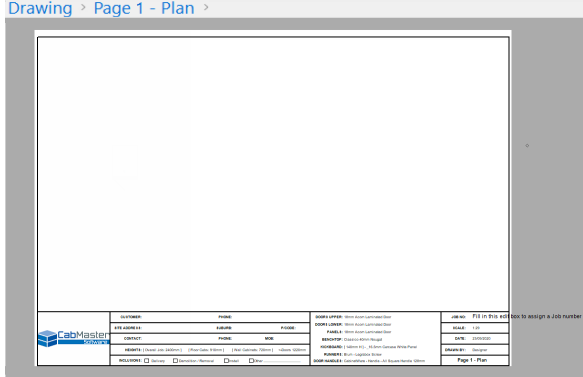
See Printer Preferences Requirement if a template supplied by CabMaster Software™ is applied and the template does not sit fully across the drawing plan page, as shown right.
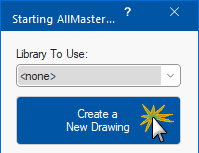
To create templates you start CabMasterPro as per normal, except without a library. You can update a current template by moving things around (see Allow Edit) or create a template from scratch. The following outlines the basic steps required.
Example
The reason for creating a template with no library is so that when you apply the template, the Drawing Properties aren't replaced with those from whichever library you were using at the time.
A template should contain the minimum amount of properties it needs to do its job.
Example
Trouble Shooting: See FAQ Saving Templates which discusses problems with...
Items such as text boxes, graphics lines, logos etc, that got added because they are part of a template, are not normally editable. This is because templates are locked down so that they do not interfere with cabinets and drawings in general and to prevent users from accidentally editing, or dragging, resizing etc a template item.
Also, formula controlled text updates as the details change, such as client and material information in the Drawing Properties. See discussion on Formula Controlled Labels below.
Plan View Options F9 - Click to Expand
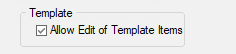
To unlock/lock, open View Options [F9] and check/uncheck the Allow Edit of Template Items, as shown.
If you apply a template to a drawing that already has one applied, and the current template contains page objects (e.g. text boxes or rectangles) you will be asked whether you wish to delete existing template items.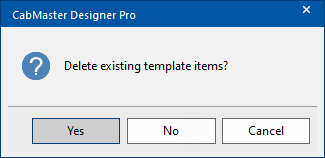
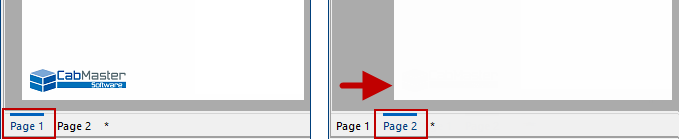
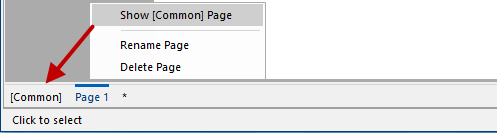
If you want the certain parts of your template, such as your logo and contact details, to appear on more than one "Page" of a drawing, then you can move these to the Common Page.
Example : A drawing with multiple pages
In this example, on Page 1 we have placed a picture of the company logo (see Insert Picture). This is not, however, reflected on Page 2.
To "Show" the Common Page right click any of the "Page" tabs and select from menu.
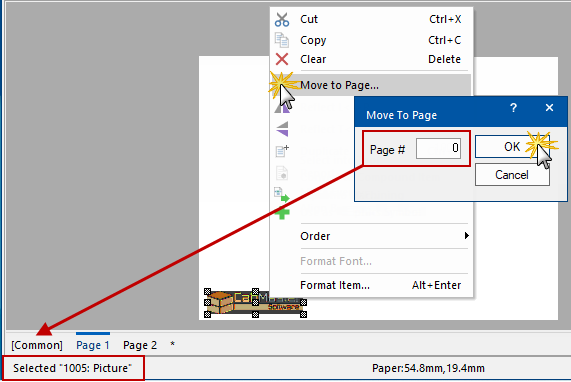
To move objects to the [Common] page:-
- Select the objects to be moved and right click to bring up the menu;
- Select "Move to Page..." option and in the presented dialog, enter in "Page #" edit box the value 0 (i.e. zero) and click OK;
- Now check each page, including the [Common] page, you will see the company logo duplicated on all pages.
Example : Move to Common page
You can set a common size/font for your template items by using the File > Prepare > Resize Labels command, then:-

You can add/change Label and text as per the following. Simply...
Example of Amending Labels
There are two ways to add variables (including formula controlled labels) to a newly created template i.e. Load existing (recommended) or Copy.
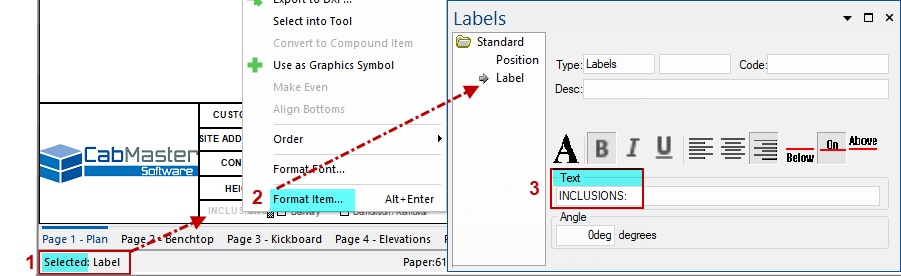
The Text box of a label can be, and frequently is, formula-controlled and these variables are denoted by being highlighted in yellow. The formula controlled text updates as the details in the Drawing Properties, for example, change.
Only Developer Software users can update these fields but they can be copied which is useful when creating new templates.
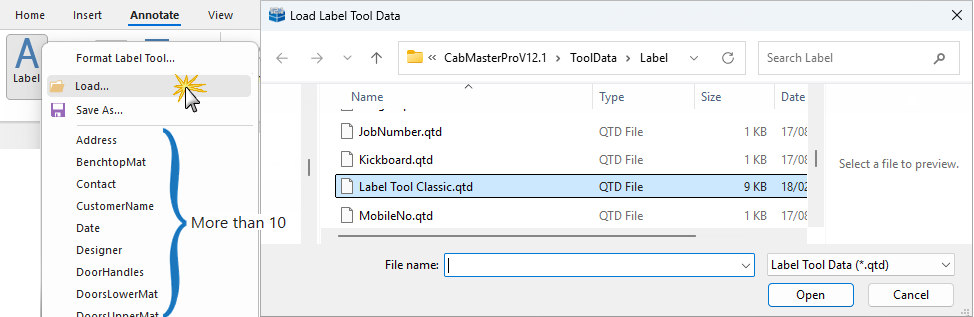
The best way to add variables, is to load supplied variables provided by CabMaster Software™ for the Annotate > Labels Tool [Label Classic V12.1]
You can also use legacy Label tool variables (used in the following video) but if you do, you will need to reload the Label Tool Classic.qtd, saved in <your CabMaster folder>/ToolData/Label folder.
The Classic Tool v12.1 also allows text to be manually entered i.e. Use Text. However, when you use the supplied variables, the Enter Text edit box is greyed out and cannot be overtyped.
You can rename the Label Tool Classic if you want it to be made available for quick selection on the drop menu e.g. !Label Tool Classic or Classic Label Tool. Remember that the list only displays up to 10 available tools (in alphabetical order), it will move the classic tool onto the list.
Another way is to copy labels from an existing template and paste these into your new template.
With your template that you are creating open...
Plan View Options F9 - Click to Expand
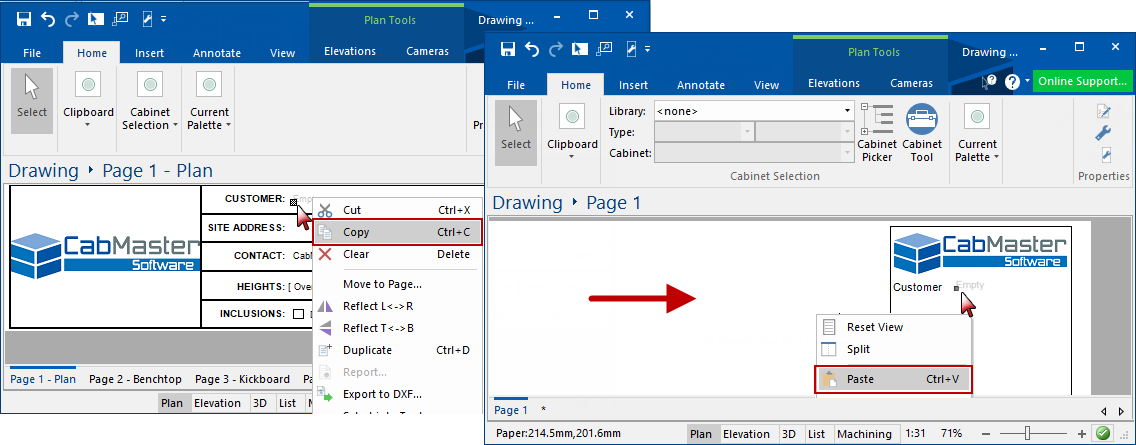
Example: Copy formula controlled text into New template
Copy the formula controlled variable (below left) and Paste into your new template (below right).
Click on image for more on Formula Controlled variables. If 'Allow Edit' is turned on, you can move/resize etc the copied variables.
Click to see more on Formula Controlled Items
After copying/loading labels you may find that the font and size are different. This is where File > Prepare > Resize Labels is useful. As you can see in the example below left, the text "Customer" is a different size and font to the variable.
After closing the "Resize Labels" dialog, all text is now displayed with the same size and font, as shown below right.

As you can see above, the label text "Customer" is not correctly lined up with it's associated variable.
There are a number of ways to move labels...

- You can simply select the text and use the arrow keys on your keyboard to move in the required direction.
- Hold down the Ctrl + arrow key to make small movements.
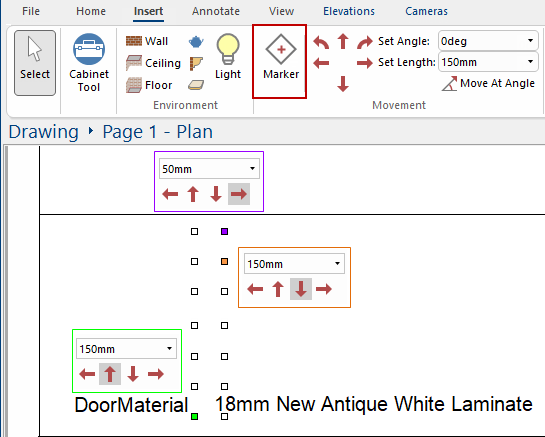
Example
First marker shown in green, continue to add markers Up until top is reached.
Then add marker right shown in purple, continue to add markers Down until bottom reached.
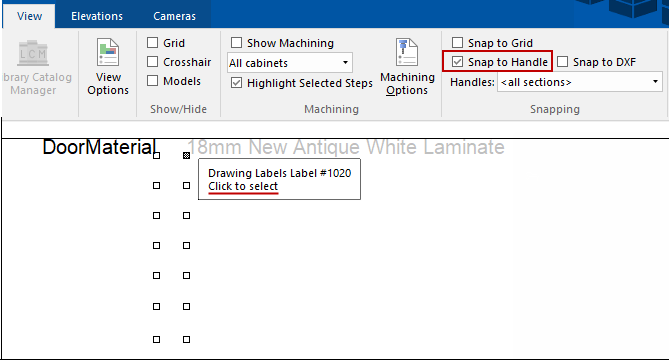
Example of Snap to Handle
This video is an indepth discussion on how to create a template in CabMasterPro. [15:28mins]
00:43 Creating a border
02:50 Adding Lines
04:32 Working with Multiple pages and Common page
07:40 Adding variables and enabling the Allow Edit of Template Items option [NB: It is now recommended to use the Label Tool Classic introduced with v12.1]
10:30 Renaming pages to Page 1 - Plan / Page 2 - Benchtop / Page 3 - Elevation and setting Visibilities [F9] for each page.
10:37 Creating an Auto Elevation for Page 3
13:30 Saving a Template
14:48 Tips