In This Topic
Snapping allows you to place objects flush up against other objects, perfectly aligned. Without snapping, it is possible to position objects so that they look flush, when in fact they may be slightly offset or have a tiny gap between them.
There are a number of snap options available. We will discuss the following...
You should always have one type of snap enabled. Which one you use depends upon what you are trying to accomplish. (There are times when it may be necessary to turn off snap completely to position a difficult cabinet, however these situations are rare).
The display of the grid is independent to operation of the snap i.e. it is possible to have Snap to Grid activated but have the actual Grid hidden.
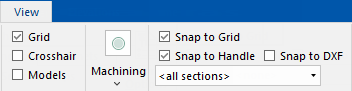
Snap to Grid is often used for positioning objects such as the start point of a wall. It ensures that the cursor will 'jump' to whole units as defined in File Options.
There are a number of ways to turn on/off the Grid and Snap to Grid options which are discussed below.
The snap distance setting is set to...
- a fixed pixel distance when Snap to Grid is turned Off.
or
- a multiple of the grid density when Snap to Grid is turned On, as shown below with a Snap Marker (diamond).
The 'Snap To Grid' feature by itself has limited usefulness because once you have started a drawing and lined it up with the grid, you want cabinets to line up with other cabinets and walls, not the grid. Therefore you may like to use this with the
Snap to Handle feature.
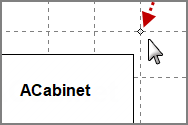
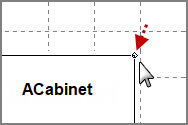
You can see which handle (or grid point) the mouse is snapping to with the snap marker (a small diamond which gets drawn near your mouse pointer). When you have any of the snapping modes enabled, you can see the snap marker (diamond) jump between handles or grid points as you move the mouse near them.
The snap marker (diamond) is useful because you can see what is going on when objects are not snapping as you would expect. It snaps to the grid regardless of whether you can see the grid or not.
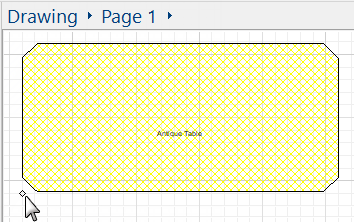
Example
These two pictures shows the snap marker move, as the mouse pointer moves diagonally down the page.
As the mouse moves closer to an item, cabinet or cabinet part, the diamond jumps to the closest handle.
Test it out and watch the snap diamonds when moving the mouse around with Snap to Grid turned ON but with the Show Grid turned OFF.
Remember the display of the grid is independent to the operation of the snap i.e. it is possible to have Snap to Grid activated but have the actual Grid hidden.
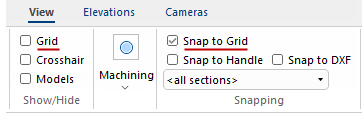
Show Grid
The Grid is just a series of lines arranged in columns and rows on the page and helps you line up objects visibly. It also allows for placement using the Snap to Grid option.
There are a number of ways to turn on/off the Grid and Snap to Grid options...
- using the Drawing Menu (Click on image below to view)
- accessed by right clicking mouse on a blank area of a drawing page.
(This menu also provides Snap options).
- using the View tab command menu
- using the check box, simply 'tick' to Show or 'untick' to Hide.
Click to view Grid On and Drawing Menu options
Using the Snap to Grid in conjunction with Snap to Handle, allows you to align objects perfectly with other objects on the page.
Once you have started a drawing and lined it up with the grid,
you want cabinets to line up with other cabinets and walls, not the grid, therefore the 'Snap To Grid' feature by itself has limited usefulness. For more on
Snap to Handle see topic on the
View command ribbon.
Snap to Handle can also be used in conjunction with the Handles to make it simpler to dimension specific items such as benchtops, tops, doors etc. Snap to Handle lets the mouse jump to these points on a cabinet, which means that any of these handles can be matched up to any other handle on existing cabinets (or objects, such as a wall). When handles snap together they join exactly, which means your cabinets will be precisely lined up.
Handles are small squares that appear on certain points of a cabinet and every other object for the purpose of snapping and also resizing. The Handles snaps all cabinets in the current drawing to give you a list of handles available. This means that when you start a new empty drawing, the will be empty but as soon as you place a cabinet, the will have a list of available sections, like those shown below.
As can be seen on the simple cabinet shown here, handles appear on each corner as well as the midpoint of each side. They become (fig.1) visible when you move your mouse over an object, and (fig.2) become filled in when you select it. Handles also makes placing Dimensions much simpler. Be sure to set it back to <none> when finished by unticking the <all sections> option, as shown below right.

Be sure to set it back to <none> when finished by unticking the <all sections> option, as shown above right.
When selecting handles, you may find it easier to use the View Options [F9] feature where Handles can be turned on/off using the Visibilities (or View Properties) page docked and readily available, rather than swapping to the View tab to use the Snapping group of commands.
Both the Visibilities and View Properties page (click on image) selections are automatically updated with changes made on the View tab, and vice versa.
![Click to compare the View commands with those on the [F9] View Properties page](tutorials/[images]/snap-handles_thumb.png)
Click to compare the View commands with those on the [F9] View Properties page
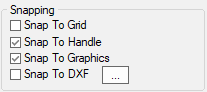
Snap to Graphics controls whether you can snap to a graphics item, like the poly discussed below, images, text, lines etc.
Ensure both the 'Snap to Handle' and 'Snap to Graphics' is turned on, as shown, on the Plan View Options [F9]
Click to Expand
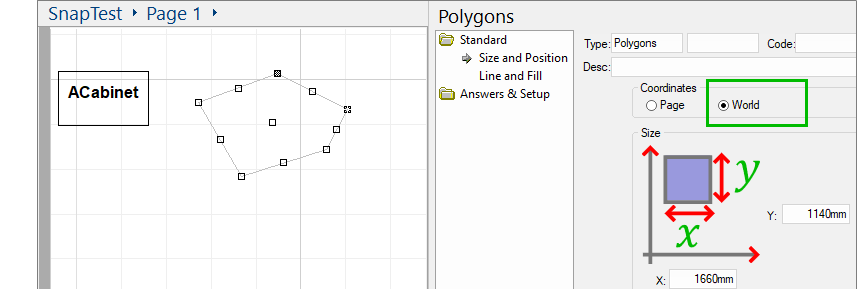
'Snap to Graphics' also allows you to make a graphics item behave as a Page Item or a World Item. Page and World items are quite different.
To explain the differences we will use a sample file which you can get here:
- Just double click this SnapTest.qid link and 'Save' zip file. Then go to your Downloads folder and Extract.
- Open and use this in conjunction with the following discussions on Page and World items.
A 'Page Item' is purely graphics and is essentially a decoration e.g. a company logo or text and borders on the drawing page. Page items do not change size when you change the drawing scale.
The Snap To Graphics setting determines whether things snap to a graphics item on the drawing or not. This only applies when the graphics item is set to Page coordinates and so is therefore purely a 'graphics item'.
If you are using the sample provided above, or your own, open the properties i.e. Format Item, for a graphics item like this poly and you will see you can change it from a 'Page' item to a 'World' item and vice versa. When you first place a graphics item, it will be set to 'Page' or 'World' based on the last usage you made of it and remembers last use of this setting.
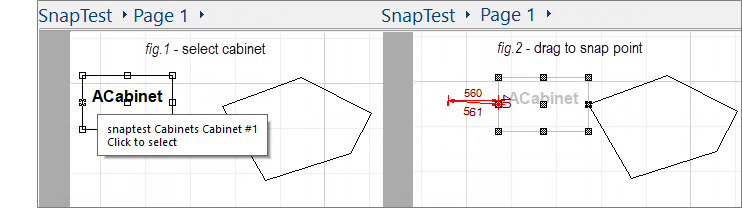
If you change it to Page coordinates then the snapping stops - it is as though the polygon is not there when you are moving the cabinet near to it. However, turn on the 'Snap to Graphics' and the cabinet again snaps to the polygon vertices.
When set to World coordinates, a 'Graphics Item' behaves like a cabinet or wall (a typical world item). It also rescales when you change drawing scale.
If you are using the sample provided above, you will see it is set to World coordinates. If you move the cabinet around, it will snap to the vertices and edges of the polygon, based on the snap distance settings.
See Also

