CabMasterPro User Guide
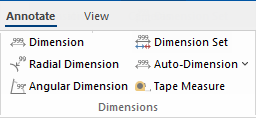
Tools used for measuring different parts of your drawing are located on the Annotate ribbon in the Dimensions group of commands. These tools offer powerful features which allow you to dimension drawings quickly and effectively.
This tutorial discusses straight line dimensioning only. Follow link for a discussion of Angular and Radial Dimensions.
 Watch a Minute with Mike which discusses how quickly and easily a combination of dimensioning tools can be incorporated.
The Keyboard Shortcut Esc returns you to the Select command and effectively ends an enabled command/tool (e.g. Dimensions Tool).
Watch the Video which discusses how to use both the v12.1 Dimensions Tool Classic and the legacy Dimensions v10 options.
The Dimension tool allows you to manually measure individual items on your drawing. There is a tool for measuring straight line items as well as radial and angular items.
A Dimension Set (DimSet) is a collection of dimension lines where each line can be measuring a different part of a drawing.
In this tutorial we will discuss how to...
Watch the Video tutorial to learn some useful tips and tricks to help clean up your designs and perfect your plans. These include:-
Watch the Video for a demonstration of quick dimensioning. The dimension tool works in a 3 click process. Turn on View > Snap To Handle and select Dimension Tool  then...
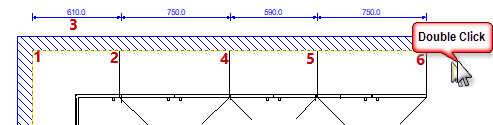
Start with the first 3 clicks, as per above, and continue clicking along the line of cabinets. To end double click.
To move a dimension (or dimension line), hold down the Ctrl (or Shift) key, then click and drag
You can move both individual dimensions and the dimension line as shown. When the dimension is selected, it will change colour.
To delete a dimension line, simply select and hit the Delete key.
If you double-click on the last point on a run of dimensions you are currently drawing, you can automatically start drawing a new dimension run.
To end, simply use the Keyboard Shortcut Esc which returns you to the Select command.
You can also click another command icon, including the 'Dimension' command icon.
You can automatically place dimensions to an entire drawing. To demonstrate how to Auto Dimension, create a new drawing and...
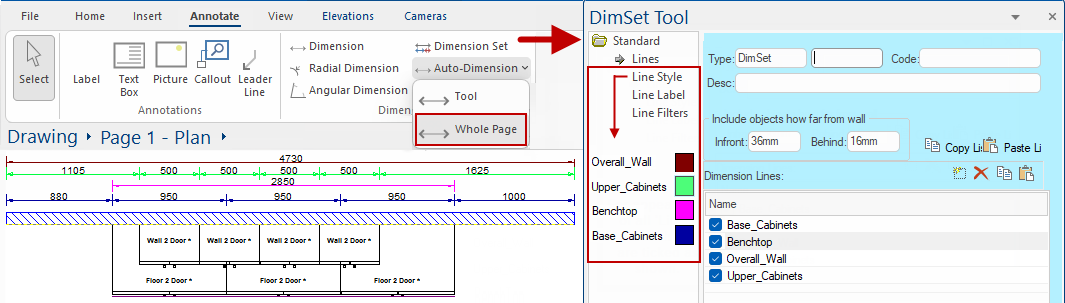
Now select Auto Dimension > Whole Page from drop menu on the Annotate tab (as per the following example).
Example of Auto Dimension
Dimension lines can be presented in different colours for each type by changing the Line Style using the DimSet. Note that the Benchtop dimension line (pink) is also aggregated i.e. total length is displayed. See DimSet > Line Style discussion.
In this example, all Dimension Lines are turned ON to display on the Lines page. If you turn off (uncheck) Overall_Wall and Benchtop dimensions, these will disappear from view.
Note that you will have to open the DimSet on the drawing. See Dimensions Format Label tutorial.
A DimSet has multiple dimension lines and each is independently configurable (font size, style, presence of stems,ticks etc). This means that you can select the DimSet of interest and customise as per your personal preference (see Dimension Format Label tutorial). The Tool is usually saved in a state where the settings are as desired, so you would not have to make this change every time you use it.
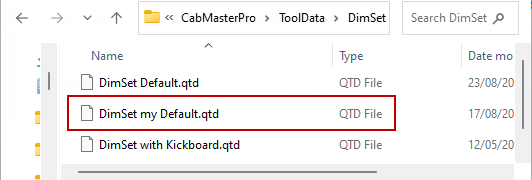
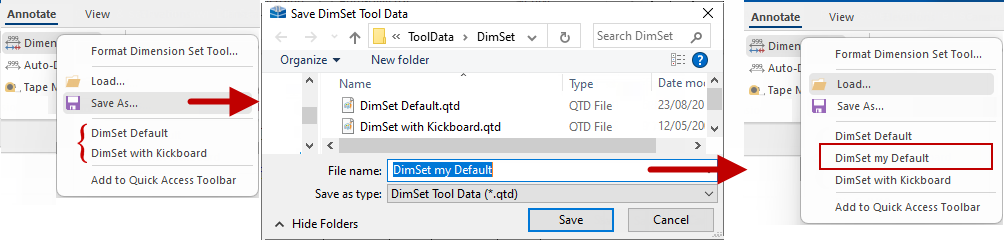
The DimSet Tool (like all Drawing Tools) and its settings are saved on exit (in the ProgramFolder). Like all other tools, saved with an extension .QTD, as shown, in the appropriate subfolder of ToolData (in this case, the DimSet subfolder) - see topic on File Locations [F10].
When you have completed customising a DimSet, right click on the Dimension Set button in the ribbon and save as a new name (like DimSet my Default). This will save a QTD file in the appropriate subfolder of ToolData (in this case, the DimSet subfolder) - see example below.
These saved configurations can be quickly reloaded, again using the right click on the tool in the ribbon, as shown below far right. If the required dimension tool is not on the displayed list, then click Load and it will look in the subfolder for that tool. This is particularly helpful for the more complex tools where there is sometimes quite a bit of tweaking possible and one might want to keep a few versions for different usage situations.
Example: Save As and Load
Use Save As... after you have created your personalised DimSet e.g. DimSet my Default (click on image). This will be added to the list of available DimSet files.
To use this DimSet at a later time, simply select from the list or use the Load command.
Click to view personalised DimSet
See discussion Annotate > Dimensions for more e.g. direction of measurement and Dimension Format Label tutorial.
Watch the Video tutorial below to learn some useful tips and tricks to help clean up your designs and perfect your plans.
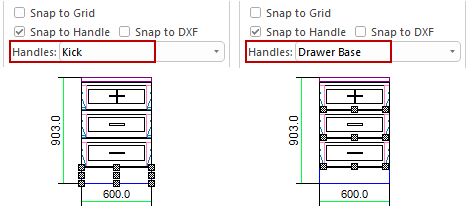
Snap To Handle can also be used in conjunction with the Handles drop list to make it simpler to dimension specific items such as benchtops etc. As you add items to your drawing, all the parts available will be added to this drop list.
It is recommended that Snap to Handle be left turned ON, because it makes accurately placing cabinets very easy. In some rare cases, when placing odd-shaped cabinets, this option may need to be temporarily disabled.
Dimensions are associative. This means dimensions attached to objects in the drawing will resize automatically when the object is changed or moved to a different location. Turning on Snap To Handle will ensure that the dimensioning command tool will know which cabinet handle they are meant to be associated with. When Handles is set to <none>, selection is to raw cabinet dimensions.
In this example, we added end panels which include a 20mm benchtop either end of the two cabinets. With <none> selected, the dimension tool only snaps to the raw cabinets (shown in blue as 1936mm).
We have then selected the specific type of item to snap to i.e. Benchtop, from the Handle Section drop menu. This made the snaps available for benchtop items i.e. dimension now displays 1936 + 20 + 20 = 1976mm. Selecting the Door item to snap to allowed just the door to be dimensioned.
Be sure to set it back to "<none>" when finished, which will revert selection to raw cabinet dimensions.

Click to view End Panel with Benchtop included
Example in Elevations
This feature can also be used in elevations, as shown in the following examples.
Here we have selected first the Kick and then Drawer Base components on a drawer cabinet.
If you want to make dimensions a little cleaner to see and easier to understand, especially around panels and items that can get a bit cluttered, you can now manually move existing dimensions anywhere you like.
Once you auto-dimension a wall, you can hold down the 'Ctrl' key and select individual text dimensions, which can then be moved to a new position of choice.
As shown in the image below, just hold down the CTRL key and then click on the dimension number you want to move and drag it to a new position.

Dimensions on the Plan - Click to Expand
Other ways to make dimensions cleaner and easier to read is to change the colour and size of label and in some cases display as aggregated e.g. the Benchtop dimension line (pink), shown above right, is has been aggregated i.e. total length is displayed. Customise the dimension on the plan or the DimSet Tool which can be Saved for future use.
A Minute with Mike : As shown right, there are a number of ways to display dimensions on your drawings, including...
This video will discuss how quickly and easily a combination of dimensioning tools can be incorporated. [1:47 mins]
This video shows you how to add dimensions quickly and easily. [1:17 mins]
In this video learn some useful tips and tricks to help clean up your designs and perfect your plans in CabMaster Software™. [7:21 mins]
Tips and tricks include:-