CabMasterPro User Guide
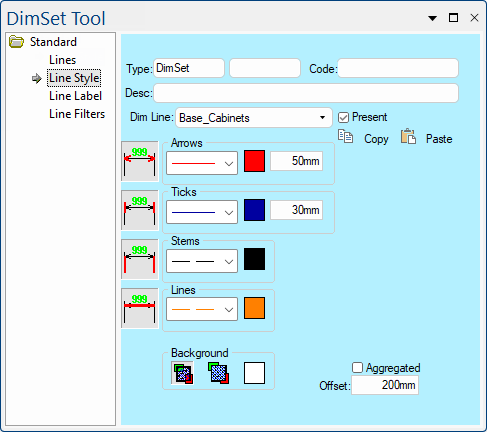
This page allows you to change the style of each Dim Line in the set with the use of a drop list.
For quick links to more information, click on  the options or page names. See also Dimension Set Tool.
Each of the drawing tools located on the Annotate tab, such as the one discussed here, can be customised with the 'Format...Tool' option.
 |
Refer Common Controls.
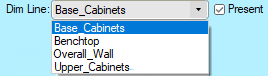
The drop down list allows you to select the dimension line in the set that you want to apply style settings i.e. each line can have different lines, arrows and colour settings applied.
The 'Present' check box automatically reflects the selection on the Lines page but you can change whether the selected Dim Line is displayed (or not) here as well.
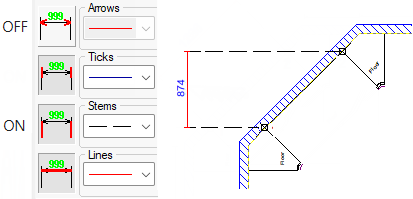
Click on the buttons to include/exclude the Arrows, Ticks, Stems and/or Lines.
The example shows Arrows turned Off and Stems etc turned On.
The Arrows box is used to specify and display arrows on the end of dimension lines. These can be turned On/Off using the Include button icon on the left.
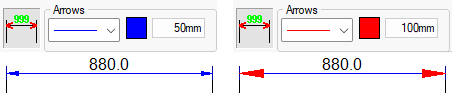
The other controls let you specify the style (drop list), colour and length of the lines. Clicking the coloured square will open a standard Color Select dialog where you can select the colour, e.g. changed to red. The edit box on the right of Arrows sets the length of the arrow heads in real-world dimensions, so a typical value may be 50mm.
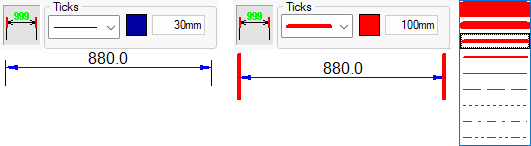
As per arrowheads, these can be turned On/Off using the Include button icon on the left. The edit box on the right of Ticks sets the length in real-world dimensions, so a typical value may be 30mm.
The example shows the length increased to 100mm and red in colour. The drop list has been used to change the width/style of the Ticks.
The Slashes (architectural style) controls let you specify the length, colour and style of the slashes and the degree of slant of the slashes drawn at each end of a dimension.
You can turn them on and off using the button icon on the left and so on.

These are the lines which extend from the ticks to the object being dimensioned, and are typically drawn with a lighter dashed line style. See example above.
These are the dimension lines themselves and can be turned On/Off using the Include button icon on the left. The line style and colour can be customised in the same way as Arrows, Ticks and Stems.
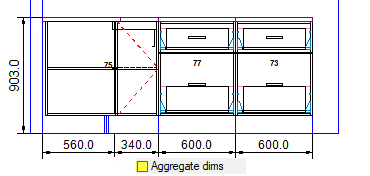
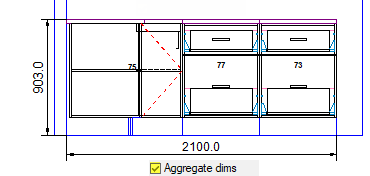
A dimension line usually shows the width of each cabinet that is measured by the dimension, but sometimes you might wish to display only the total length of the line instead.
Checking the Aggregated box means the dimension line will not be broken up into multiple measurements but will collect all the lengths into a single dimension. Any sub-dimensions which disappear when you tick the Aggregated box are only hidden, not deleted, so unticking it will show all the individual measurements again.
Example
These two images show the difference between a normal and aggregated dimension along a row of cabinets...
If offsets are set to the same value all the lines will be on top of each other, making it hard to view. Notice that the Offsets illustrated are set in increments of 100mm (the wall is included which has a depth of 100mm).
Each type is automatically set an appropriate Offset value but these can be changed manually here.

This is a compact version of the Transparency and Back Color controls from the common Line page. These controls are only available when the selected Line Style has gaps in it e.g. a crosshatch fill pattern or a dashed line, as per the example below.
When one of these patterns is used you can set the transparency option to either transparent or opaque ![]() respectively. When transparent is selected, anything behind the object shows through the gaps.
respectively. When transparent is selected, anything behind the object shows through the gaps.
With opaque, everything behind the object is obscured and the object's background colour is drawn in the gaps instead. In this example, the blue back color is visible between the red line color.