CabMasterPro User Guide
 Before selecting an object, make sure that you are turn on the Select command. Objects on the page will display their handles when you move the mouse over them (called highlighting). Handles are small squares on the corners and midpoints of objects that allow you to snap them neatly with other objects (see the tutorial on Grids and Snap). When an object is selected, its handles appear filled in.
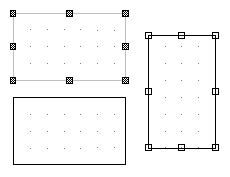
The image here shows three simple cabinets - the top one is selected, the one on the right is highlighted, and the bottom one is not selected or highlighted. See also Handles on Wall.
Once an object is highlighted (by moving the mouse over it), you can select it by clicking it once with the left mouse button. If two objects overlap at the mouse position, the one on top of the vertical order will be selected. To select the underlying object, you will need to move the selected object to the back then select again.
Multiple selection means you can select groups of objects/cabinets and perform operations on the entire group, such as moving or deleting. You can also change the order of multiple objects or create a report on just those selected cabinets.
Making multiple selections can be done in many ways, including the standard Windows methods...
If any object is partially selected (e.g. a poly cuts through half of it), then it will be entirely selected, unless the object is a wall or horizontal panel. With these, you can select and deselect end and mid points individually. This means you can grab the middle of a wall and drag that whole edge around, or drag an end point to move just that end.
See Selecting in 3D tutorial.
One of the reasons for selecting multiple objects is to be able to move them all in one go. To do this, you first have to select all the objects you want to move using any combination of the methods above. You can then click on one of the selected objects and drag it to the new location, just as you would with a single object - except in this case, everything else that is selected will move with it.
To move something accurately it is probably easier to use the Move 3D commands (see example below) or the Movement dialog. With the Movement commands, you can simply enter a distance (and angle if required) into the text boxes. Now click one of the direction buttons, or the "Move at Angle" button for a movement that is not along one of the four primary directions.
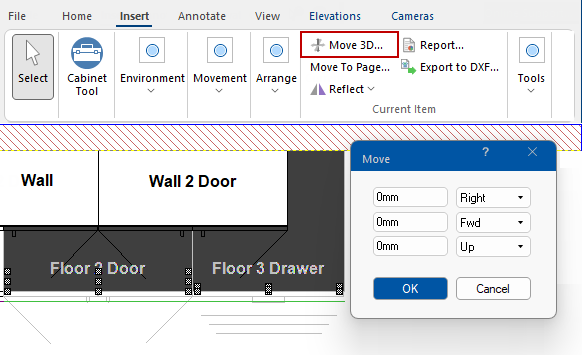
Example Move 3D dialog
These two cabinets have been selected and the Move 3D command on the Insert tab has been used.
 When the Select command is active, each object displays small squares on its edges called handles, as mentioned above. Handles are not only used for snapping (see Grids and Snap), but you can also drag handles to change the shape of an object. If a cabinet is correctly constructed, dragging its handles can resize the cabinet, and all its size-dependant formula controls will be automatically updated.
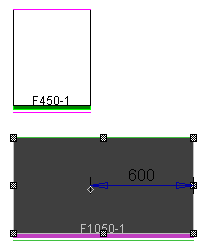
Shown here are two images of the same cabinet. The top one is how it appears when placed from the library - a standard F450-1. Below it is the same cabinet, except the handle on its right side has been dragged outwards from the centre of the cabinet to extend it. The cabinet updates itself internally to become an F1050-1, exactly as if you had changed it via its Property Inspector.
If the Property Inspector is visible while you drag-resize the cabinet, then you will actually see the page update when the cabinet width changes.
Width: Dragging to resize a cabinet like this, not only updates formulas that depend on the width, but also updates the formula that controls the width. If the width (or depth) of a cabinet is controlled by a single cabinet-level variable, then changing the width by dragging will actually change the value of that variable. Of course, the formula can't be any more complicated than a single variable, because CabMasterPro has no way of reverse-engineering your formulas and setting each variable accordingly.
Depth: You can't change the depth of a cabinet by dragging, because the depth is controlled by a global variable, not a cabinet-level one.
Once you select an object, you can...
Follow the above links to related topics for full discussions on editing .