CabMasterPro User Guide
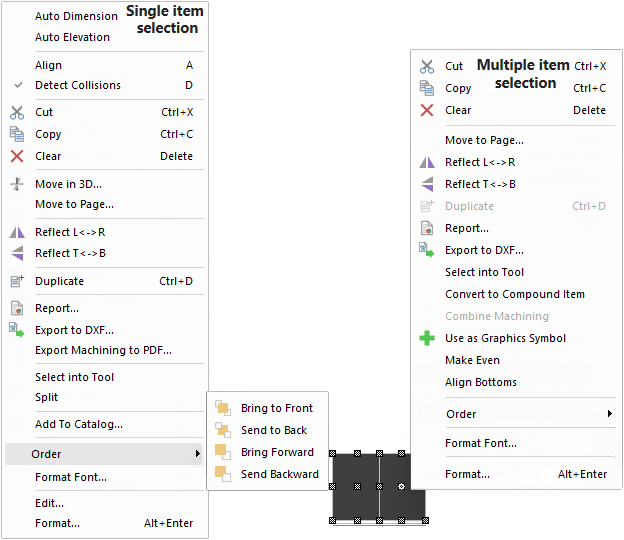
These menus are made available in Plan or Elevation view when you right click on a selected item/cabinet or multiple items/cabinets.
Options made available will be dependent on your selection criteria i.e. some may not be displayed or be greyed out.
|
|
 menu option of interest to locate the full discussion.
 Automatically places a dimension set along a specified cabinet or wall.
See Tutorials on Dimensions for full discussion.
Automatically generates an elevation of a specified cabinet or wall.
Keyboard Shortcut: A
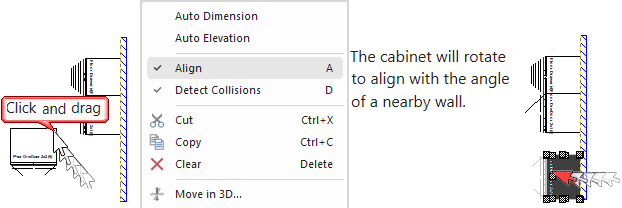
Toggles alignment On/Off.
When alignment is On, the cabinet will try to rotate to align with the angle of a nearby wall.
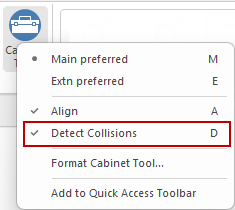
The current status of Align and Detect Collisions can be seen by right clicking on the Cabinet Tool and looking at the drop menu. See Detect Collisions for an example.
 Watch the Video for more on Align and Detect Collisions.
Keyboard Shortcut: D
Toggles Collision Detection On/Off. By default this is turned On because when detection is Off, the cabinet can overlap another cabinet.
The collision detection status of a cabinet is remembered when the drawing is saved. The current status of these settings can be seen by right clicking on the Cabinet Tool and looking at the drop menu.
Example
Keyboard Shortcut: Ctrl+X and Ctrl+C respectively.
Keyboard Shortcut: Del
Deletes the current selection.
Used to move an item or group of items a precise distance in 3D space.

This command button moves any selected cabinets and objects to a specific page of the current drawing. This command has basically the same effect as selecting the cabinets, using Cut and then Paste on the new page, except that it is faster and does not overwrite the contents of the clipboard.
If you move the objects to page zero (i.e. Common page), they will appear to not move. This is because any objects on page zero automatically appear on every other page in the drawing. Especially useful when creating templates as objects placed on page zero appear on every page. See also Using Other and Multiple Pages.
Example: If you want the certain parts of your template, such as your logo and contact details, to appear on more than one "Page" of a drawing, then you can move these to the Common Page.
Flips selected cabinets horizontally or vertically across the page. See Insert > Reflect for full discussion.
Keyboard Shortcut: Ctrl+D
Creates an exact copy i.e. (Duplicate), of any object and places it on the drawing. This is similar to using cut and paste, except that it is slightly faster and does not involve using the clipboard.
Creates a machining DXF file for a selected cabinet.
Creates a pdf report for a selected cabinet, with a page for each machine part.
Example
In this example, a corner cabinet is selected and 'Export to PDF' option used. Click Yes to Launch the PDF viewer - Click on image to PDF.
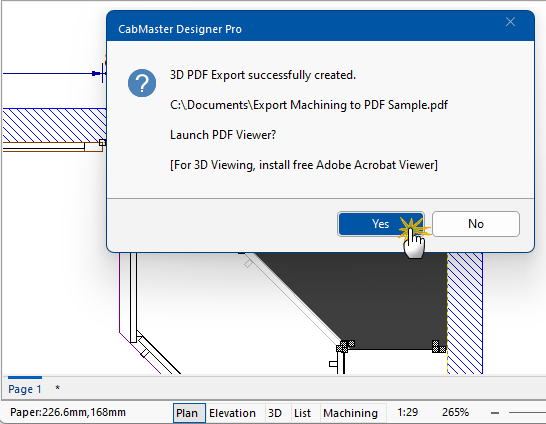
Click to view page 1 of the 10 page PDF report generated
The Select into Tool option is used when you have formatted a cabinet in the drawing and want to place another cabinet with the same characteristics. If you have placed other cabinets in between the customisation of a cabinet, the changes will be lost.
You can also copy the data, for any item in the drawing, into the drawing tool for that item. From there you can either edit and re-insert a new copy into the drawing, or add it to the library (for a cabinet), or save it as ToolData (for other tools).
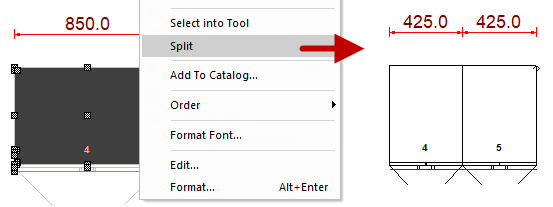
This option can be used to split a cabinet into two similar cabinets at half width. See Split and Make Even Tutorial and Video.
Example
This example show a cabinet of 850mm width is split into two (2) cabinets of 425mm each.
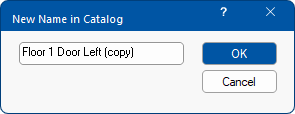
Adds selected cabinet/item to the current Catalog which will need to be renamed by using the supplied edit box, as shown.
These commands allow you to change the layering or vertical ordering of objects and can also be accessed on the Insert command ribbon.
Click on the links for full discussion on ...
Opens the following options dialog.
Allows you to select the item/cabinet and breakdown the item/cabinet into its' parts for machine view/editing.
Same as function of drop list on Breadcrumbs Bar.
Allows you to select and customise a cabinet/item (including drawing tools). Same function as double clicking on cabinet/item.
Either of these methods will open a property sheets for the object. Any changes made in the property sheets are applied to the object immediately.
See Format Cabinet for full discussion.
This menu option provides the ability to group items together into a compound item which can be moved around as one item. It can also be added to the catalog and reused.
See Compound Items.
Symbols can be created by combining drawing tools e.g. the Annotations group and/or Shapes group commands.
See Annotations Tutorial for full discussion.
This menu option provides the ability to make selected cabinets even in dimension.
See Make Even and Split Tutorial and Video.
The Align Bottoms option helps line up bottoms of a multi-selection of cabinets. It does this by using the first cabinet in the multi-selection to determine the new bottom alignment.
It is similar to the Make Even option and is available in Plan View and 3D View.
In the following examples, we have place three Wall cabinets and added 100mm to the Height of the middle cabinet, so that the bottoms are displayed lower than the first cabinet.
(Examples of both Plan and 3D views are discussed here, even though different right click menus are used).
Plan View Example
With all three cabinets selected, right click and select the Align Bottoms option.
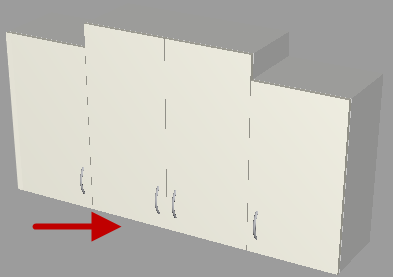
The result is that the middle cabinet has been moved up so that it is aligned with the first cabinet, as shown in the elevations.

3D View Example
The same three Wall cabinets are shown here in 3D View. Align bottoms by...
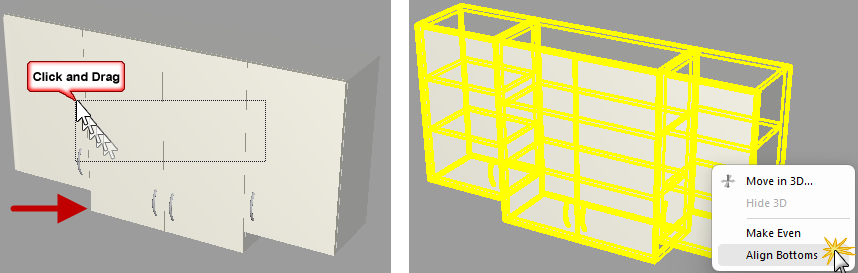
The Align Bottoms option removes formulas for the Height off floor.
It should only be used sparingly, as once the formulas are removed, cabinets will not respond in the same way you might expect if, for example, you change the height of the cabinet.