In This Topic
For quick links to more information, click on  the options or another page.
This drawing tool is located on the Annotate tab and can be customised with the right click Format... option.
Refer
Common Controls.
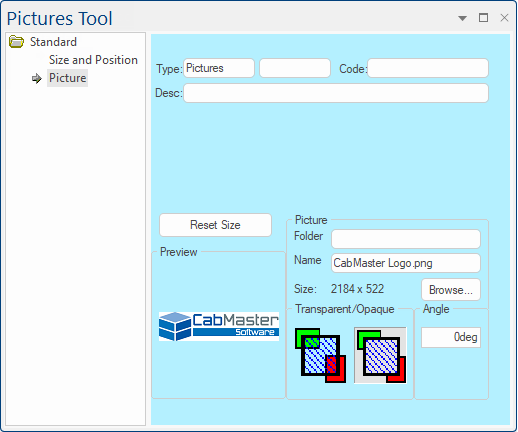
Pictures are files with extensions such as bmp, jpg, png, gif etc. You can create, view, and edit these in any raster graphics editor (e.g. Microsoft Paint which is included in a standard install of Windows).
The Picture tool can be used to place one of these images on a drawing, for example, you may place your
company logo on a drawing template. As well as regular bitmaps, the tool also supports DIB (device independent bitmap) and compressed RLE (run length encoded) images.
To insert a picture object :
- Right click on the Picture tool and select "Format Picture Tool" (or double click tool icon).
- Change to the Picture page and click the Browse button to locate the image file.
- Select "Transparent" or "Opaque" as desired.
- You may want to enable "Lock Aspect Ratio" on the Size and Position page which, when ON, keeps the width vs height ratio the same (especially useful with company logo).
- Close the Property Sheet and select the Picture tool icon.
- Click on the drawing page to place the picture (you must drag a rectangle to define its size).
- After placement, you can select and drag the picture around or resize it at any time after placement.
The transparency colour is determined from the very top left pixel of the picture, which means that wherever that colour occurs in the picture, the background will show through.
Top left pixel colour, transparent gifs not supported.
Only property supported for MF's.
See Also