CabMasterPro User Guide
To locate information about any option or another tab,  click on the area of interest.
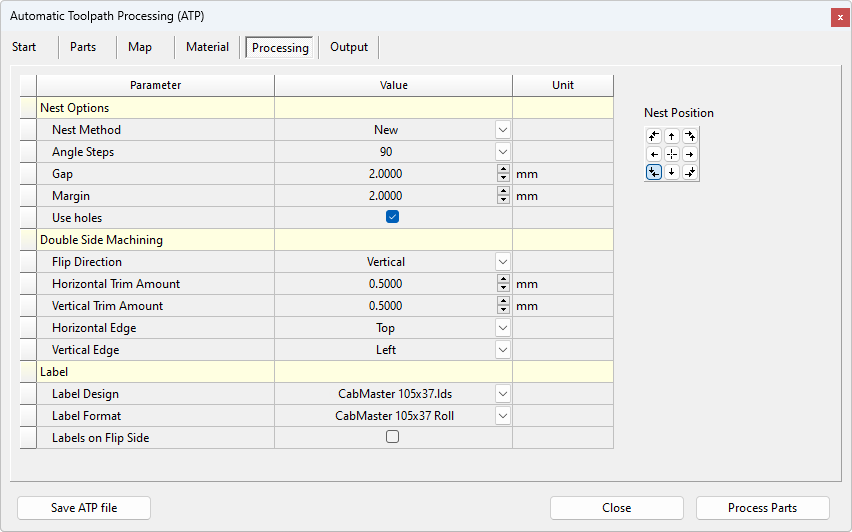
Parts are grouped together for nesting based on the associated material type for each part. The nesting options define how the parts are placed within each sheet of material.
Select one of the methods from the drop list. These are...
Standard
This is the default algorithm and has been present since EzyNest v4. This method takes into consideration the actual shape of the part while figuring out where to position each part on the nest.
New
This nesting method allows EzyNest to automatically recognize contours that are selected as nesting “obstructions” and will nest around these obstructions. This provides a very simple way to avoid clamps on the machine or to avoid a section of the material that is not good for nesting, such as knots or other defects in a solid wood panel. It also takes into consideration the actual shape of the part while figuring out where to position each part on the nest.
Legacy
This is the original nesting method that was used with older versions of EzyNest. The 'Standard' and 'New' nesting methods have since been developed for better efficiency. This method takes into consideration the actual shape of the part while figuring out where to position each part on the nest.
Block
This method is designed to be used with squares and rectangles only. Despite the shape of the part (i.e. triangle, circle, etc), the Block method determines the position of all parts on the nest by assuming that all parts are either square or rectangular.
If the 'Allow Rotate' checkbox is ticked for a part in the Parts tab, the nesting algorithm may rotate that part by the angle specified here in order to find a suitable position for it on the nested plate.
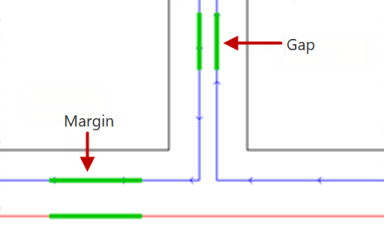
The gap is the distance that will be between the outer-most toolpaths of adjacent parts.
The margin is the distance from the edge of the plate (red line) to the centre of the toolpath of the nested part (blue line). For the purpose of calculation, the edge of the plate (red line) is the centre of the tool if there was a margin of zero.
If a part has a large cutout in the centre of it, that large cutout would normally be discarded. The Use Holes option allows smaller parts to be nested inside the centre of those larger parts’ cutouts.
This determines which edge of the plate from which the parts will start to be nested. In the example below, you can see how it would position nesting for all 8 origin points.
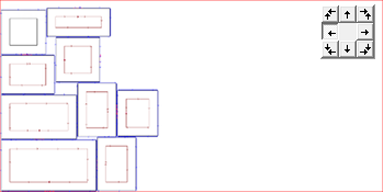
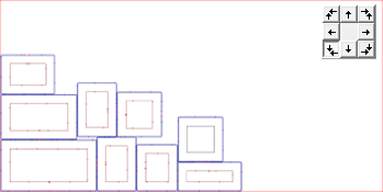
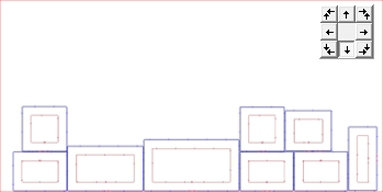
See three examples of this below: Left Middle, Bottom Left, and Bottom Middle. Using these examples, you can see how it would position nesting for all 8 origin points
Nesting from Left Middle
Nesting from Bottom Left
Nesting from Bottom Middle
The direction the material will be rotated when processing 2 sided geometry.
The thickness of material trimmed off the horizontal edge of the material to create an accurate registration surface for flipping the material.
The thickness of material trimmed off the vertical edge of the material to create an accurate registration surface for flipping the material.
Select the Top or Bottom horizontal edge to trim.
Select the Left or Right vertical edge to trim.
Label Design allows you to select a label design (.lds file) created by the Label Designer application.
Label Format is the required stationery created in Label Maker application.
The Labels on Flip Side checkbox allows printing on the flip side when double sided parts are processed.