CabMasterPro User Guide
 |
For quick links to more information, click on  the options or another page.
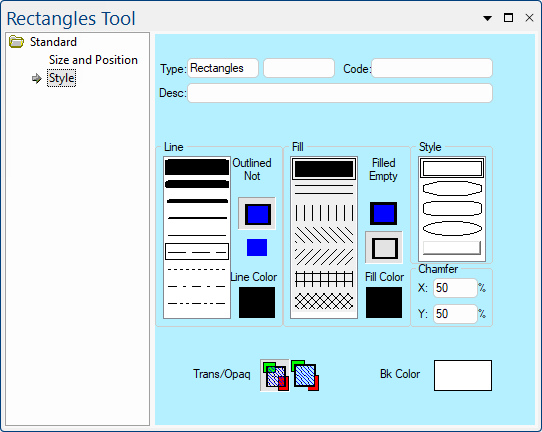
This drawing tool is located on the Annotate tab and can be customised with the right click Format... option.
This controls whether a line is drawn around the object or not. On/Off respectively.
Most objects in CabMasterPro can have the colour of their lines, background or fill changed, which is done using the standard Colour Select dialog. This dialog allows you to select a pre-defined colour by clicking the colour that you would like to use.
From the Style list you can select a shape for your rectangle or text box. Click one of the shapes to change to it, or you can formula-control the shape by clicking the Style list and using the formula box that appears. When writing a formula to control the shape, the different styles are selected by numbers of a zero-based list. This means that the value "0" will select a plain rectangle, "1" will select a chamfered rectangle, and so on.
The available styles in the list are a rectangle, a chamfered rectangle, a rounded rectangle, an oval or a shadowed rectangle. The size of the corners on the chamfered and rounded rectangle are set using the Chamfer controls.
Controlling the Fill options is very similar to setting the Line style. First select whether you actually want the object to have a fill pattern by clicking either the button with the filled box or the one with the empty box under "Filled or Empty". If you select filled then the brush style list becomes active and you can select a solid or crosshatch style by clicking the list, like you select a pen style. Finally, click the fill colour option to set the colour of the floodfill or hatch lines.
This controls whether the rectangle has a Fill or Not (i.e. empty). If the 'Filled' button is ON, as shown in image above, then the transparency options become available.
Most objects in CabMasterPro can have the colour of their lines, background or fill changed, which is done using the standard Colour Select dialog. This dialog allows you to select a pre-defined colour by clicking the colour that you would like to use.
These two edit boxes X and Y are used to control how much of the corners are cut off for the chamfered and rounded rectangle styles. Each value is a percentage between 0 and 100, where 0 is no chamfer (square corners) and 100 is maximum chamfer. If both chamfer boxes are set to 100, the chamfered rectangle appears as a diamond and the rounded rectangle as an oval.
Before you will see any effect there must be a non-zero value in both boxes. When you enter a chamfer value, the small preview shapes in the Style List also update to reflect the new values.
The transparency controls are only available when the selected Line style or Fill style (where applicable) has gaps in it e.g. a dashed line or a crosshatch fill pattern.
When one of these patterns is used you can set the transparency option to either Transparent or Opaque ![]() respectively. When transparent is selected, anything behind the object shows through the gaps. Otherwise, with opaque, everything behind the object is obscured and the object's background colour is drawn in the gaps instead.
respectively. When transparent is selected, anything behind the object shows through the gaps. Otherwise, with opaque, everything behind the object is obscured and the object's background colour is drawn in the gaps instead.
You can only set the background colour of an object when the Transparency controls are enabled and set to Opaque. Clicking the coloured preview box opens the Color Select dialog where you can pick a preset colour or define your own. The background colour is then used to fill in the gaps of the line or fill pattern, instead of drawing whatever is behind the object.