In This Topic
Splayed cabinets are those that are built with an angle on one or both ends, so as to match up with another cabinet at a different angle. They are different to corner cabinets because they are actually formed out of two separate cabinets, whereas a corner cabinet is a single cabinet with two halves - see the
Corner Cabinets tutorial.
Putting a splayed end on a cabinet does
not mean you have to join it up to another cabinet; and if you do, the two cabinets are not linked in any way. They are simply two
individual cabinets that may have angled ends that happen to match up. If you wished to make a mitred join between two cabinets, you would have to set the splay on the left side of one to be that same as the splay on the right side of the other, then place them side by side.
There are four types of splayed end available, and any combination of these can be used on one or both ends of a cabinet. This flexibility allows you to create virtually any type of join between two cabinets. They are:
- Square Ends: Not really a type of splay, this is the default for regular right-angled cabinets.
- Join To Depth: Makes the end of a cabinet angled so it will join up exactly with a square cabinet of the given depth.
- Join At Angle: Sets the angle of a cabinet end to an exact value.
- Mitred: Angles the end of a cabinet so that it will join with another cabinet of a specified depth that is mitred to the same angle.
Hints on Using Splayed Cabinets
Placement: When placing an angled cabinet, it is usually much easier to adjust the properties before you place it on the drawing page. This is because cabinets will automatically rotate to align with other objects when they are first being placed, whereas they may have to be manually rotated if they are already on the page. To do this, double click the Cabinet Tool (or right-click it and select Format) and then set it up like a normal cabinet, including its splay details. After you have finished this, you can then click on the page and place it as a normal cabinet.
Negative Values: When you enter a depth and / or angle value for a splay, you might find that it angles the opposite way to which you expected. To fix this, enter a negative depth or angle value (i.e. put a minus sign in front of it), and the end of the cabinet will angle back the other way.
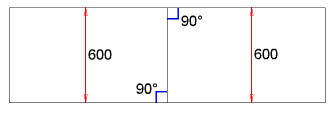
As mentioned above, this is not technically a splay but rather a lack of. It is the equivalent of turning splayed ends off, as it gives a cabinet the normal 90 degree ends. This diagram shows two right-angled cabinets joined at an angle of 180° - it should look pretty familiar.
The next two types of splays consist of one angled cabinet and one square cabinet.
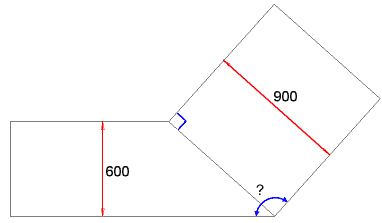
This method angles the end of a cabinet so it will match up with another cabinet of a specified depth. In the diagram here, the 600mm cabinet has been angled on the right end to join up with the deeper 900mm square-ended cabinet. As indicated by the question mark on the diagram, the actual angle of the join is unknown, but this doesn't matter. All we need is for two cabinets with different (but fixed) depths to join up.
When you select this option for either end of a cabinet, you will notice that a text box becomes active further down the Splayed Ends page. This is where you enter the depth of the other cabinet. If you enter a depth that is less than or equal to the depth of the current cabinet, you will notice that nothing happens. After all, to join up to a cabinet of the same depth we only need a right angle, and trying to join up to anything smaller is physically impossible.
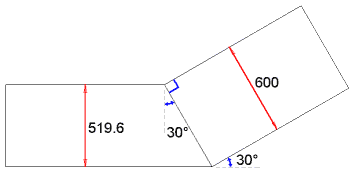
This is probably the least commonly used method for joining cabinets. It allows you to precisely set the angle of the join, but this means that unless you also set the cabinet depths accordingly, the cabinets will not match up properly. In fact the "join at angle" method may be more frequently used for joining a cabinet to an angled wall or other object.
When you select this option on the Splayed Ends tab, a text box will appear below it where you can enter the angle. The angle is relative to a normal right-angled cabinet, so a value of 10° would be slightly angled and an angle equal or above 90° would be impossible (and you will end up with some strange-looking cabinets).
In the diagram here, the cabinet on the left is the one that has been angled, and it has also had its depth adjusted so that it will align correctly with the 600mm cabinet. The required depth was calculated using trigonometry; the formula in this case being
600mm * cos(30 deg). Even if you are not familiar or comfortable with trig, you can just copy this formula into the Nominal Depth box on the Cabinet
Sizes tab. You need to change the "600mm" and "30 deg" parts to match the depth and angle of the other cabinet - in fact you can get the 30° value from one of the
Splayed Ends variables such as AnglePrev.
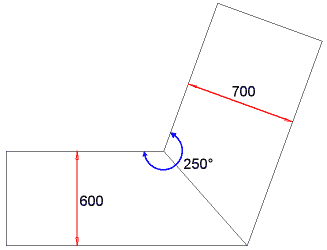
The mitred method is the only one designed to be used on both the cabinets in a join. For cabinets of equal depth, a mitred join will bisect (divide equally) the angle between them. When the cabinets are of differing depths, the angle of the ends will be adjusted accordingly.
When the mitre method is selected, both text boxes near the bottom of the page will become active. This is because you need to specify both the depth of the other cabinet as well as the angle you wish them joined at. On the other cabinet, you need to mitre the other side using the same angle and the depth of the original cabinet.
In the example diagram here, the cabinet on the left has "depth of adjacent cabinet" value set to 700mm and the one on the right is set to 600mm. Both have the "angle between cabinets" set to 250°.