CabMasterPro User Guide
CabMasterPro can calculate nearly all values in a property page using a formula. This is similar to cell-formulas in a spreadsheet.
You enter and edit formulas in the formula edit box at the top of most property pages. To edit a formula for a particular value, highlight the desired value edit box (or button); the formula for that value, if any, now appears in the formula edit box.
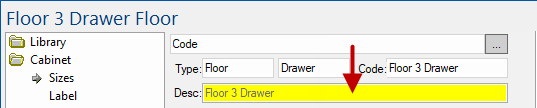
If there is no formula, then the formula edit box is empty and you can change the value as usual, or type in a new formula in the formula edit box. CabMasterPro colours the value box yellow if it already has formula assigned to it. A red filled box means the formula for that box has an error.
For example, you can use a formula for the Desc (description) field or for any of the Nominal or Standard dimension boxes (a numerical value result). As soon as you put a valid formula in for any of these fields, it will turn yellow, indicating that it is formula controlled.
Formulas can evaluate to numbers, text, dates, colours, or yes/no answers. They perform operations such as addition, multiplication, and comparison on property values; they can also combine values. Formulas can contain literal numbers and quoted text, and can include the usual arithmetic operator (e.g. +, -, * and /). They can also contain property names that refer to other properties of the same object or properties of the drawing itself. For more examples, see Colours tutorial.
Formulas are the expressions used to simplify the coordination of various events within a Cabinet. For example, you may wish that all the Carcass backs were 4mm instead of 16mm. This is easily achieved in one simple step.
When the section definitions of the various cabinets were created, they were specified with variable names instead of 'hard coded' numbers. As in the example mentioned above, the thickness of the carcass backs were specified with the formula 'Default_Carc_Back_thickness' instead of the fixed numerical equivalents 16 or 12 or 4, etc.
The importance of the above procedure, if not already implied, is that all of the many carcass backs that share this common size, can be all altered at the same time in one, quick, easy manner. These constantly used terms, called formula, must have values assigned to them, and these values are taken from within the drawing file (or library file in the case of libraries).
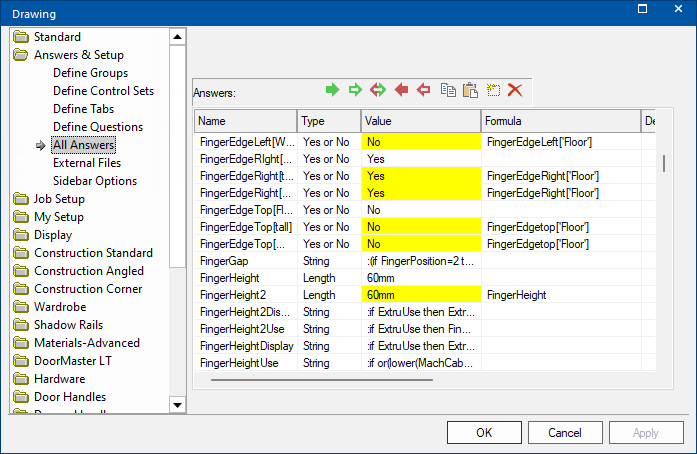
These Values are set within Answers & Setup > All Answers page of the Drawing Properties (or Library Properties) sheets - see Colours tutorial.
When you edit the Drawing properties [F4], there are several pages of information in the drawing property sheet. You can enter values in most of these pages, such as Customer, Materials, Appliances, etc., but you can only enter this data into pre defined fields on these pages; i.e. you cannot make your own custom fields. You can however create 'friendly pages' which allow you to do exactly this.
Formula can be of different "Types", Text, Number, Formula, Yes/No, Length etc. The different Formula types are selected when a formula is first created, by selecting the appropriate one from a drop list.
When you make reference to a variable that CabMasterPro does not recognise (i.e. does not have an assigned value stored for it) it prompts you for an explanation of it. The first part of this process is assigning a type as shown here.
You can, of course, change the Type and/or Value of a formula at any time. This is achieved within the Answers & Setup category of the Drawing Properties (or Library Properties) dialog boxes, in the All Answers page. The process is as follows:
Example of All Answers page
All Sections can be described using Formula, with like things being described with the same Formula name. In this way, we are able to control an entire Drawing or Library (parametrically) by modifying a few values with a dialog box. Also, we are able to use the value of any other Sections field within the cabinet. This method is extremely useful, as it doesn't rely on the direct presence of a formula in the field being referenced.
You may want to create a new formula name "carc_back_thickness" to refer to a distance. You may find that you have a "Length" option in the drop-down list, in which case you would use it.
You may initially think that the correct Type to assign this formula is Number; however, a Number is reserved for a mathematical multiplier... no UNITS necessary. The length for "carc_back_thickness" does have units, mm, m, inches, feet or whatever. It is vitally important to specify this so that the correct use of this information is achieved during Reporting. We may wish to correctly report the area of certain sections in square mm, square m, square inches and/or square feet for appropriate costing or out-sourcing of supply. One or all of these are possible as long as the appropriate units are specified.
Given the options in this drop-down list, the most appropriate Formula Type is "Length". If you have a look at this newly created formula on the All Answers page of the Drawing Properties dialog box, you will notice that the appropriate units as defined in the Options [F10] dialog box has been automatically appended.
We have already looked at a simple example of defining length using "Default_carc_back_thickness", let us now have a look at how QI surface appearances can be controlled.
All files have a Path (a location) and a Name. If we are to control the 3D Appearances of many Sections surfaces, then we have to control both Path and Name selection.
If you don't already know, the realistic colour of a sections surface is achieved by attaching a specific bitmap (simple picture file comprising a series of dots) to one or more surfaces.
The Style of a Sections surface is achieved by placing another bitmap on top of the colour bitmap in an "overlay" fashion. For formula Bar on property pages and any lists e.g. All Answers and Define Questions, CabMasterPro will automatically suggest words as you type, similar to address bar in some web browsers. The word suggestions come from the All Answers lists (drawing and cabinet levels), so this is especially useful when entering formulas.
As you type, CabMasterPro will suggest words which you may be typing to save you time. To accept the current suggestion, just press the Enter key (or right arrow key) and continue typing. To view other suggestions, pressing the Tab key will cycle between all the words that start with what you have typed. For example, when you type "door", CabMasterPro will suggest "doorbrand". As you press Tab this suggestion changes to "doorcolor", then "doorfinish", and so on.
If the word you are trying to type is not available through Auto-Complete, simply type the whole word and the suggestion will disappear. Auto-Completion will correct the capitalisation of words, so typing "doorbr" and pressing Enter might automatically change it to "DoorBrand" (assuming that was the capitalisation used on the All Answers list).
If you wish, you can disable the auto-complete feature by pressing F6. If you change your mind later, it can be re-enabled by pressing F6 again.