CabMasterPro User Guide
CabMasterPro has the ability to look up a table, such as a price table for different sizes of door. Typically, a table is provided by the supplier, and to price a door you need to look up the height and width of the door in the table. Lookup Tables (QLTs) are just like a spreadsheet, in a series of rows and columns. The difference to a normal spreadsheet file like from Excel, 1-2-3 or Quattro Pro is that QLTs are text-only files where the columns are separated by tabs.
Lookup Tables, which have a file extension of "qlt" are kept in your Table directory. When you want to reference one, you can use one of the Lookup Table functions in a formula within a cabinet or All Answers page. For example, you could have a lookup within a door component for pricing, or within the Drawing Properties to control colour availability. You can even control which table is looked up by having the table names automatically listed in a dropdown list on a Friendly Page. This technique is used frequently throughout the sample libraries.
QLTs can be used anywhere you can use a formula, which is most places in CabMasterPro. Here we give a simple example where we'll put a formula behind a text label.
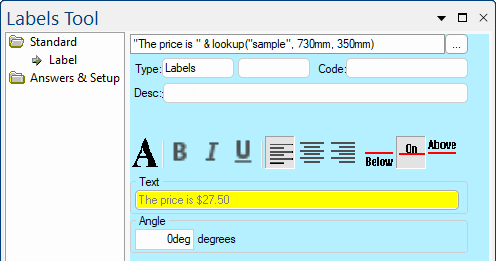
You will immediately see it evaluate to the string "The price is $27.50". This text label can now be placed on your drawing by clicking on the drawing page.
Here is what the "Sample.qlt" table contains, viewing it in Excel as a spreadsheet.
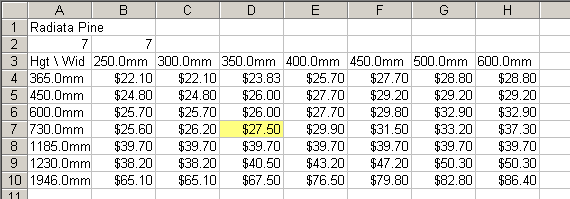
QLTs are simply text files with the columns separated by tabs, so they should open up OK in most spreadsheet programs. The first line contains a description of the contents which is ignored by CabMasterPro. The second line says how many rows and columns are in the table body - this must be correct for the table to be read properly. The remainder of the file is the body of the table itself. The first row and column of the table are the column and row labels and the top left corner is a description of the axes of the table ("Hgt \ Wid" in this example), which is also ignored. It is only to help you document how the table is set up, in this case widths appear across the columns and heights appear going down the rows.
QLTs are general tables, which means the actual meaning of the table data is up to you. You can arrange a table with heights across and widths down if you prefer. Just make sure you read the table in the same way it was written. Table data can be in imperial or metric units, or have other row and column headings that have nothing to do with lengths. The body of the table can contain any data you like - this example has monetary amounts but you can have markup factors, text strings, lengths or even formulas.
The important part of the formula above was the lookup("sample", 730mm, 350mm) on the end. This Lookup function takes the first parameter "sample" and searches for a lookup table called that in our Table folder (it automatically adds the ".qlt" to the filename). Once it has opened this, it looks for a row with a label of 730mm then scans across to the column labelled 350mm and returns the value $27.50 found in that cell.
Notice that we specified 350mm which is not exactly the same as the 350.0mm in the table - this is because they are actually compared as lengths. If they were both strings they would not match because they are not exactly the same. What this means is even if you use imperial measurements, this table would work fine even though it is laid out in metric units, because they are compared as proper lengths and not just values.
From what we know so far, this "Sample.qlt" would not appear to be very useful as a door price file, because what happens if our door has different dimensions to the available row and column labels?
If our door is a slightly wider 360mm then it would seem that the price lookup would fail because there is no width column labelled 360mm. Luckily, this is not the case. Lookup tables have a feature called next value lookup which means that if there is no exact match for a value in a lookup table, the value is rounded up to the next row or column label. In this example, the 360mm would match with the next available width which is 400mm. This works out nicely in real-life situations because doors usually come in preset sizes and to get an odd-sized door you have to get the next size up and cut it back. Functions like LookupExact are provided for when you don't wish next value lookup to be used, for example the table is not a pricing file.
Like any functions, you can use other properties as parameters instead of literals like "sample" and 730mm. For example, we could have used:
Where doortable is a string which holds the filename of the door pricing table, and dim1 and dim2 are the height and width of a component - most likely a door in this case. This is much more powerful because it automatically updates itself when the size of the door changes, and you can easily have multiple door price files for each door range. As mentioned above, this is done throughout the sample libraries, when selecting colour ranges, etc.
Since QLTs are just text files, you can view them in any text editor (like Notepad) if you want. However, since the columns are tab-separated, they may not line up correctly. It is much easier to view and edit lookup tables in a proper spreadsheet program, as long as it can import tab-separated data. You can associate QLTs with a spreadsheet such as Excel by clicking one in Explorer so that the "Open With" dialog opens. This lets you associate QLTs with an application so that whenever you click on one in future it will open in that application. Select Excel from the list (or your preferred spreadsheet) and type "Lookup Table" in the description box. Click OK to open Excel and create the file association.
When you modify a QLT in a spreadsheet application, make sure that it gets saved back as a tab-separated text file, and not the applications native format. For example, sometimes Excel will try to save it as an XLS file which will render the table useless (CabMasterPro can't read these types of files yet). Even if it warns that you may lose formatting, etc, make sure you select "yes, I want to save it as a text file".
Lookup tables can contain text strings either as row names, column names or in the table body. If you use strings in your tables and then open one of those tables in a text editor, you will notice that each string has triple quote marks on each end. For example, the string "abc" looks like """abc""". This is how CabMasterPro handles embedded quote marks, by doubling them and then adding an extra pair around the whole string.
Spreadsheet programs like Excel will usually handle this type of quoted string, so they will appear as the original "abc" when you edit them. The triple quotes will be automatically added when you save the edited file, so there is no problems editing tables with strings in Excel. The only problem arises when you edit a table by hand in a text editor and forget the extra quotes. When this happens, CabMasterPro would read our example string as abc and try to evaluate it as a variable instead of seeing it as a literal string.
It is also important to quote real strings, but to NOT quote things like yes and 123mm as these are known constants with correct typing. For example, "yes" is the string not the yes/no value... if put into another formula where a yes/no is required, CabMasterPro will have to evaluate the string to convert to a yes/no, at best inefficient and possibly leading to errors.
Lookup Tables can contain formulas, not just constants.
A formula like 1+2+3 is just evaluated to give 6.
A formula like "abc" & "def" evaluates to give "abcdef".
It is important to use the correct quoting around strings as explained in the previous section. To create a formula, you write a regular CabMasterPro formula, then replace every " with "", then place quotes around the equation.
When the formula uses variables, it cannot be evaluated at table load time, but must be deferred, as in the string "=mywidth" to evaluate mywidth. If the formula includes strings, then things get messy with the quoting conventions for table cells. It is best to use the Lookup Table Editor to handle this but even then it may not be obvious. Here are a few examples.
In the table, the first column matches directly with what you would put into the formula box in CabMasterPro, the second column shows the text with quotes fixed as it would appear in the Lookup Table Editor, and the third shows the text as it would appear if you opened the QLT in Notepad.
| Step 1: Write CabMasterPro formula. | Step 2: Make strings (double quotes and add outer quote). | Step 3: Raw text, double internal quotes. |
|---|---|---|
| 8+4 | 8+4 | 8+4 |
| =kickheight | "=kickheight" | """=kickheight""" |
| ="Pantry Door: Kick " & kickheight & ",Door " & bottomdoorheight" | "=""Pantry Door: Kick "" & kickheight & "",Door "" & bottomdoorheight" | """=""""Pantry Door: Kick """" & kickheight & """",Door """" & bottomdoorheight""" |
It is possible to write values to a lookup table from within CabMasterPro itself. This means you could have an update feature on a Friendly Page where the user could replace or add values in a table without locating the QLT file, opening it in a spreadsheet app and making the changes.
Table cells can be edited by using the Update function. You can use this function by specifying the row and column (by either name or index) and the new value to place in that cell. Any Update calls must be placed within a transaction, which is a similar process to opening, editing and saving the table.
Transactions allow you to safely make multiple changes to a Lookup Table. Sometimes when a related series of updates are to be made to a table, they either must be done all at once or not at all. To make sure that all the updates are treated as a single action, you can combine them into a transaction. In fact, to make sure that tables are always modified correctly, CabMasterPro requires that any updates be placed within a transaction, even single update commands.
The four transaction commands - BeginTrans, Update, CommitTrans and Rollback - are all used together to provide a safe and easy way to modify lookup tables from within CabMasterPro. They provide safety for multi-user setups, so that table updating problems are avoided. Instead of just simply writing a single value to a table, updates must be done with transactions, which make sure that a whole set of related updates are done at the same instant. The Begin Transaction command is used to initiate an exchange between CabMasterPro and a lookup table, Update is used to modify the table data, and Commit / RollBack save or abandon the changes.
Transactions allow users to cancel changes being saved because all updates are done in memory, on a temporary copy of the table. This also means that if you don't save the changes (using Commit), they will all be lost when the transaction is broken off.
You can have multiple transactions open at the same time, as long as they are on different lookup tables. It is also possible that multiple users can access the same lookup table simultaneously across a network.
Transactions are Action Only, which means they can only be executed from the Action field of a Friendly Page. Listed below are the four transaction commands, see the Lookup Table functions page for examples and syntax.
LookupCol/LookupRow - equivalent to ColValues/RowValues except returning an array instead of pipe-delimited string.
LookupCol("my.qlt","colname") ==> [value1,value2 ...]
LookupColMap/LookupRowMap - look up QLT rows or cols as maps, indexed by col or row id.
LookupColMap("my.qlt","colname") ==> [row1:value1,row2:value2 ...]
Calling LookupRowMap with no second parameter fetches the whole table.
LookupRowMap("my.qlt") ==> [row1:[col1:value1,col2:value2], row2:[ ... ] ... ]
LookupColLabels/LookupRowLabels - equivalent to ColLabels/RowLabels except array instead of string.
LookupColUnique - equivalent to uniq(sort(lookupcol(...))) but with better performance.
LookupColWithFilter, LookupRowMapWithFilter, LookupRowLabelsWithFilter - these accept an additional parameter as a map in the form [ col1 : value1, col2 : value2 ]
This provides a multiple-filter equivalent of the ColValuesFilterByCol2 function.
LookupColWithFilter("my.qlt","colname",["brand":"sample"])
Any lookup tables used in formulas are cached by CabMasterPro, which helps to increase performance when accessing tables. A copy of the data in a table is simply kept in memory, which is much faster to read and write than your hard drive. When CabMasterPro is finished with the table, it writes any changes done to the memory copy back to the one on disk.
Normally, table caching is a transparent feature which means that you don't have to be aware of it or worry about it. However sometimes the copy of the table on disk gets out of sync with the one in memory so your formulas may not be reading the current values. This can happen when you edit a table in an external editor while CabMasterPro is running. Another problem is when you are just viewing a table outside of CabMasterPro, because some spreadsheet programs like Excel lock the table and prevent CabMasterPro from having full access to it. Although these minor issues will be fixed in a future version, for now you can use the provided Reload function which refreshes the table in memory from the disk version. Another way to solve any lookup table problems is to close any other programs that have tables open in them, then restart CabMasterPro.
In the Sample Libraries, there used to be a number of Friendly Pages which read through a lookup table and listed all the row or column labels which met certain criteria. They were typically used to list available colours or material ranges. Looping through all the values in the table like this usually took several seconds, and caused a noticable pause when loading one of those Friendly Pages.
To eliminate this problem, several functions were added which had the same functionality but took next to no time instead of a few seconds. What they do is list all the column labels where the column contains a certain value (ColLabelsForVal), or vice-versa for rows (RowLabelsForVal). There are also two other functions which only list the column labels where the column contains a certain value in a certain row (ColLabelsForRow), or for row labels (RowLabelsForCol).
These are similar to the existing functions ColLabels and RowLabels which just list all the labels, except they have to look through every cell in the row or column to see whether to include a particular label or not. This means you can effectively get a restricted set of row or column labels which only contain values which are required.
The simplest example for these functions looks like:
ColLabelsForVal ( "sample" )which returns a list of the column labels from the table "sample.qlt" only where each column is not empty, ie the column contains a value somewhere in it. Since the empty value isn't the only thing you might need to check for, there is an extended version of the same function:ColLabelsForVal ( "sample", "Find Me", yes )This lists all the columns which contain the value "Find Me". The Yes at the end indicates that we want to find values which do equal "Find Me" - if this was No then it would find any values which do not equal "Find Me". Note that this means we will be finding columns which contain any value that is not "Find Me", not columns which do not contain "Find Me". The difference sounds subtle but is very significant. It means we would be listing all the columns except those where every value in the column is "Find Me".
The matching function RowLabelsForVal works in exactly the same way except it returns a list of rows which contain a certain value. The remaining two functions find an even more restricted set of labels, as it only matches values in a specified row or column. As with the first two, there is a basic version of the function and an extended version.
ColLabelsForRow ( "sample", "Some Row" )This will list all columns where the cell in each column and "Some Row" is not empty. The extended version lets you specify which value to search for and whether to find cells which match it or don't match it:ColLabelsForRow ( "sample", "Some Row", "Find Me", yes )As you can see these are both very similar to ColLabelsForVal, except you need to specify the row to search in as well.
This also has a matching function RowLabelsForCol which returns the rows which contain a certain value in a given column.
All of these examples will use this lookup table called "example.qlt", which is shown here:
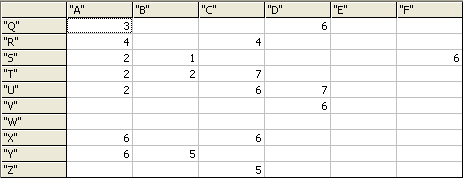
Click here to download a copy of the example QLT.
Remember, if you open in Excel, the first line contains a description of the contents which is ignored by CabMasterPro. The second line says how many rows and columns are in the table body - this must be correct for the table to be read properly. The remainder of the file is the body of the table itself.
| Formula | Result |
|---|---|
| ColLabelsForVal ("example") | "A|B|C|D|F" |
| ColLabelsForVal ("example", "4", Yes) | "A|C" |
| ColLabelsForVal ("example", "4", No) | "A|B|C|D|E|F" |
|
Note this last one returns all four columns because all of them contain a value which is not equal to "4" | |
| RowLabelsForVal ("example") | "Q|R|S|T|U|V|X|Y|Z" |
| RowLabelsForVal ("example", "6", Yes) | "Q|S|U|V|X|Y" |
| ColLabelsForRow ("example", "T") | "A|B|C" |
| ColLabelsForRow ("example", "T", "2", Yes) | "A|B" |
| ColLabelsForRow ("example", "T", "2", No) | "C|D|E|F" |
| RowLabelsForCol ("example", "C") | "R|T|U|X|Z" |
| RowLabelsForCol ("example", "C", "7", Yes) | "T" |
| RowLabelsForCol ("example", "C", "7", No) | "Q|R|S|U|V|W|X|Y|Z" |
| ColLabelsForRow2 ("example","T","R") | "A|C" |
| ColLabelsForRow2 ("example","T","2","R","4") | "A" |
| ColLabelsForRow2 ("example","T","2",no,"R","4",yes) | "C" |
| RowLabelsForCol2 ("example","A","C") | "R|T|U|X" |
| RowLabelsForCol2 ("example","A","2","C","6") | "U" |
| RowLabelsForCol2 ("example","A","2",no,"C","6",yes) | "X" |
| ColValuesFilterByCol2 ("example","A","C","6") | "2|6" |
| RowValuesFilterByRow2 ("example","T","X","6") | "2|7" |