In This Topic
For quick links to more information, click on  the controls or another category/page.
To find out the property names for these controls, see the Material page under the Formula Reference.
For more information see Textures and Applying Textures.
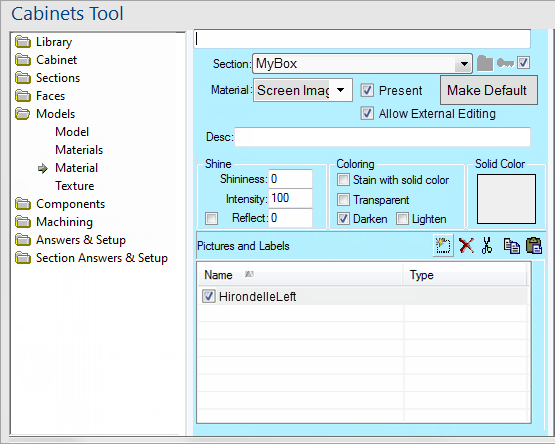
This page allows you to assign a material (with one or more textures in it) to an object and it gets painted onto all the faces of that object.
Material
Clicking on any of the materials listed on the Models > Materials page will automatically open this 'Material' page, allowing you to edit the selected material, in this example "Screen Image".
The Shine values control how sharply the surface reflects light, and gives a nice polished metal effect. A typical value for Shininess is 10.
- The Shininess of a surface determines how sharply it reflects the light in 3D views. Typical values for shininess range from zero for matte surfaces to around 20 or 30 for highly reflective faces. A medium value of around 10 usually gives the best results. The sequence of images below shows the same curved object with different shine values: 5, 10 and 30 (left to right). As the Shininess increases, you can see the reflected spot become brighter and more defined.
- The Intensity value controls the brightness of the spot so decreasing it results in a duller reflection. Values for Intensity range from zero to several thousand, but typical values lie around 100 or so. Anything higher than a few hundred tends to make objects over bright and hard to see straight on.
- Reflective properties work best on surfaces that are reflective or glossy in real life, like glass panes, metal sinks, and even polished benchtops. They are more noticeable when the viewpoint is moved around the surface, so the brightness changes dramatically. Curved surfaces show up even better. See Reflect Flag for an example and more.
The checkbox lets you say that a face is reflective. The value you enter is then a fraction in the range 0 to 1 where 1 is a perfect mirror, and numbers close to zero show the colour and texture of the face more than they show the reflection.
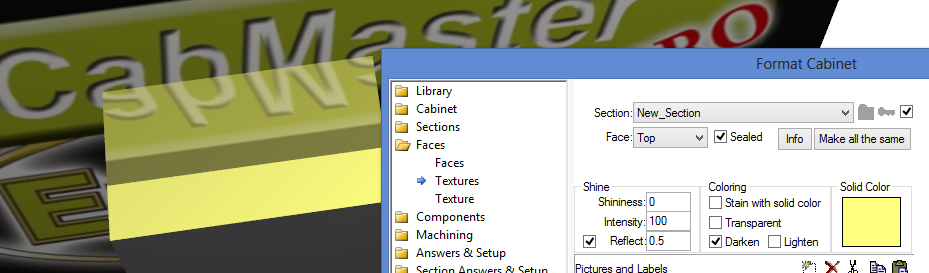
Example
Here is an example with a yellow face that is 0.5 reflective (50% of the face and 50% of the reflection showing):
With the
Coloring options you can set whether the texture appears:-
- Stained (useful for wood). Click the "Solid Color" preview to set the stain colour.
The Stain with Solid Color option takes the specified Solid Color and combines it with the texture when displayed in Textured 3D mode. This is similar to applying a stain to a real surface, so using this option with a brown or yellow colour can give several different shades of the one texture. Staining usually works better with lighter colours.
- Transparent (glass).
The Transparency flag is used to make a section see-through, like with glass cabinet fronts or microwave doors. You still need to apply a texture to a transparent section otherwise it will be invisible. The Darken and Lighten flags affect the type of transparency and how the objects behind transparent surfaces show through - try different combinations and see what the result looks like. They also set the blending mode for the Surface and Style textures.
- Darken only:
This is the default option and gives the most intuitive result. Pure white areas of the image will become completely transparent, and black stays black. Colours in between have varying levels of transparency, but the resulting image will always be the same or darker than the original texture.
- Lighten only:
Black areas are transparent, while white stays white. The brightness of the texture adds to the brightness of the image behind, so the result is never darker than the original texture.
- Darken and Lighten:
Mid-grey (all RGB values of 128) becomes completely transparent. Black stays black, white changes to almost white. The result can be darker or lighter than the original image.
The Darken and Lighten options are effective when used on door styles, as it is possible to have not only dark engraved lines, but also highlights (where the Style lightens the door texture). You can use this to simulate the reflections and shadows created by overhead lighting. The best idea is to experiment with the different combinations to discover which transparency mode best suits particular situations.
This is the colour that the face is drawn in for Solid renderings when Fast mode is enabled (see
Generating A 3D Image). When Fast mode is turned off, the solid colour of a face is determined by the average colour of the texture, if any.
Solid Color is also used as the stain colour when 'Stain with Solid Color' is enabled. Click the colour preview box to open a
Color Select dialog where you can select a colour to use on the face.
See example of the wall
texture. Each face of a 3D object can have two separate textures applied to it, a Surface and a Style. The list box lets you choose between the two and displays which one you are currently editing. It changes the Picture, Preview, and Tiling boxes so you can view or modify the properties of either texture.
The preview box shows a small version of the specified surface or style texture. It is also a good indication of whether the texture you set is valid or not. If nothing appears in the preview box it probably means that the image is not a supported format or is corrupted in some way.
These five tool buttons  are used to edit. They are in order: Add, Delete, Cut, Copy, Paste.
See Also