CabMasterPro User Guide
This is a common page for a number of Tools and works in combination with the Textures page. A texture is an image drawn onto the face of a 3D object to give it a more realistic appearance. See Tutorials on Creating Textures and Applying Textures.
For quick links to more information, click on  the options or another page.
 |

The Intensity value controls the brightness of the spot so decreasing it results in a duller reflection. Values for Intensity range from zero to several thousand, but typical values lie around 100 or so. Anything higher than a few hundred tends to make objects over bright and hard to see straight on.
Reflective properties work best on surfaces that are reflective or glossy in real life, like glass panes, metal sinks, and even polished benchtops. They are more noticeable when the viewpoint is moved around the surface, so the brightness changes dramatically. Curved surfaces show up even better, as can be seen above.
The reflection coefficient is a number between 0 and 100. If it is greater than 0, the surface is reflective. 100 is like a mirror.
The Stain with Solid Color option takes the specified Solid Color and combines it with the texture when displayed in Textured 3D mode. This is similar to applying a stain to a real surface, so using this option with a brown or yellow colour can give several different shades of the one texture. Staining usually works better with lighter colours.
The Transparency flag is used to make a section see-through, like with glass cabinet fronts or microwave doors. You still need to apply a texture to a transparent section otherwise it will be invisible. See Applying Textures in the Textures tutorial for examples of transparency.
The Darken and Lighten flags affect the type of transparency and how the objects behind transparent surfaces show through - try different combinations and see what the result looks like. They also set the blending mode for the Surface and Style textures.
The Darken and Lighten options are effective when used on door styles, as it is possible to have not only dark engraved lines, but also highlights (where the Style lightens the door texture). You can use this to simulate the reflections and shadows created by overhead lighting. The best idea is to experiment with the different combinations to discover which transparency mode best suits particular situations.
This is the colour that the face is drawn in for Solid renderings when Fast mode is enabled (see Generating A 3D Image). When Fast mode is turned off, the solid colour of a face is determined by the average colour of the texture, if any.
Solid Color is also used as the stain colour when 'Stain with Solid Color' is enabled. Click the colour preview box to open a Color Select dialog where you can select a colour to use on the face.
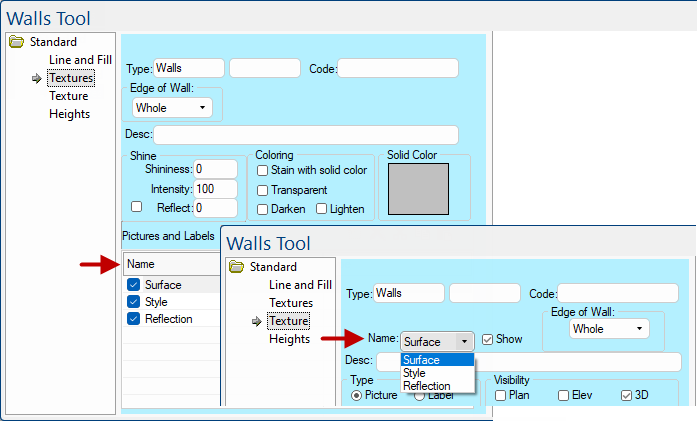
This example of the wall textures will help to understand the following discussion.
Each 'Picture and Label' is control by an individual 'Texture', as shown bottom RH corner of image below. Refer also to Texture.
Example
Each face of a 3D object can have two separate textures applied to it, a Surface and a Style. The list box lets you choose between the two and displays which one you are currently editing. It changes the Picture, Preview, and Tiling boxes so you can view or modify the properties of either texture.
The preview box shows a small version of the specified surface or style texture. It is also a good indication of whether the texture you set is valid or not. If nothing appears in the preview box it probably means that the image is not a supported format or is corrupted in some way.