CabMasterPro User Guide
CabMaster Software™ allows you to print any of the pages in a drawing, including plan and 3D views. You can also print RDL reports, and even have two printers set up - a good graphics one for drawings and a fast text one for reports.
Before printing from CabMaster Software™, you must have your printer setup in Windows. If you have not done this yet, click the Start button on the taskbar then point to Settings and select Printers. Run the "Add Printer" icon to step through the wizard and consult the Windows documentation for help.
Once this is done, you can configure your printer in CabMaster Software™ if need be by using the Print Setup dialog, found on the File menu. You can also run "Report Print Setup" which opens the same dialog except it controls the secondary report printer. If you wish to use the same printer for both drawings and reports, open the File Options dialog and check "Reports to use default printer".
Previewing a drawing allows you to see how a drawing will look before you actually print it.
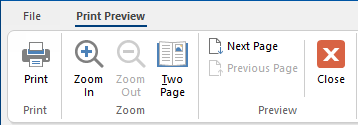
When you select from the File menu > Print Preview (or click its icon on the toolbar), another window will open with a picture of the page, and this toolbar at the top...
Click to view File > Print menu selections
The Print button is the same as selecting File > Print, which is discussed below.
Zoom In / Zoom Out magnify and shrink the preview respectively (although they will not affect the printed size).
The Two Page button displays a double page side-by-side layout, and changes the button to "One Page" so you can change back.
Next Page and Previous Page scroll through the different pages of the drawing in order, and may be disabled depending on the number of pages.
Close [X] button exits the preview (not CabMaster) and returns to the current job/drawing.

To print one or more pages of a plan view, select from the File menu > Print Preview (or click its icon on the toolbar). Either way will open the Print dialog, where you can select which printer to use, set the range of pages to print and other options. Click OK on that Print dialog to begin printing.
Printing a drawing in 3D View can be useful, especially if you require in PDF format to email to another department/customer - see 3D Image for Print/Email tutorial.
You must first generate reports by selecting from the File menu > Report, then selecting the report/s that you want to create. When the report is generated, you can click the Print icon on the displayed window to send them to the printer.
If the Automation Server add-on is installed, you can send a job to the server by selecting File > Report > Automation Server instead of the usual "Print" command. Doing so will open the Automation Server dialog, where you can select which types of pages you want printed.
The Automation Server can be used for any kind of print job: drawing plans, reports, or 3D views. Each CabMasterPro client which is configured to use the server can send the job to be printed and then become usable within seconds, instead of waiting the minutes that complex reports can sometimes take to generate.
If the Automation Server command is disabled on the File > Report menu then you do not have the client set up to use the Automation Server correctly. If you are interested in setting up the Automation Server please ask us for more information.
Automation Server is not limited to reports, see the discussion on Automation Server dialog for more details.