CabMasterPro User Guide
For quick links to more information, click on  the controls or another category/page.
To find out the property names for these controls, see the Sections Size and Pos page under the Formula Reference.
These three tabs change between the three axes of a section - Width, Depth, Height.
The controls are the same on each little sub-page but the option names change to make sense for that axis, e.g. "From the left" might change to "Forward from back". When you change the which face the section is in.
For example, if you change a section to be in the left face, the "Width" tab changes to "W (B->F)" to indicate that the width of this section is now measured between the front and back of the cabinet. This is because sections in faces always points outwards from the centre of the cabinet. Similarly, the "Depth" tab changes to "D (L->R)" because the depth of the section is in the direction of the cabinet's left-right axis.
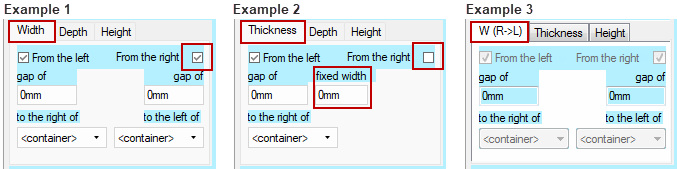
The names of the tabs also depend to a lesser extent on the values of the dimensions themselves. Normally the depth of a section is just called "Depth" but below a certain depth it becomes "Thickness". If either of the dimensions is much larger than both the others then its label will change to "Length". Although the names might seem to change a lot, they should always be intuitive and let you know which direction it is actually talking about.
The sizing method of a cabinet is determined by two checkboxes with opposite names like "From the left" and "From the right". Depending on the sub-page you are viewing, these names may change (e.g. "From bottom up" / "From top down"). We will use the Depth sub-page throughout this example, but the exact same principle applies to all three tabs.

When both of these checkboxes are ticked, the two "gap of" boxes become visible and the "fixed depth" box disappears (see above example images 1 and 2). This means that the depth of the section is now relative to the depth of its container. If the value in both gap boxes is zero, then the section has the exact same depth as its container. When we enter a gap it recesses the section inwards from the front or back faces, so that we can position the section anywhere within its container. Entering a negative distance will cause a "negative recess", i.e. an overhang. So with this method, no matter how we resize the container, the sections back and front faces will stay the same distance from its containers.
In other situations, we may want the depth of a section to be fixed no matter how much its container gets resized. For example, if we make a cabinet narrower we do not want its back panel to suddenly become thinner - the material is always a fixed depth. So in this case we would untick the "Backward from front" box because we want the back panel to start from the back face and come forward a fixed depth.
When one of the boxes is unchecked, the "gap of" box on that side disappears and the "fixed depth" box becomes visible instead (see example 2 image above). We can now enter the depth (thickness) of the panel, and optionally enter a gap to recess from the back face. Note that entering a gap does not make the back panel thinner, the depth stays fixed regardless of the gap.
Using just these two checkboxes, we can position a section anywhere within a container and control its behaviour when the container is resized. Since we can do this same thing for all three directions, these controls provide a very powerful means to control the exact size of a section.
These are the three text boxes mentioned above which appear depending on which sizing method you use. The "gap of" boxes are visible when the checkbox above them is ticked, otherwise the "fixed size" box is shown. Entering a negative value in the gap boxes effectively gives the section an overhang, although you can also do this on the Faces page. Each of the three boxes can be (and usually are) formula controlled.
The two drop-down lists on the bottom of the sub-pages allow you to position the section relative to another section. These lists allow you to easily and quickly place sections where you need them without complex formulas. For example, on a floor cabinet the "benchtop" section sits on the "carcass" section. Instead of trying to do this with negative gaps and several formula, we can just set the benchtop to be above the carcass by selecting it from the benchtops "above" list.
The positioning controls are also required for Angled Sides to work (see Miscellaneous).
The "Shrink when not present" flag means that when you turn a section off (by unticking its Present flag) it not only disappears but it reduces its dimensions. Any of its dimensions which used a fixed height will be set to zero so that any other sections which depend on its size can expand to fill the gap.
For example, imagine two sections which split a cabinet horizontally. One sits on the bottom of the cabinet by being set to "From bottom up" and having a certain fixed height. The other section does not have a fixed height but is set to be above the other section. If the first section is turned off, the second section will not change size because the it is still above the first section even though it is not visible. However, if the Shrink flag on the bottom section was ticked, then its fixed height would be set to zero and the top section could expand to fill the whole container.
The Include in Dims checkbox allows you to have sections which are essentially decorative and are ignored for dimensioning and collisions during placement.
The Include for Snapping checkbox allows filtering of handle section dropdowns. Currently on View tab "Handle Section" and "Visibilities" page.
This checkbox allows you to reduce the number of hsection names in the snap section combo (which is in that visibility property page).
When unchecked, this section will not appear in the list of section that can be selected as the snap section.
Even though you can place a section practically anywhere in relation to its container using gaps and overhangs, sometimes it is easier to use only the gaps you need then offset the section. The Offset Position controls allow you to shift a cabinet along any axis by any amount. Select the direction you wish to offset the cabinet and then enter the distance to move it, or leave it as zero to not move in a certain direction. Offsets are applied after gaps and overhangs, etc.
The Join Method controls how corresponding sections in a corner cabinet match up. For an detailed explanation of the available join methods and how to use them, see the Corner Cabinets tutorial.
Example
This shows, in plan view, a cabinet which has a 30 degree splay on the Left End with the BackLeft Corner chamfered (see Faces page below).
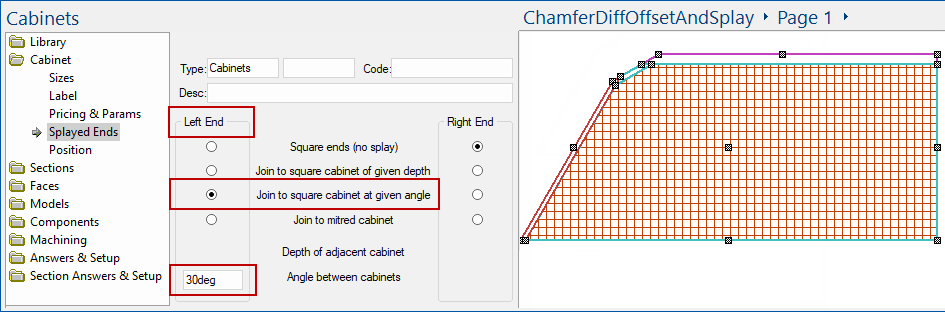
Faces > Faces page : Chamfer the BackLeft Corner
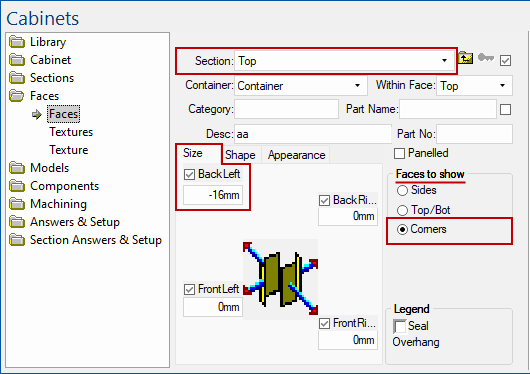
This shows the Top section with the Size tab with BackLeft ticked and the Corner (Faces to Show) radio button selected.
The “Top” section is also offset from both the back and the left – shown below.
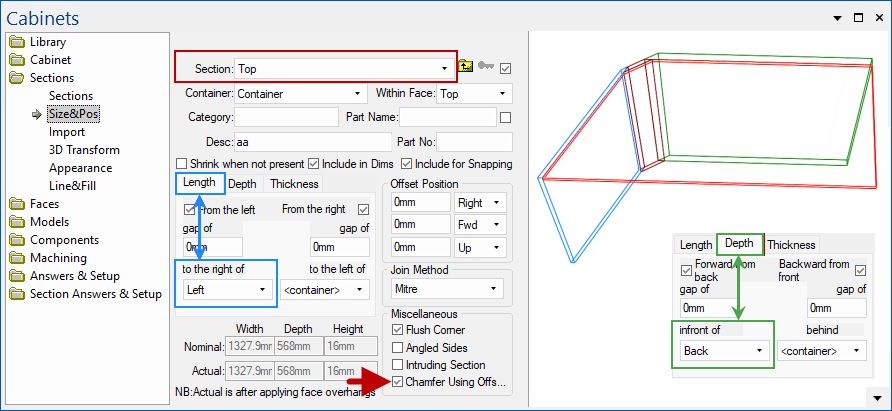
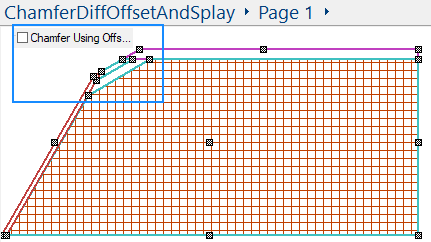
It is this offsetting of the top section that would make it difficult to calculate the corner chamfer required to make it fit correctly. If you tick the checkbox for “Chamfer Using Offsets” for the “Top” section, then this calculation is done for you, adjusting the actual corner chamfer to make it fit.
The following image shows the checkbox for “Chamfer Using Offsets” unticked. You can see that it chamfers without taking account of the extra offsets of the left and back edges of this section.
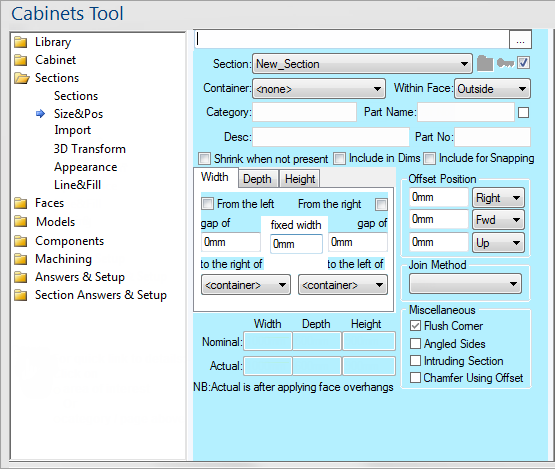
Click to view Size&Pos page
This lower section of the page shows the current dimensions of the section. These are the real sizes after applying gaps, positioning (e.g. "to the left of"), fixed sizes, etc. As the label below it says, the Actual sizes are the same as the Nominal sizes except they include overhangs on Faces whereas the nominal ones do not.
The nine _boundsXXX variables are built-in system variables that evaluate properties of the current section.
These variables evaluate by calculating the bounding 3D box for the current section, relative to the back left insertion point. You can use...
If you want to calculate the size of that box, you can use _boundssizex etc, where _boundssizex is the same as _boundsmaxx - _boundsminx
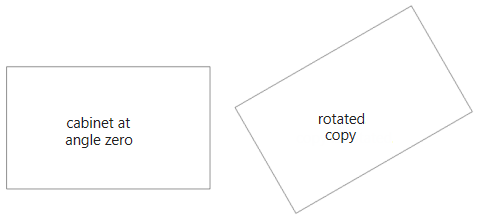
If the cabinet or section is rotated that could change these bounds, as you can see in this little example, which has the same cabinet at angle zero and then a copy is rotated.