In This Topic

For quick links to more information, click on  the controls or another category/page.
To find out the property names for these controls, see the Sections page under the Formula Reference.
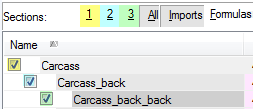
Displays all the sections in the current half of the cabinet (depending on the selected List Options). The section names are indented depending on their level of nesting, i.e. cabinets that are contained in other will appear below and slightly to the right of their containing sections. This provides a tree-like structure which makes it easy to see how sections are nested. You can sort the list by any of the columns by clicking the column headers. When you do this the tree structure disappears and all the sections appear at the same level. To get the tree view back, sort the list by Name in ascending order.
The first thing you will notice about the sections list are the bright colours used. The background colour of a cell indicates at a glance where the value in that cell comes from,
possible colour codes are:
- White:
This is a normal cell which has no formula control and you are free to edit. To edit a value, click on the text and wait a second, or hit the F2 key while the cell is highlighted (this is the standard Windows key for "Rename").
- Yellow:
A yellow background indicates that there is a formula behind the value. On other pages, clicking on a yellow control displays the formula in the text box at the top of the page for editing, but you cannot edit formulas from the Sections list directly.
- Red:
Indicates that the value is formula controlled, but that the formula has errors. This means that has problems evaluating the value of the formula... you should check this and see what the exact error message is.
- Magenta:
This indicates a value is automatically calculated. i.e. you cannot directly enter a value or a formula. Examples are the dimensions of a contained section, as calculates these from the size of the container.
- Grey:
On the Sections list, a grey background is used to indicate the level of importing. An imported section will have a light grey background, and an imported section inside that will appear darker grey. The deeper the import of a section, the darker the grey.
The text of a section name also appears the same colour as the section itself, which is set on the
Section Line and Fill page.
When you right-click on a section in the list, the
Popup Sections Menu appears, which offers many powerful features (see below). Double-clicking on a section jumps to the
Section Size and Pos page for that section.
All of these buttons control what is shown in the main sections list.
The
first four buttons control how deep into the section tree to display, with the numbers corresponding to the number of levels to show. Clicking the "1" will only display the important top-level sections,(coloured yellow on image to show level discussed here), clicking "2" will expand this to show one sub-level of sections and so on. The "All" button is used to show every section in the cabinet regardless of how deeply they are nested.

The
"Imports" button shows or hides sections which have been imported from other libraries. This can help make the list less complicated, but it may be confusing when large parts of the cabinet (e.g. the carcass) are imported.
The final button
"Formulas" displays all the formula controls behind the various fields instead of the values themselves. This can make it easy to spot formula problems without having to look through each section in a cabinet by hand.
The doubleheaded arrow  generates the export file in a temp folder, then watches for changes – when you edit and resave it, will reimport and update, displaying the change.
These four tool  buttons are used to edit the sections list. They are in order: Add, Delete, Copy, Paste.
You can use Copy and Paste to duplicate a section multiple times, an then edit them to have different offsets for example. When you Paste a section, it appears in the same container as the original except with the name "Copy of [original name]".
Clicking the Add button creates a top-level blank section called "New_Section", which you can then rename and edit like any other section. However, for complex sections it is usually easier to base it on a similar one by copying it then editing the copy. Finally, the Delete button removes the selected section from the cabinet without confirmation. If there is a corresponding section in the other half of a corner cabinet this will not automatically be deleted.

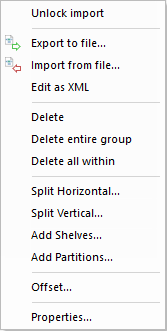
The popup sections menu appears when you right-click a section in the sections list. It offers the following options:
- Unlock - The Unlock Imports command is the same as clicking the Unlock key icon on the other Section pages.
- Export / Import - See ASCII Import and Export under Tutorials.
- Delete - The Delete command is like the delete button above the section list but it does not remove sections contained within the deleted one. This means you will receive errors when you delete a container because the child sections suddenly have no parent. To avoid this problem, use the Delete Entire Group command instead which removes the section and any sections inside it. The Delete All Within command removes all the contained sections but does not remove the selected section itself.
- Split - Using either Split Horizontal or Split Vertical, you can break a section into any number of sub-sections. You can also have a formula-controlled gap between each section. will automatically create any sections needed, so this is a very quick and convenient way to split up a section. If you need anything more complex than this, you will find it easier to use the Add Shelves / Partitions commands...
- Add - Selecting either Add Shelves or Add Partitions opens the Add Shelves Or Partitions dialog. From here you can add a number of sections with specified widths and thicknesses, and you can even import other sections into them.
- Offset - This command opens a dialog that is exactly like the Move 3D dialog, where you can quickly offset a section by any distance in any direction. The values you enter will be combined with those on the Section Size and Pos page.
- Properties - This has the same effect as double-clicking a section, and jumps to the Section Size and Pos page for that section.


 the controls or another category/page.
 generates the export file in a temp folder, then watches for changes – when you edit and resave it, CabMaster will reimport and update, displaying the change.
 buttons are used to edit the sections list. They are in order: Add, Delete, Copy, Paste.
 The popup sections menu appears when you right-click a section in the sections list. It offers the following options: