CabMasterPro User Guide
When your CabMaster Software™ application is first opened, a splash screen is presented which is a combination of...
 click on the area of interest on image above.
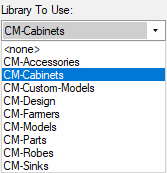
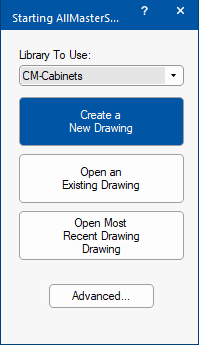
This is the library which will be initially loaded. Any new drawings created will use the Friendly Pages and cabinets from the selected library, although the current library can be changed once the program has started (see the Switching Libraries FAQ).
You will usually want a library loaded, however you can choose not to load one by selecting the "<none>" option. You will find that there are no cabinets or Friendly Pages when you start a new drawing. This is advisable when creating a new template - see the templates tutorial for more information. (Make sure you do not accidentally leave this option set to "<none>").
Clicking this will start your CabMaster Software™ application and create a new, blank drawing using the library you have selected from the "Library To Use" list. This is probably the most common way of starting the program.
This works exactly as if you had used the "Create a New Drawing" option, and then when your CabMaster Software™ application is started, selected Open from the File menu. It displays the standard Open and Save dialog from where you can locate a drawing file to open.
If you click the Advanced button, the dialog changes to show the following...
The Library to Use drop list usually only includes "top-level" or full libraries. However, when developing libraries you frequently wish to open "lower-level" or sub-libraries. In this case, you can enable the Include libraries in subfolders option which will display all available libraries in the drop list.
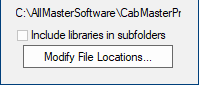
After clicking the Advanced button, the current value of the Library folder is displayed (which by default is "C:\AllMasterSoftware\CabMasterPro\Library").
Clicking the Modify File Locations... button opens the File Locations dialog, which allows you to change the place where CabMasterPro looks for libraries.
This will exit your CabMaster Software™ application completely, without loading the rest of the program.