CabMasterPro User Guide
Items displayed in 3D View can be controlled using the Visibilities [F9] or the Hide Selected/Restore Hidden commands in the Show/Hide group of commands on the Display tab.
These Show/Hide tools can be useful in cases where items are obscured. For example, you may have a U-shaped kitchen where one side of the U obscures the view and it would be useful to filter out items in the foreground.
The Visibilities page of the 3D View Options [F9] gives you greater control as you can unhide individual items, unlike the Restore Hidden command which only allows you to unhide all hidden items.
 Watch the Video : A Minute with Mike which discusses some of the new visibility options in V12.1, with a main focus on hiding cabinets in 3D view and how view filters can be set up for any camera view, which also acts as a 3D callout in plan view.
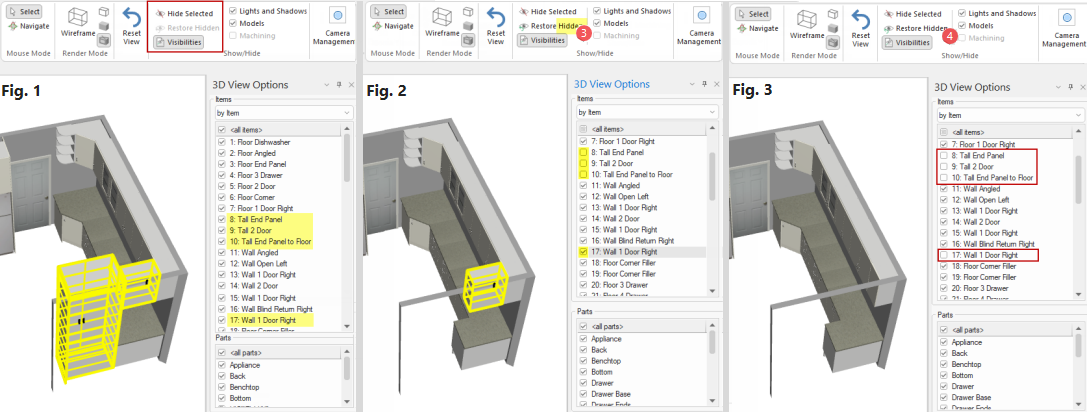
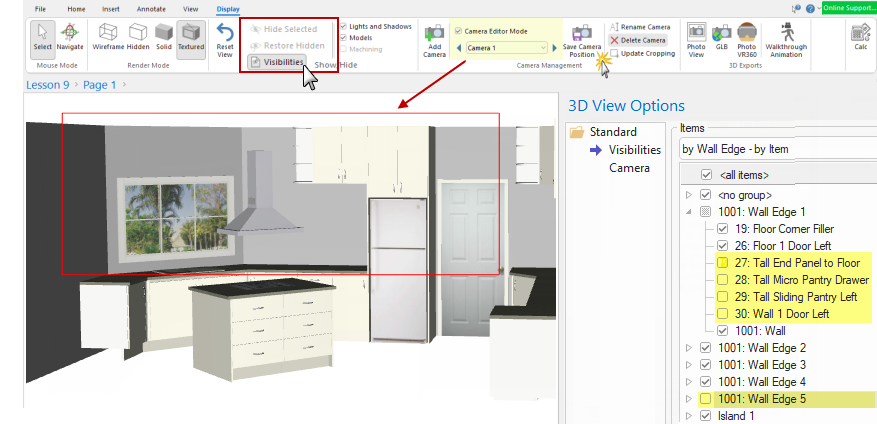
When the Visibilities command is pressed on the 3D Display ribbon, the 3D View Options filter checkbox list appears in a dockable pane (initially docked on the right as shown below).
As stated above, there are different ways of filtering using the tree control using the drop menu list i.e. by Wall Edge, by Type, by SubType and/or by Item
Example : The initial default is set to “by Item”.
The 3D View Options is docked to the right and the drop menu list is highlighted in yellow.
The filter also allows you to add/remove from selection by ticking and unticking the relevant checkboxes.
Example
Fig. 1 and Fig. 2 shows the cabinets selected that correspond with the checkboxes simply for visual aid - items do not have to be selected to be used with the filter.
The Wall is invisible from the back option in the Walls Tool Standard > Heights page for this example is turned on. It only applies to the edges (not End) and determines whether the back of the wall (i.e. when rotated) is visible or not in 3D Display. Each section (edge) of the wall can be set individually.
The Visibilities view filter is the best way to unhide selected/individual items, whereas the Restore Hidden button will restore all hidden items.

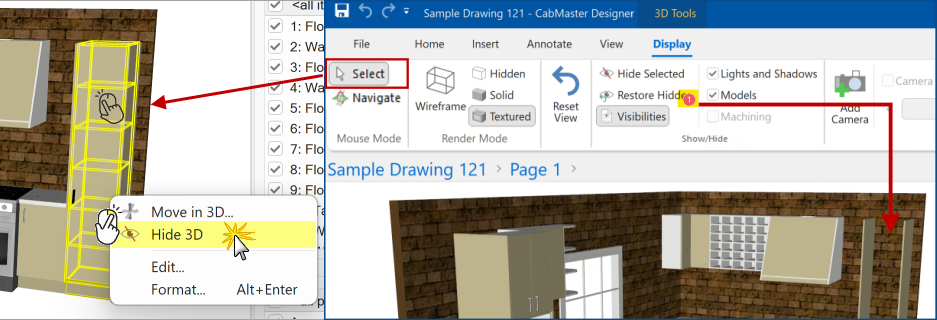
Hide
Selected cabinets/items can be hidden from view by using the...
- Hide Selected ribbon command button;
or- Hide 3D right click 3D menu option (see example below).
When items are hidden, a red tag with the number of items made invisible is provided.
Restore
To make all hidden items visible, click on either the...
- Restore Hidden ribbon command button (shown below right);
or- Restore Hidden Items 3D menu option (get this by right clicking on a blank area of the drawing page).
You cannot restore/unhide individual items using this method.
To restore/unhide individual items use the Filter Tree Controls (discussed above) on the Visibilities page of the 3D View Options [F9].
Items (cabinets, walls, models etc) can only be selected when the Mouse Mode group of commands is in Select mode (not Navigate* mode).
When Select mouse mode is enabled in Display 3D, the current selection is made visible by drawing a yellow outline in wireframe on top.
When Select is enabled, it changes to the Select tool, which allows you to...
and then use the right click menu to Hide a little collection of items in one go.
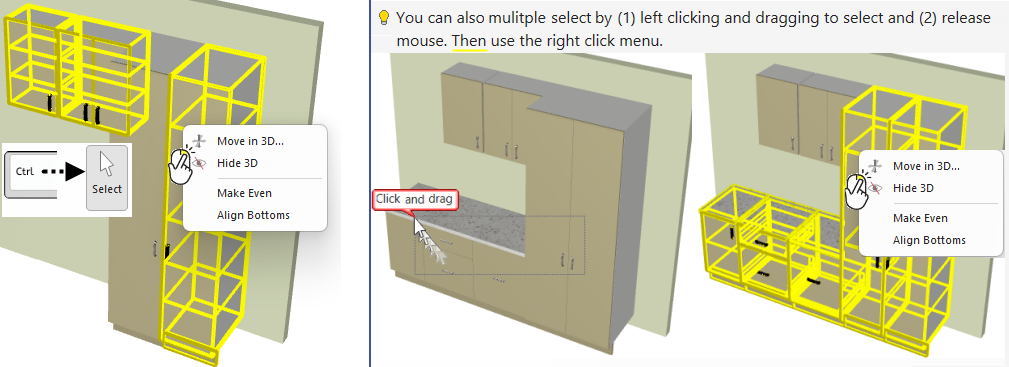
To deselect all items, simply click on a blank area of the drawing page.
If you want to deselect individual items without affecting your current selection, hold down the Ctrl key while left clicking each item/s.
View filters can also be set up for any camera view, which also acts as a 3D callout in plan view - watch the video below.
In this example, both the Camera Editor Mode and Visibilities are enabled and the 3D View moved until the red rectangle encloses the camera view required to add to our plan. However, the cabinets on Wall Edge 5 are obscuring the door.
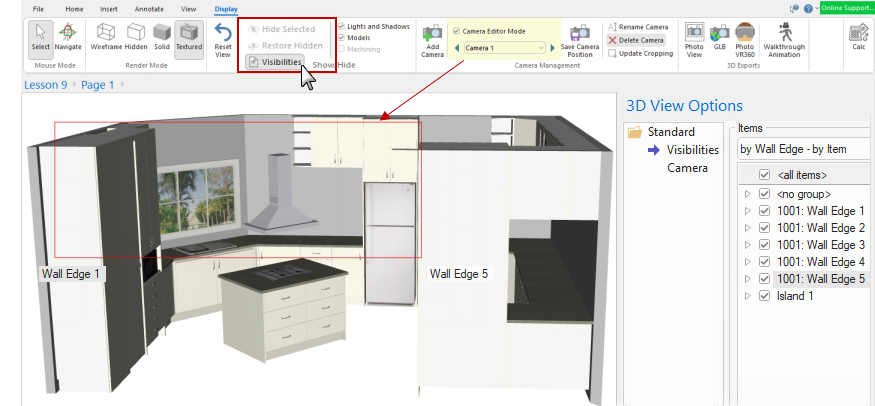
The Visibilities for Wall Edge 5 and four of the cabinets on Wall Edge 1 have been turned off to open up our camera view.
The result can be seen after we have placed the camera view item on the plan...

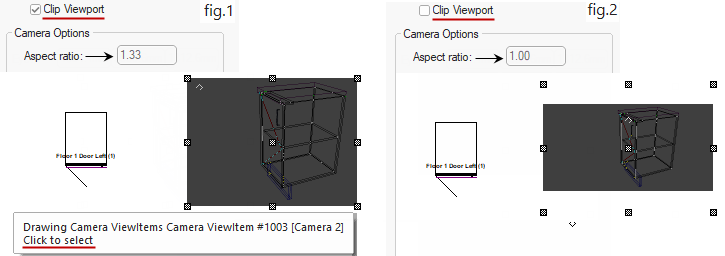
The Camera page provides mainly informational information only. The Clip Viewport can be used to change the Aspect ratio.

In the following example, a cabinet has been placed in Plan View and a Camera ViewItem placed next to it.
fig.1 shows the Clip Viewport checkbox is enabled and the Aspect Ratio is 1.33
Compare this with fig.2 where the Clip Viewport is turned off and the Aspect Ratio is reduced to 1.00
A Minute with Mike : This discusses some of the Visibility [F9] options in V12.1, with a main focus on hiding cabinets in 3D view! It also quickly discusses how view filters can be set up for any camera view, which also acts as a 3D callout in plan view. [1:20 mins]