CabMasterPro User Guide
This tutorial discusses how to change cabinet labels displayed on your Plan. This includes how to...
 Watch the video below on how to renumber cabinets placed on your drawing.
See also the tutorial on Display/Hide Cabinet ID in Elevation View.
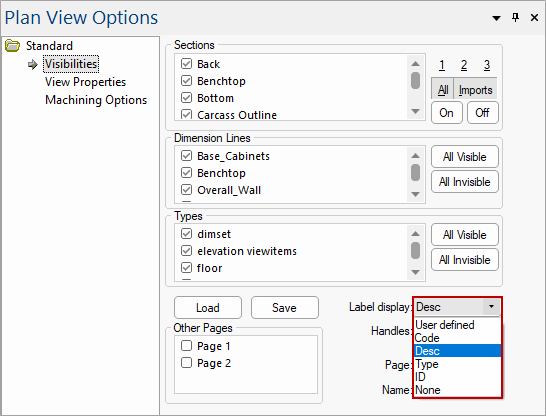
The Label display can be changed using the View Options Properties Sheet which can be accessed in a number of ways.
On the Visibilities page there is a drop list for Label display bottom right hand corner.
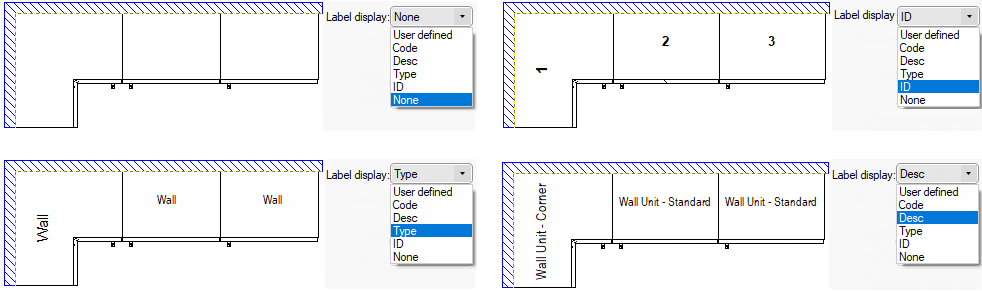
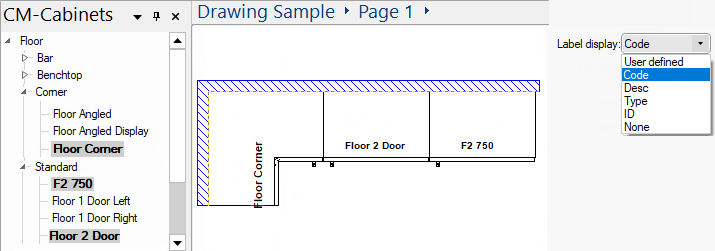
The Label Display options, starting from the end of the list, are...
Pictorial explanation of Label Display 1 to 4
Pictorial explanation of Code
User defined i.e. default cabinet name or user defined name (cabinet width included as part of the name) if defined in the Library Catalog Manager.
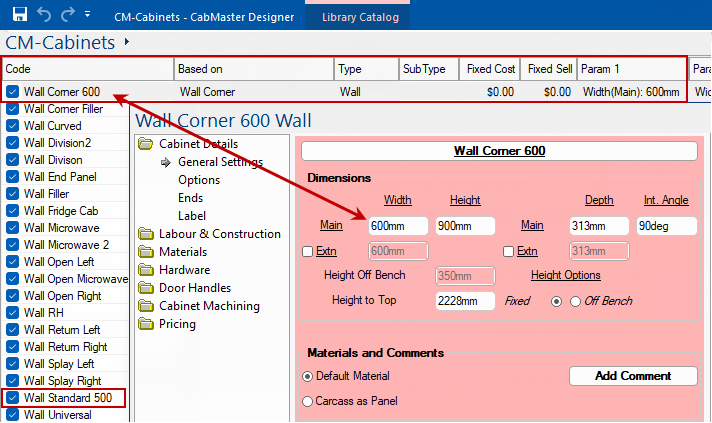
In this example below left, we place a Wall Corner cabinet (default 600mm - see LCM note below) and 2 x Wall Standard (default 500mm each).
Then the Wall Corner cabinet was resized from 600mm to 540mm and 1 x Wall Standard was resized from 500mm to 480mm.

This is a very popular option as the cabinet label dynamically changes to show the size of the cabinet as part of the label. When a cabinet is resized from it's default setting it is indicated by an asterisk (*) even if the cabinet width is not included in the name. As no changes were made to the other Wall Standard, no asterisk is displayed.
See the discussion on LCM and User Defined below, which explains how this can be achieved.
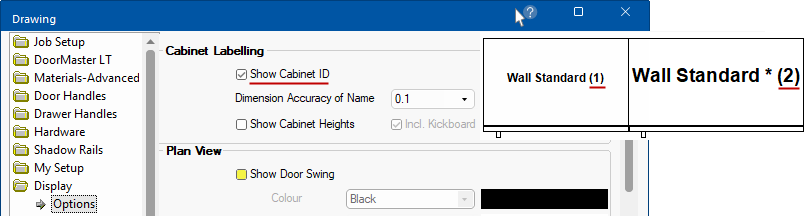
The Display > Options page
of the Drawing Properties can also be used to control details on the Cabinet Label.
For the examples above, the Show Cabinet ID has been turned OFF but ON for the example below.
The example below also has the Show Cabinet Heights option enabled but will also need to be enabled on required cabinet.
Show Cabinet Heights works in conjunction with Label settings on individual cabinets.
For User defined, as shown in the example above to work, you need to ensure the catalog accessed via the Library Catalog Manager, is set up correctly.
The default cabinet width MUST be saved in the catalog as part of the name as illustrated. The label will then automatically update to show the correct width when it is resized, as shown in the above examples.
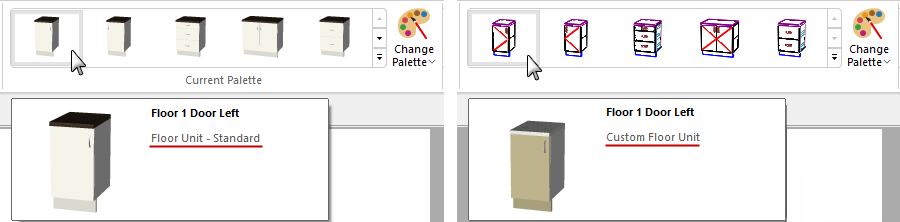
The cabinet Description can be customised in the Library Catalog Manager to change...
- the cabinet placed on the plan;
and- the cabinet tooltip description, displayed in the Palette/Gallery.
Click to Expand
Open the Library Catalog Manager from the View tab and...
- double click on the cabinet code e.g. Floor 1 Door Left - this opens the Property Inspector displayed with a pink background.
- select the Cabinet Details > General Settings page;
- then click on the Customer Information button, shown.
- on the Cabinet Information > Information page, type the Description changes;
- either directly into the edit box or by clicking on the button.
- close the Local Properties using the OK button;
- click on the Save Changes and Exit of the Library Catalog Manager.
As per the following example, we have changed the description from the default Floor Unit - Standard to Custom Floor Unit.
- This change is reflected on the drawing page for cabinet placed after changes made.
See discussion below for more on how to offset the cabinet label (e.g. for the 'Custom Floor Unit' shown).
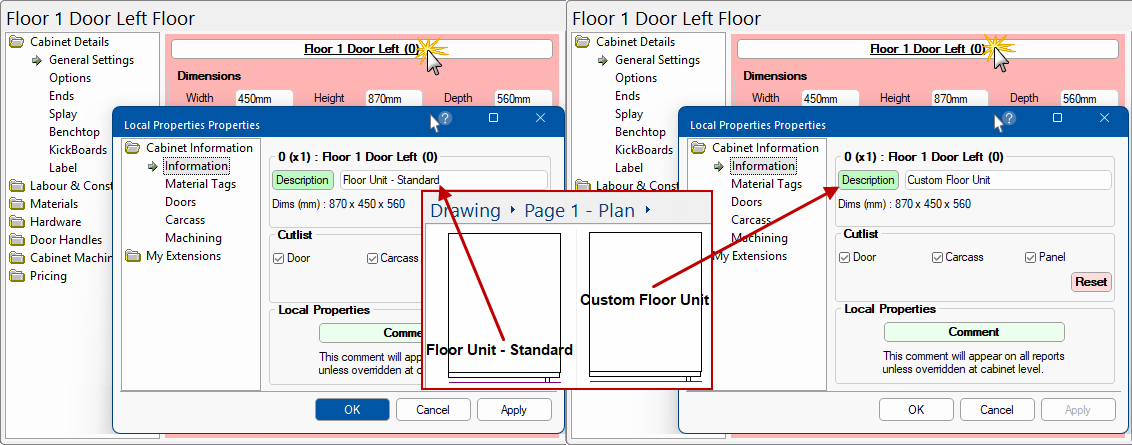
- This change is also reflected on the tooltip available in the Palette/Gallery.
Cabinet labels can be customised in a number of ways.
You can change the size and appearance of cabinet labels and ID numbers on individual cabinets or set a common size/font for all cabinets on your drawing.
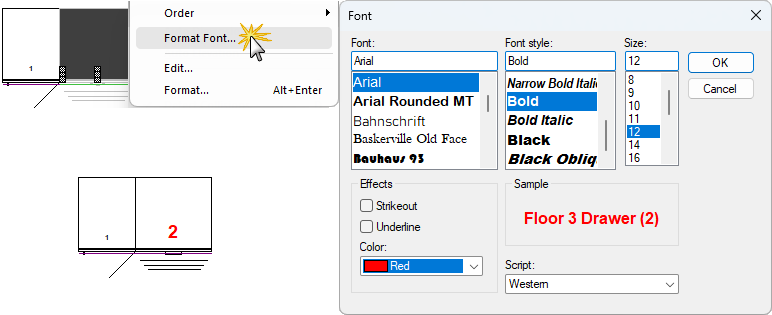
Select the cabinet and use the right click Format Font menu command. As you can see this opens a Font dialog.
Here we have changed the size of the font from 5 to 12 and the colour from black to red. Then simply click OK.
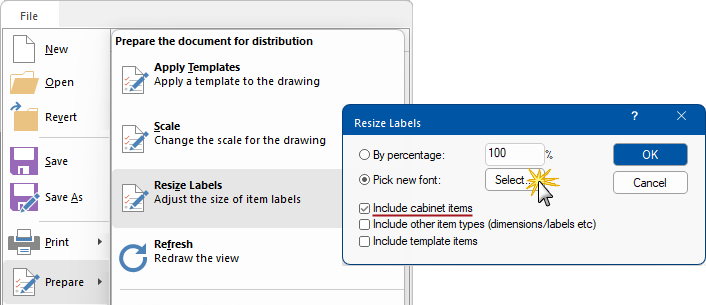
To change or get a common size/font for your cabinet labels and ID numbers, go to the File menu and Prepare > Resize Labels, as shown below. A dialog allows you to configure a new font size etc.
The simplest way is to choose Pick new font then click on the Select button. The Font dialog, shown above, allows you to choose the font and size required.
Also deselect Include other items and Include template items if you do not want them to change at the same time.
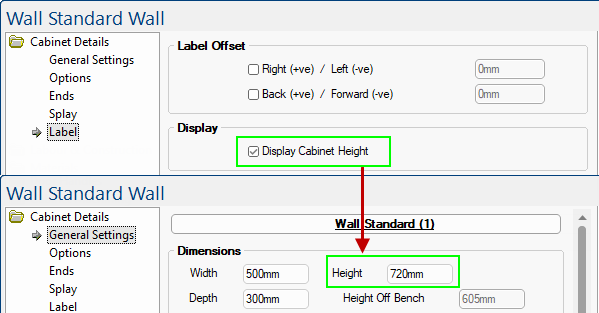
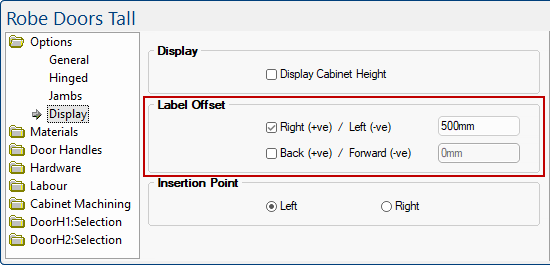
Label Offset on the Display page of a cabinet, allows you to move the cabinet label right or left and/or back or forward dependent on whether the measurement is positive (+ve) or negative (-ve), as shown.
For more on Display Cabinet Height, see discussion above.
Insertion Point is the distance from the floor to the bottom of the cabinet.
A Minute with Mike : Re-numbering Cabinets to Tidy Up Your Drawings. [1:07 mins]
This video quickly shows the benefits of using the Arrange group of commands located on the Insert tab to renumber cabinets on your plan.
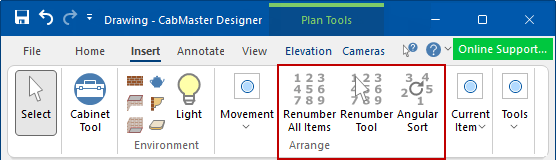
Renumber All Items: Renumbers all items into the sequence cabinets were placed on the plan
Renumber Tool: Allows you to manually renumber the cabinet order.
Angular Sort: Reorders the list of cabinets in the order that the user defined rotating line touches them.
Use the links above to locate more information on the commands discussed in this video.