CabMasterPro User Guide
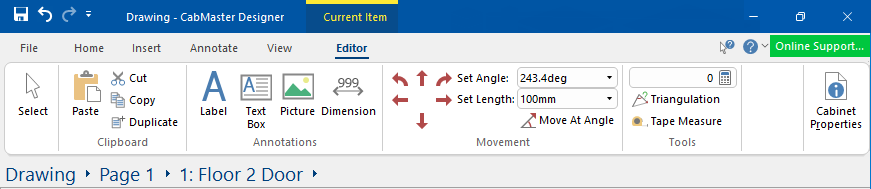 |
This command ribbon is provided when you select a cabinet, wall or another item using the Breadcrumbs Bar e.g. Floor cabinet, as shown.
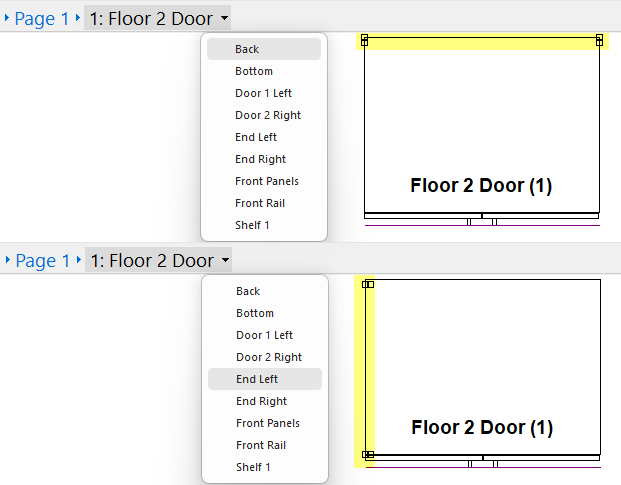
When you move your mouse up and down the Breadcrumbs list, the handles are displayed.
Handles are small squares on the corners and midpoints of objects that allow you to snap them neatly with other objects (see the tutorial on Grids and Snap). When an object is selected, its handles appear filled in.
The mouseover handles for each item in main view are displayed as shown below. The yellow highlight is only added for explanation purposes only.
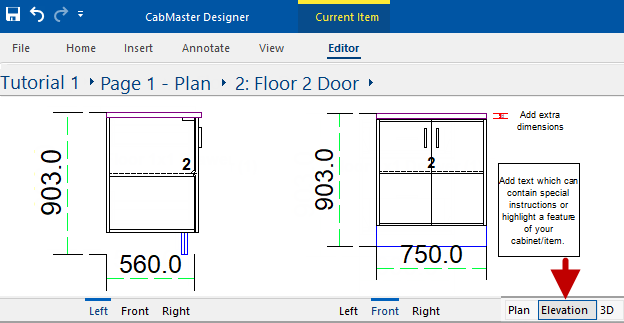
The cabinet/item selected can be viewed/edited or annotations added in Plan or Elevation.
To locate information about any commands or tabs,  click on the area of interest on ribbon image above.
Clicking on the Select and Movement commands will direct you to a separate discussion page.
See also Drawing Tools for more information about customising object properties.
It allows you to select one or more (multiple) cabinets/items at the same time and then copy/paste to enable faster reproduction of previously drawn cabinets/items.
See topic on the Select command for more details.
This Group of commands allows you to Cut, Copy, Duplicate and Paste.
This command lets you place text into a drawing. You can select text size, font and so on. To place a text label on a CabMasterPro drawing:
This command lets you insert text inside a rectangular box into a drawing. The text auto-wraps to fit inside the box, and if there is too much text, it is clipped to the box. To do this follow the instructions above for Label. To place a text box on a drawing, you need to specify two points which are opposing corners of the rectangle. Just select the text box tool, click on the drawing while holding the button down, then drag the mouse to form a rectangle. You can then move the text box and resize it exactly to your needs.
To Format the tool, access by right clicking on tool. A Text Box Property Sheet will be made available.
Simple dimension lines allow you to insert and place dimension lines easily into a drawing - for a full discussion, see Annotations.

Right click Format... opens a Dimensions Property Sheet.
See also Dimensions Tutorial and the Dimensions Format Text tutorial.

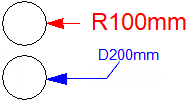
The Radial Dimension tool allows you to allows you to dimension placed circles, cutouts, benchtops etc- see Dimensions Radial Tutorial.
The resulting radial dimension will be shown, to which a leader line can be added by clicking again away from circle. To end, simply click this or another command.
Right click Format... opens a Radial Dimensions Property Sheet.
This is where you can set the text style and whether to measure radius or diameter.

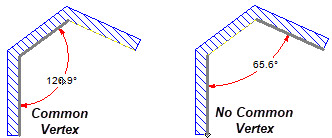
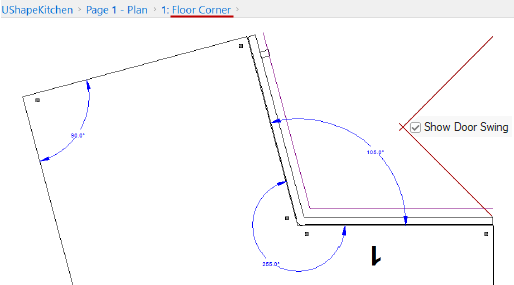
The Angular Dimension tool allows you to dimension...
Then after the first one or two clicks (depending on where you click) there is a rubberband movement of the arc dimension line until you click to place.
Example of use in Current Editor
Right click Format... opens an Angular Dimension Property Sheet.
See also Dimensions Angular Tutorial.
For full discussion, click on the link to Movement.

Shows the properties of the selected item (which could be a cabinet, wall or other object) allowing you to view/edit, in the same way as using the right click Format... option.
The command name on this button will change dependent on the item selected.
For example if you select a wall, then the button will be shown as Wall Properties.

Click to Expand